I blog about anything I find interesting, and since I have a lot of varied interests, my blog entries are kind of all over the place. You can browse my tags to sort them by topic and see which ones I frequently write about, or the archive has a complete history of my posts, dating back to 2008!
Besides my blog, I have pages for my creative projects, which are linked to on the navigation bar.
I write a lot about Linux and Android, Minecraft, and I like to rant about stuff. Generally anything that makes me curious. Also check out my Bookmarks for all sorts of cool websites about various topics I'm interested in.
For the geeks: this website respects your privacy and doesn't run any third party ads or analytics. This site speaks HTTP and doesn't require any JavaScript to work.
KAGE: Multiple Heroes and Maps
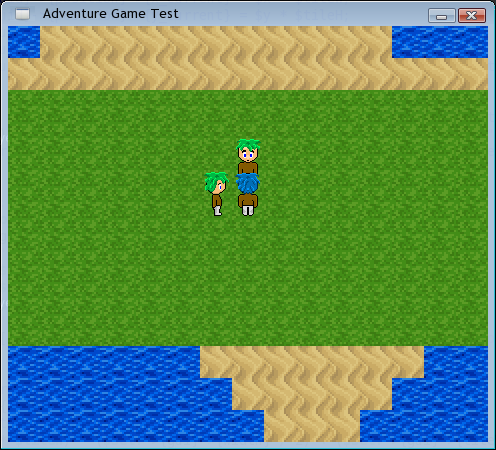
Spiky blue-haired hero...
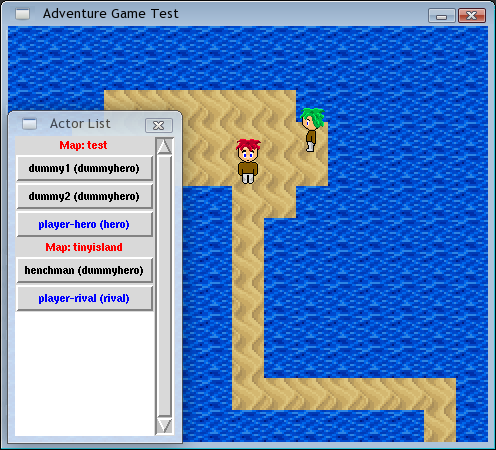
Spiky red-haired villain! And the debug-mode actor selector window.
I made some new character sprites (the ones pictured are temporary. I created a template spriteset and then hurriedly threw these guys together so I wouldn't have to show naked sprites in the screenshots).
The engine supports multiple heroes now (the blue and red haired guys are the singleton heroes), and multiple maps (each of the singleton heroes are on different maps), and it keeps track of what's happening on each map at all times.
Next on the to-do list: teleporting between maps (and when a singleton is the last one to leave a map, the map gets purged from memory and non-singletons left on it are forgotten about and reset if the map gets reloaded in the future), and animations.
After that: on-screen text and dialogs. Then shortly thereafter there will be a public alpha release of it that you can mess around with.
See other blog posts about my game engine: KAGE.
The laptop has an ATI Radeon Xpress 1100 (a.k.a. Xpress 200M), and it seems that just months after I bought this laptop a couple years ago, ATI obsoleted that card. So, I've been using just Windows XP on the laptop since converting it to a media center PC, because getting the S-video to work in Linux with the obsolete/unsupported drivers was a nightmare.
Windows, however, annoys me. I'm using the VLC Player for my DVD-playing needs, because it's pretty much the only program I can get to actually play DVD's. But it's annoying, and half the time when I start up Windows and tell VLC to play my DVD, VLC starts crashing the whole system really hard and forcing a reboot. I'd much rather have Linux around for situations like this.
Today I installed Ubuntu 9.10 on the laptop. I would've installed Fedora 12, but I don't have any LiveCD's handy at the moment. I installed it in a dual-boot way so that Windows XP is still there if things blow up.
So far, I'm pretty sure I'm using the default drivers Ubuntu picked for my video card, unless me installing "atitvout" accidentally pulled in the fglrx drivers or something. So it's either radeon or fglrx right now; I dunno which.
Anyway, the S-video port doesn't detect the TV at all without some manual fscking around with it. I eventually found a collection of xrandr commands I can run to force it to detect the S-video port and add an 800x600 mode to it and a couple other things.
I wound up writing this small shell script, so after I log on to the desktop I run this in the terminal and pray that the TV will get a signal from the laptop, and display a second desktop on it without it being all scrambled:
#!/bin/bash

xrandr
xrandr --output S-video --set load_detection 1
xrandr --output S-video --set tv_standard ntsc
xrandr --addmode S-video 800x600
xrandr --output S-video --right-of LVDS --mode 800x600
Here, LVDS is the built-in LCD screen on the laptop. Line 2 forces xrandr to detect S-video, line 3 sets it to use NTSC standards (PAL for outside the US), line 4 adds an 800x600 mode to it (which is pretty much standard for dinosaur TV's like the one I have), and line 5... might actually activate the second monitor and extend my desktop to it.
The last line there is hit-or-miss. It seems to have an 80% chance of showing a scrambled output on my TV, a 10% chance of sending no signal at all (TV goes to a black screen), and finally a 10% chance of doing what I want it to do: actually show my extended desktop clearly.
So, I copied that very last line into a separate shell script called "tv-retry.sh", so after running "tv-out.sh" (the first script) I run this second one for however many times it takes for my TV to show a clear picture.
Here's my terminal output from the last time I got the TV to work:
kirsle@ubuntu:~$ sh tv-out.sh
Screen 0: minimum 320 x 200, current 1280 x 800, maximum 2560 x 800
VGA-0 disconnected (normal left inverted right x axis y axis)
LVDS connected 1280x800+0+0 (normal left inverted right x axis y axis) 304mm x 190mm
1280x800       59.9*+
1280x720       59.9
1152x768       59.8
1024x768       59.9
800x600        59.9
640x480        59.4
S-video disconnected (normal left inverted right x axis y axis)
xrandr: cannot find mode 800x600
kirsle@ubuntu:~$ sh tv-out.sh
Screen 0: minimum 320 x 200, current 1280 x 800, maximum 2560 x 800
VGA-0 disconnected (normal left inverted right x axis y axis)
LVDS connected 1280x800+0+0 (normal left inverted right x axis y axis) 304mm x 190mm
1280x800       59.9*+
1280x720       59.9
1152x768       59.8
1024x768       59.9
800x600        59.9
640x480        59.4
S-video disconnected (normal left inverted right x axis y axis)
kirsle@ubuntu:~$
kirsle@ubuntu:~$ sh tv-retry.sh
kirsle@ubuntu:~$ sh tv-retry.sh
kirsle@ubuntu:~$ sh tv-retry.sh
kirsle@ubuntu:~$ sh tv-retry.sh
xrandr: cannot find mode 800x600
kirsle@ubuntu:~$ sh tv-retry.sh
xrandr: cannot find mode 800x600
kirsle@ubuntu:~$ sh tv-retry.sh
xrandr: cannot find mode 800x600
kirsle@ubuntu:~$ sh tv-out.sh
Screen 0: minimum 320 x 200, current 1280 x 800, maximum 2560 x 800
VGA-0 disconnected (normal left inverted right x axis y axis)
LVDS connected 1280x800+0+0 (normal left inverted right x axis y axis) 304mm x 190mm
1280x800       59.9*+
1280x720       59.9
1152x768       59.8
1024x768       59.9
800x600        59.9
640x480        59.4
S-video disconnected (normal left inverted right x axis y axis)
kirsle@ubuntu:~$ sh tv-retry.sh
kirsle@ubuntu:~$ sh tv-retry.sh
kirsle@ubuntu:~$ sh tv-retry.sh
kirsle@ubuntu:~$ sh tv-retry.sh
kirsle@ubuntu:~$ sh tv-retry.sh
kirsle@ubuntu:~$ sh tv-retry.sh
kirsle@ubuntu:~$ sh tv-retry.sh
kirsle@ubuntu:~$ sh tv-retry.sh
kirsle@ubuntu:~$ sh tv-retry.sh
kirsle@ubuntu:~$ sh tv-retry.sh
kirsle@ubuntu:~$ sh tv-retry.sh
kirsle@ubuntu:~$ sh tv-out.sh
Screen 0: minimum 320 x 200, current 2080 x 800, maximum 2560 x 800
VGA-0 disconnected (normal left inverted right x axis y axis)
LVDS connected 1280x800+0+0 (normal left inverted right x axis y axis) 304mm x 190mm
1280x800       59.9*+
1280x720       59.9
1152x768       59.8
1024x768       59.9
800x600        59.9
640x480        59.4
S-video connected 800x600+1280+0 (normal left inverted right x axis y axis) 0mm x 0mm
800x600        59.9*+   59.9*
kirsle@ubuntu:~$ sh tv-retry.sh
kirsle@ubuntu:~$ sh tv-retry.sh
kirsle@ubuntu:~$ sh tv-retry.sh
kirsle@ubuntu:~$ sh tv-retry.sh
kirsle@ubuntu:~$ sh tv-retry.sh
kirsle@ubuntu:~$ sh tv-retry.sh
kirsle@ubuntu:~$ sh tv-retry.sh
kirsle@ubuntu:~$ sh tv-retry.sh
kirsle@ubuntu:~$ sh tv-retry.sh
kirsle@ubuntu:~$ sh tv-retry.sh
kirsle@ubuntu:~$ sh tv-retry.sh
kirsle@ubuntu:~$ sh tv-retry.sh
kirsle@ubuntu:~$ sh tv-retry.sh
kirsle@ubuntu:~$ sh tv-retry.sh
kirsle@ubuntu:~$ sh tv-retry.sh
kirsle@ubuntu:~$ sh tv-retry.sh
It would've been much easier if this video card wasn't made obsolete right after I bought this laptop. Stupid ATI! This is why I like Nvidia more, just in case you were wondering; Nvidia works better in Linux, and they at least support their old unsupported cards (or somebody does, at least).
Ubuntu by default follows some good security practices such as locking out the root password so that you can't log in directly as root (short of using sudo -i), but in Fedora systems if you lock out the root password, you can't use any of the graphical admin apps anymore since they ask for the root password.
So, here's how to set up Fedora to ask for the user password for graphical admin apps:
There are scripts in /etc/security/console.apps/ for most of the graphical admin apps, for example /etc/security/console.apps/system-config-users for the user & groups app. The general syntax for these files is like this:
USER=root
PROGRAM=/usr/share/system-config-users/system-config-users
SESSION=true
The general idea how to change it to ask for the user password is to add a line that says "
UGROUPS=wheel" (where "wheel" is the name of a built-in group commonly used to give sysadmin capabilities to regular users). Then, any user who belongs to the "wheel" group will be asked to give their user password; all other users have to give the root password. Make sure your user belongs to the "wheel" group and you're all set.
On my Fedora 12 system though, all these scripts include /etc/security/console.apps/config-util first. So, my system-config-users script just said this:
. config-util
PROGRAM=/usr/share/system-config-users/system-config-users
SESSION=true
And my
config-util file just said USER=root. So, I just added "UGROUPS=wheel" to config-util and now all my graphical admin apps ask me for my user password now, since all these files included config-util.
After my first blog post about it, I've already made a lot of progress. Here's a (very alpha) screenshot I took today:

What you're seeing here is a debug mode "actor selector" window. This is a screenshot on Linux so the actor window looks ugly as sin (it'd look nicer on Windows) -- but this is only available when the game's run in debug mode so you'll never see it as an end user. The game window itself looks the same on every platform.
The interactive bits of the game revolve around actors (things that do stuff, including the hero character and in-game NPC's). There are singleton actors that exist exactly once in the entire game world (this includes the hero(s) of the game), and the other actors may exist multiple times.
In the screenshot there is one singleton actor named "hero", and two dummy hero actors who aren't singletons but use the same sprites as the hero (simply because I didn't feel like making additional sprites yet).
The debug window there just lets you choose which actor you want to control, out of the list which shows every actor on every loaded map. And it works, and you can walk around as any of the three clones there.
I'm a day or two's work away from programming an event scripting system, which will make the game become more interactive than just walking around, and then I'll start trying to make an actual game with this engine. The rest of the details (weather effects and other nifty features like that) will come later, since I want to create a game and not just make an engine.
BTW, the graphics aren't going to suck as badly as in that screenshot. I'm using stock RPG Maker graphics just for development and will be replacing those, and programming an auto-tiling system so that the tiles will blend better and not be so square.
I needed to do this because I was testing something at work that involved an Asterisk server calling a softphone running on my Linux box, and it wanted me to record a voice prompt and then hang up. This computer didn't have a microphone installed, so I started looking for a way to fake the mic input and make it record an MP3 or something instead.
If your system is using PulseAudio (every recent Fedora and Ubuntu distribution does), the steps to follow are:
1) Open PulseAudio Volume Control
This is pavucontrol on the command line, and in Fedora is provided by the package pavucontrol.
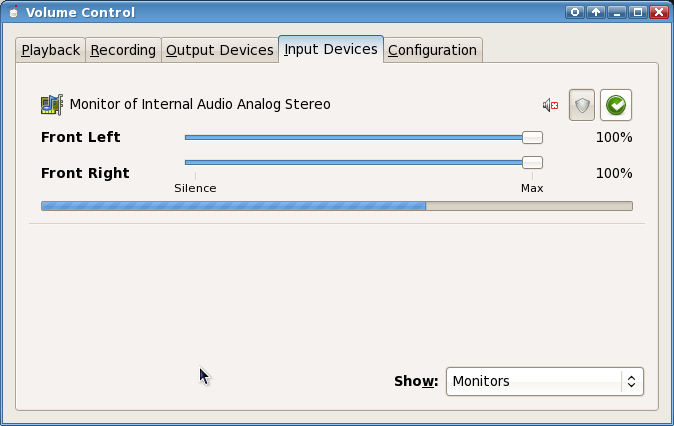
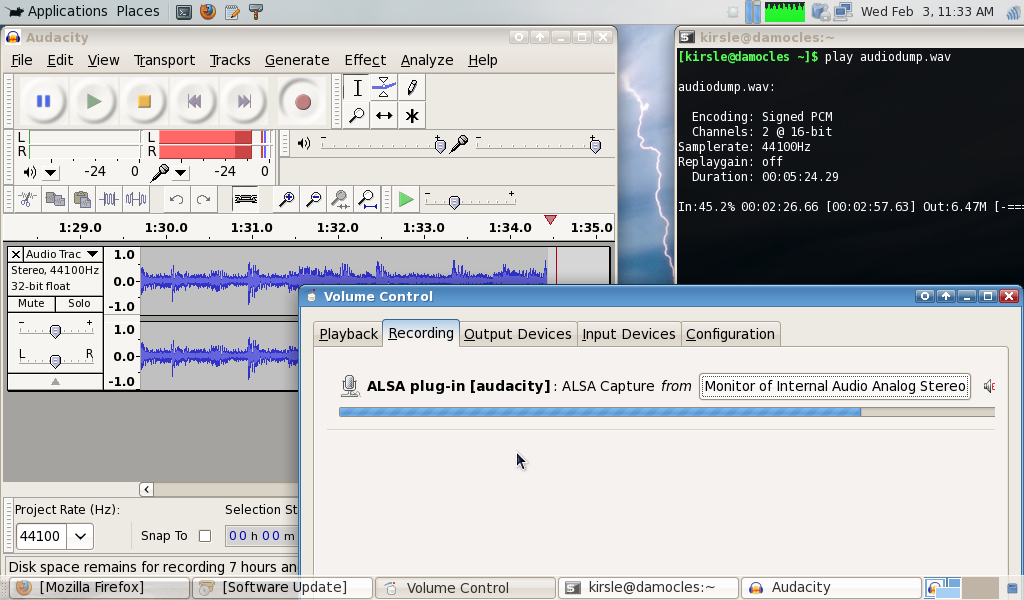
Go to the "Input Devices" tab, and select "Show: Monitors" from the bottom of the window. If your computer is currently playing audio, you should see a bar showing the volume of the output:
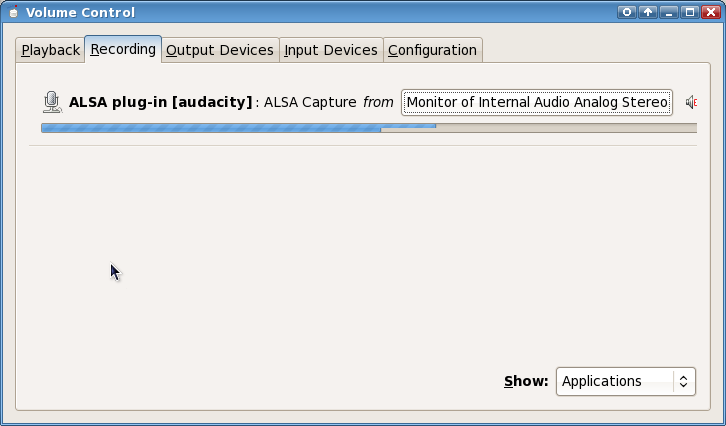
2) Start running an app that is recording audio, and go to the "Recording" tab and see if your app is listed.
In this screenshot I'm running Audacity and recording audio.
3) Click the input device button ("ALSA Capture from") and pick "Monitor of Internal Audio Analog Stereo")
And that's pretty much it. If you see volume bars on the Recording tab now then it's probably working, and the recording app is now recording your audio output.
Here's a full desktop screenshot of me running `play audiodump.wav` (a WMA-to-WAV conversion of the Windows XP Welcome Music) in a terminal, the PulseAudio Volume Control running, and Audacity recording from the mic.
Why? To see if anybody else uses my computer when I'm not there, and to see what they were doing with it.
Basically, you run this script as root, and it monitors your major hardware input devices for any activity. By default it watches /dev/console (which, on Fedora systems, seems to output data whenever there's keyboard activity), and /dev/input/mice (which is a common node for the collective input of any and all mice attached to a computer).
When it sees any activity at all on either of these devices (it doesn't care what the devices are doing, it just cares that they're active), it begins taking screenshots. If you use the keyboard or mouse for a little bit, and then stop for 2 seconds, it takes a screenshot. If you use the keyboard or mouse constantly and don't stop, it will take a screenshot every 5 seconds.
So it essentially creates a visual log of everything you were doing on the computer; every time you type, stop typing, type like crazy, move the mouse, stop moving the mouse... anything that happens, a screenshot is taken.
It uses scrot to take the screenshot, since this is the lightest-weight screen capturing program I could find. Using ImageMagick's import command is slow, and makes the computer beep, and GNOME's screensaver application can't run without showing a GUI window.
You can check it out here. You'll be required to edit the script in the "configuration" section though, at least to change the directory where it saves the screenshots to.
Since the script runs as root, the images it creates are naturally owned by root as well, and can't be deleted by the nonprivileged user, even if the user does manage to find the screenshots. Better yet, you can have the screenshots saved under root's home directory, keeping them completely out-of-sight for the user. And, to kill the script, you have to be root since it will be a root-owned process. +1 if your unauthorized users don't know your root password!
/dev/input/event0. You run it as root again, and it saves keystrokes to a file under /tmp.Actually, it doesn't store all keystrokes; instead, it stores what the user "intended" to type. That is, if a user begins typing a sentence and makes a typo and hits backspace a few times and then continues typing, what gets logged is what they actually ended up typing... you don't see their typo; when they hit backspace, the log buffer also deleted the last character it logged, before saving it to disk.
It separates what they type based on certain "divider characters," which includes Tab, Return and Enter. So as they fill out a web form, the script would log one line of text for each field they filled out as they tab through the form. Also, if they delay their typing for a few seconds it will dump the current buffer to the log file as well, so if they're a particularly slow typer, one "sentence" may span multiple lines in the log file.
I can't recommend using this keylogger for malicious purposes, it's just being uploaded for educational purposes only and should only be used as a personal desktop monitoring solution, if it should be used at all.
Source code: keylog.
The type of game I'll be making with it will be a 2D RPG type game, with a top-down perspective (think: Zelda, SNES-era Star Ocean, etc.). I feel that this type of game offers the most flexibility, having a wide-open game world where you can move your character in two dimensions.
I'm programming it in Perl, because I know Perl better than any other language (with Java coming in second place, but I'll avoid getting Java involved if I can help it). ;) However, it's highly possible that I'll need to switch languages down the line, so I'm future-proofing what code I am writing just in case any major changes need to happen.
For example, I like the model employed by Sierra and LucasArts when they made their games based on AGI (Adventure Game Interpreter) and SCUMM (Script Creation Utility for Maniac Mansion), respectively. Their game engines were programmed in who-knows-what language (likely C), but the games themselves--the scripts for dialog and interactions within the game--used a new, home-made programming language. This way, the game engine can be reprogrammed in a different language, and the existing games can "just run" on the new engine without any modification.
This is how ScummVM is able to run old SCUMM games; they've just re-implemented the SCUMM engine, and the existing games can "just run" on ScummVM without requiring them to be modified at all.
So, my game engine will be similar, using a new scripting language, so that if I have to scrap Perl in the future and go to Java, all I need to do is re-implement the engine in Java, and what game code I have written will "just work" on the new engine.
Now, as for the Perl stuff... I'm future-proofing my code against other Perl modules, too.
The engine runs out of a core Perl module, and it uses multiple "front-end plug-ins" to actually interact with the user. They're divided into three categories: Graphics Front-end, Sound Front-end, and Filesystem Front-end.
Perl/Tk may be dated, and look ugly as hell on Unix, but if the Tk window only consists of a Canvas widget (which is what I'm planning for), you won't be able to tell. Compose a nice picture in a Canvas and it looks the same on all platforms.
Tk Canvas treats everything you draw in them as "objects", or sprites as far as my game will be concerned. It means that once you put an image in the canvas, you can move that image around later by its ID. SDL, on the other hand, is not sprite-based, but pixel-based, so to move a sprite you've already placed, you have to erase it and redraw it. Plus one for Tk.
Tk Canvas doesn't support layers, but it does support "implied layering"... that is, each object you place on the canvas gets an implicit Z-index that's one higher than the object you placed before it. This is the same as the default behavior in HTML. When you move sprites around after placing them, they'll either stay above or below other sprites, depending on the order the sprites were drawn. Therefore, by drawing sprites in the right order, layers can be simulated. SDL doesn't support layers either, so +1 for Tk here again.
At any rate, the graphics front-end won't be too integrated with the core game engine. Instead, it will register callbacks to the engine, so Tk will say "when you want me to draw a sprite, call this function of mine and I'll take care of it."
This way, the core engine just tells the graphics front-end what to do: what sprites to draw, where to move them to, etc. and the front-end just does as it's told. This way, the internals of Perl/Tk don't get caught up in the core engine; if I need to ditch Tk and use SDL instead, I just need to make SDL respond to the same commands from the core as Tk does and all is well.
Tk doesn't have any audio support of any kind. But fortunately, there are other Perl modules that can handle audio. For Windows computers, there is Win32::MediaPlayer, and for Linux there is GStreamer.
Win32::MediaPlayer and GStreamer both can play whatever codecs the user has installed. On Windows this means it can play mp3, wav, even midi music out-of-box. On Linux it means it can play wav, ogg, and other formats that aren't patented. If the Linux user installs MP3 support, though, GStreamer can play mp3 files too!
Similar to the graphics front-end, the sound front-end registers callbacks. When the core wants to play a sound effect, it calls a method in the sound front-end to do so, and the sound front-end does it.
If I stick with open audio formats, I can have an SDL audio front-end to get sound for Mac OS X too, since there isn't yet a Perl module to play sound natively on OS X.
With such an archiving algorithm, the game could store all its data files (images and scripts) into a read-only archive, which only the game knows the password to. This stops the players from getting in there and seeing sprites for characters in the game they haven't seen yet themselves, and especially to prevent them from modifying the game's script if they do manage to get into the archive.
(By the way, my game engine will probably be released as open source software, so you'll be able to make your own games with it; just stay out of my games' files!)
Until Archive::Tyd is completed though, the game will just read files off the filesystem directly. But the filesystem front-end is there so that in the future, I can replace it with one that reads files out of Tyd archives instead.
Anyway, I've already gotten a few hundred lines of code written, and the general framework for the engine is already working (abstracting away the graphics front-end from the core, for example). I've recently completed a tileset handling Perl module which I intend to use for it.
When I get more work done, and especially when there's a playable demo of the game engine, I'll probably make a small website for it as a subdomain of kirsle.net.
This blog post is primarily for my own reference, to avoid having to dig through the manual to look up the occasional edge case.
How to use SSH to do port forwarding. These assume you're on a Unix-like system (Linux or OS X) and not using some lame Windows client like PuTTy.
ssh -R 9022:localhost:22 remotehost.comThis will open port
9022 on remotehost.com (loopback only; you can only connect to 9022 from the local remotehost.com, not from elsewhere on the internet), and forward it to "localhost:22", where "localhost" refers to your computer at the office, and 22 is of course the SSH port.
By default the remote host only would make port 9022 available on the loopback address, so from your home PC you can do ssh -p 9022 localhost and connect to it, but you can't do e.g. ssh -p 9022 remotehost.com and connect to it from somewhere else on the Internet.
To open the port on all interfaces (thus making it available on the internet too):
ssh -R *:9022:localhost:22 remotehost.comReplace the
* with any other bind address if you want.
ssh -L 8080:localhost:80 remotehost.comHere,
8080 is opened on your office computer, for the loopback interface only, and localhost:80 refers to port 80 on the remote (home) computer. It's the reverse of ssh -R.
Then you open Firefox and go to http://localhost:8080/ and yer in.
Another example: you have a VNC (remote desktop) server running on remotehost.com, but the VNC protocol itself is insecure, and you don't want your password being sent across the network in clear text to log in. So, you need your VNC traffic to be encrypted via SSH.
Here, remotehost.com is listening on port 5900 (the VNC port). You want to open a port on your local computer to the same number, so that you connect a VNC client to "localhost:5900" and it really connects you to "remotehost.com:5900" over a secure SSH tunnel:
ssh -L 5900:localhost:5900 remotehost.comThen with your VNC client, just connect it to "localhost".
ssh -L 5900:10.10.1.101:5900 remotehost.comHere "remotehost.com" goes to the main PC which I can access.
This opens up a listening port 5900 on my local (office PC) -- the first 5900 in the command -- and if I connect to it, it will use remotehost.com as a jumping off point to connect onward to 10.10.1.101:5900 (the laptop with a private LAN IP address on the remote network).
Then I point my VNC client at "localhost" and I end up with remote desktop on the laptop.
ssh -D 8080 remotehost.comNow you can configure your programs (e.g. Pidgin, Firefox) to use a SOCKS 5 proxy and have them connect to
localhost:8080. All their internet traffic will be routed through the SSH tunnel to remotehost.com, secured, and then enter the cloud from there.Additionally, this can be used to reach other devices on the remote server's LAN that you otherwise couldn't get to. For example, turn on your proxy settings in Firefox and you can navigate to http://192.168.1.1/ to log into the router from the remote LAN (as opposed to a router on your local LAN). The SOCKS 5 proxy would cause Firefox (or any other app configured to use it) to use "remotehost.com" as a jumping off point into the internet, so it can connect to other local network devices on its end just the same.
First, this is what I mean about serial numbers. Suppose you're using a Windows system, have a floppy disk at drive A:/ and a regular USB flash drive at E:/, and you run these commands in the command prompt:
C:\>vol E:
Volume in drive E is CRUZER
Volume Serial Number is 955C-59BF

C:\>vol A:
Volume in drive A has no label.
Volume Serial Number is EC2B-36AF
These serial numbers are assigned when the drive is formatted; reformatting a floppy disk or flash drive will give it a different serial number.
According to The Wikipedia, the serial number (ID) is kept in two different places on the partition depending on the version of FAT being used.
In FAT12 and FAT16 (used with floppy disks), the ID begins at byte offset 0x27 (39 in decimal); in FAT32 (used with flash drives and external hard drives), the ID begins at 0x43 (67 in decimal).
So, with the handy dd utility that comes standard on pretty much any Unix-like system, you can extract this information and display it. Here are a couple of one-liners you can run in a Unix terminal. I'll explain how they work afterward.
# For FAT32 filesystems (modern flash drives)
dd if=/dev/sdb1 skip=67 bs=1 count=4 | hexdump -v -e '1/1 "%02X" " "' | xargs perl -e '@_=@ARGV; print "Serial Number: $_[3]$_[2]-$_[1]$_[0]\n"'

# For FAT12/16 filesystems (old floppy drives)
dd if=testfloppy.img skip=39 bs=1 count=4 | hexdump -v -e '1/1 "%02X" " "' | xargs perl -e '@_=@ARGV; print "Serial Number: $_[3]$_[2]-$_[1]$_[0]\n"'
I underlined the input file (if) and byte offset (skip) in both of these commands. In the first one, I ran the command on a real, physical, flash drive, that had a device node at
/dev/sdb1 for its one and only partition. In the second one, I ran it on a floppy disk image file (who has a computer with a real floppy drive these days?)If you're going to be using a physical device like in my first command, you need to run the command with root privileges (regular users can't read directly from the device node). My second example (using an image file) can be run as a regular user, however.
These commands printed in the terminal for me:
(for the flash drive)
4+0 records in
4+0 records out
4 bytes (4 B) copied, 3.3445e-05 s, 120 kB/s
Serial Number: 955C-59BF

(for the floppy image)
4+0 records in
4+0 records out
4 bytes (4 B) copied, 3.1551e-05 s, 127 kB/s
Serial Number: EC2B-36AF
And now, how the commands work. I'll use the flash drive command as the example. In this one-liner, three commands are being executed at once:
dd if=/dev/sdb1 skip=67 bs=1 count=4
hexdump -v -e '1/1 "%02X" " "'
xargs perl -e '@_=@ARGV; print "Serial Number: $_[3]$_[2]-$_[1]$_[0]\n"'
The
dd command gets the operating system to read raw data from the flash drive at /dev/sdb1, skipping the first 67 bytes, reading only 1 byte at a time, and reading a total of 4 bytes. This gets the 4 byte serial number; now we need to display it in hexadecimal like Windows and DOS.
The hexdump command takes the 4 binary bytes and displays them in hexadecimal. On my flash drive, it looks like this: BF 59 5C 95. Note that the hex codes are out of order; Windows shows them as 955C-59BF - basically, the reverse of what hexdump shows. Hexdump is showing the correct order; Windows and DOS reverse them when they show you the serial number.
So, we run it through xargs (which turns the four hex numbers into four separate parameters) and sends them to a quick Perl script, which prints out "Serial Number:" and puts the hex codes in the correct order, to give the same result as Windows and DOS.
One could use this information to make a vol command for Unix. If the command checks other places in the filesystem headers to determine the version of FAT, it could automatically use the correct byte offset and get the serial number from both floppy disks and flash drives.
This is a re-do of my previous blog post about Perl upload progress bars - my previous approach was completely wrong. By the time $q->upload(); is used, the file has already been received and stored in a temporary location, and so the "progress bar" in this case is really just gauging how fast the server can copy the file from one place to another on its hard drive.
So this post is how to really do a real working file uploader progress bar in Perl.
The basic steps required to do this include:
$q->upload(); and everything like before.The source code needed for this is still amazingly short and concise, compared to the source codes you'll get when you download solutions from elsewhere.
Implementing this doesn't require any special Apache handlers or mod_perl or anything fancy like that.
Sources:
upload.html<!DOCTYPE html>
<html>
<head>
<title>Upload Test</title>
<style type="text/css">
body {
background-color: #FFFFFF;
font-family: Verdana,Arial,sans-serif;
font-size: small;
color: #000000
}
#trough {
border: 1px solid #000000;
height: 16px;
display: block;
background-color: #DDDDDD
}
#bar {
background-color: #0000FF;
background-image: url("blue-clearlooks.png");
border-right: 1px solid #000000;
height: 16px
}
</style>
</head>
<body>
<h1>File Upload Test</h1>
<div id="progress-div" style="display: none; width: 400px; margin: auto">
<fieldset>
<legend>Upload Progress</legend>
<div id="trough">
<div id="bar" style="width: 0%"></div>
</div>
Received <span id="received">0</span>/<span id="total">0</span> (<span id="percent">0</span>%)
</fieldset>
</div>
<div id="upload-form" style="display: block; width: 600px; margin: auto">
<fieldset>
<legend>Upload a File</legend>
<form name="upload" method="post" action="upload.cgi" enctype="multipart/form-data" onSubmit="return startUpload()" id="theform">
<input type="hidden" name="do" value="upload">
<table border="0" cellspacing="0" cellpadding="2">
<tr>
<td align="left" valign="middle">
Session ID<span style="color: #FF0000">*</span>:
</td>
<td align="left" valign="middle">
<input type="text" size="40" name="sessid" id="sessid" readonly="readonly">
</td>
</tr>
<tr>
<td align="left" valign="middle">
File:
</td>
<td align="left" valign="middle">
<input type="file" name="incoming" size="40">
</td>
</tr>
</table><p>
<input type="submit" value="Upload It!"><p>
<small>
<span style="color: #FF0000">*</span> Randomly generated by JavaScript. In practice this would be
randomly generated by server-side script and "hard-coded" into the HTML you see on this page.
</small>
</fieldset>
</div>
<div id="debug"></div>
<script type="text/javascript">
// a jquery-like function, a shortcut to document.getElementById
function $(o) {
return document.getElementById(o);
}
// called on page load to make up a session ID (in real life the session ID
// would be made up via server-side script and "hard-coded" in the HTML received
// by the server, thus it wouldn't require javascript at all)
function init() {
// Make up a session ID.
var hex = [ "0", "1", "2", "3", "4", "5", "6", "7", "8", "9",
"A", "B", "C", "D", "E", "F" ];
var ses = "";
for (var i = 0; i < 8; i++) {
var rnd = Math.floor(Math.random()*16);
ses += hex[rnd];
}
$("sessid").value = ses;
// we set the form action to send the sessid in the query string, too.
// this way it's available inside the CGI hook function in a very easy
// way. In real life this would probably be done better.
$("theform").action += "?" + ses;
}
window.onload = init;
// This function is called when submitting the form.
function startUpload() {
// Hide the form.
$("upload-form").style.display = "none";
// Show the progress div.
$("progress-div").style.display = "block";
// Begin making ajax requests.
setTimeout("ping()", 1000);
// Allow the form to continue submitting.
return true;
}
// Make an ajax request to check up on the status of the upload
function ping() {
var ajax = new XMLHttpRequest();
ajax.onreadystatechange = function () {
if (ajax.readyState == 4) {
parse(ajax.responseText);
}
};
ajax.open("GET", "upload.cgi?do=ping&sessid=" + $("sessid").value + "&rand=" + Math.floor(Math.random()*99999), true);
ajax.send(null);
}
// React to the returned value of our ping test
function parse(txt) {
$("debug").innerHTML = "received from server: " + txt;
var parts = txt.split(":");
if (parts.length == 3) {
$("received").innerHTML = parts[0];
$("total").innerHTML = parts[1];
$("percent").innerHTML = parts[2];
$("bar").style.width = parts[2] + "%";
}
// Ping again!
setTimeout("ping()", 1000);
}
</script>
</body>
</html>
upload.cgi#!/usr/bin/perl -w
use strict;
use warnings;
use CGI;
use CGI::Carp "fatalsToBrowser";
# Make a file upload hook.
my $q = new CGI (\&hook);
# This is the file upload hook, where we can update our session
# file with the dirty details of how the upload is going.
sub hook {
my ($filename,$buffer,$bytes_read,$file) = @_;
# Get our sessid from the form submission.
my ($sessid) = $ENV{QUERY_STRING};
$sessid =~ s/[^A-F0-9]//g;
# Calculate the (rough estimation) of the file size. This isn't
# accurate because the CONTENT_LENGTH includes not only the file's
# contents, but also the length of all the other form fields as well,
# so it's bound to be at least a few bytes larger than the file size.
# This obviously doesn't work out well if you want progress bars on
# a per-file basis, if uploading many files. This proof-of-concept only
# supports a single file anyway.
my $length = $ENV{'CONTENT_LENGTH'};
my $percent = 0;
if ($length > 0) { # Don't divide by zero.
$percent = sprintf("%.1f",
(( $bytes_read / $length ) * 100)
);
}
# Write this data to the session file.
open (SES, ">$sessid.session");
print SES "$bytes_read:$length:$percent";
close (SES);
}
# Now the meat of the CGI script.
print "Content-Type: text/html\n\n";
my $action = $q->param("do") || "unknown";
if ($action eq "upload") {
# They are first submitting the file. This code doesn't really run much
# until AFTER the file is completely uploaded.
my $filename = $q->param("incoming");
my $handle = $q->upload("incoming");
my $sessid = $q->param("sessid");
$sessid =~ s/[^A-F0-9]//g;
$filename =~ s/(?:\\|\/)([^\\\/]+)$/$1/g;
# Copy the file to its final location.
open (FILE, ">./files/$filename") or die "Can't create file: $!";
my $buffer;
while (read($handle,$buffer,2048)) {
print FILE $buffer;
}
close (FILE);
# Delete the session file.
unlink("./$sessid.session");
# Done.
print "Thank you for your file. <a href=\"files/$filename\">Here it is again.</a>";
}
elsif ($action eq "ping") {
# Checking up on the status of the upload.
my $sessid = $q->param("sessid");
$sessid =~ s/[^A-F0-9]//g;
# Exists?
if (-f "./$sessid.session") {
# Read it.
open (READ, "./$sessid.session");
my $data = <READ>;
close (READ);
print $data;
}
else {
print "0:0:0:error session $sessid doesn't exist";
}
}
else {
print "0:0:0:error invalid action $action";
}
You can download my full proof-of-concept test below:
Notice: this code is called "proof of concept"; it is NOT production-ready code. You should NOT download this if all you want is a complete plug-and-play solution you can quickly upload to your web server to get file uploading to work. I wrote this code only to show how to make a file uploader in the simplest way possible; this is useful for developers who only needed to know how this is done and who will write the code themselves to develop their production-ready file uploader.
If you want to treat this as a plug-and-play solution, I'm not your tech support about it. The code was never meant to be secure or useful to allow the general public to upload files through it. Session IDs are made up client side for example which is a bad idea in real use case scenarios, etc.
0.0018s.
![]()