In this blog post, I'll recount my experience in web development over the last 20 years and how the technology has evolved over time. From my early days of just writing plain old HTML pages, then adding JavaScript to those pages, before moving on to server-side scripts with Perl (CGI, FastCGI and mod_perl), and finally to modern back-end languages like Python, Go and Node.js.
Note that this primarily focused on the back-end side of things, and won't cover all the craziness that has evolved in the front-end space (leading up to React.js, Vue, Webpack, and so on). Plenty has been said elsewhere on the Internet about the evolution of front-end development.
I first started writing websites when I was twelve years old back around the year 1999. HTML 4.0 was a brand new specification and the common back-end languages at the time were Perl, PHP, Coldfusion and Apache Server Side Includes.
A very long time ago, I stumbled upon this article "Use Java for Everything". While I disagree that you should use Java for everything (or any programming language, for that matter), the author mentions that he wrote a wrapper script that lets him use Java for shell scripts (ones where you execute the Java source file directly, without the "write, compile, run" steps).
I wanted to do something similar for Go, because I had a very simple Go program I wanted to be able to throw into my .dotfiles repo and run without needing to do too many things first: a simple static HTTP server.
The free SSL certificate authority Let's Encrypt went into public beta earlier this month, and I updated all of my sites to use SSL now. I still had several more months before kirsle.net's old certificate from Namecheap expired, but I switched to the Let's Encrypt certificate because I could include all my subdomains instead of only the www one.
Check out their website and get free SSL certificates for your sites, too. I'm just writing this blog with some personal tips for how I configured my nginx server and a Python script I wrote to automate the process of renewing my certificates every month (Let's Encrypt certs expire every 90 days).
This is something I wanted to rant about for a while: event loops in programming.
This post is specifically talking about programming languages that don't have their own built-in async model, and instead left it up to the community to create their own event loop modules instead. And how most of those modules don't get along well with the others.
I decided to take a look at the Tk GUI framework for Python and put together a simple mockup GUI to test various things.
I'd worked with Tk before in Perl (see my Perl CyanChat Client) and if you look at some of the Linux screenshots on that page, Tk looks ugly as hell in Perl.
Python's implementation of Tk (which they call Tkinter) is more modern than Perl's, and there's other neat helper modules like ttk which provides the Tk "Tile" theming engine which makes the standard Tk widgets look more modern, and takes a CSS-style approach to theming your widgets: instead of manually specifying things like background and foreground colors in each widget you program, you keep all that stuff in one central place and refer to it by name from the widgets.
For my Python mockup test app, I put together a rough copy of my Perl CyanChat Client GUI.
At first I was trying to use the ttk/Tile versions of the widgets (such as Button, Entry, etc.), but I ran into a rather annoying roadblock: in PCCC, my text Entry widgets have black background colors, and the insertion cursor (the little flashing I-beam in a text box) is also black by default. So when clicking in the text box, you wouldn't be able to see the insertion cursor.
In the standard Tkinter Entry widget, you can use the insertbackground option to change the color of the insertion cursor. But in ttk/Tile? There is no insertbackground option. Source - it's just not supported in ttk/Tile and their theming engine.
So I decided to not use ttk and just use the standard Tk widgets. I liked ttk's centralized styling system though, so I made a central class of dictionaries full of configuration attributes that I could easily reference when setting up my widgets. So, I eventually got my GUI put together and it looked nice enough I guess...
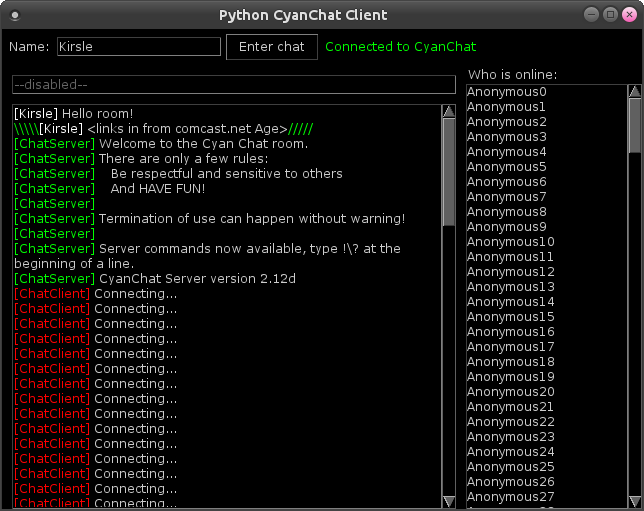
Except for those ugly scrollbars. The "1980s 3D" look to the scrollbar and those ugly triangle arrow widgets are from the Motif GUI which Tk was originally modeled to look like. It's ancient and it's ugly. This was also one of the main reasons why my Perl CyanChat Client looks so horrible under Linux, because this is Tk and Tk is ancient.
The Tile theming engine is supposed to fix this, but I wasn't using Tile in my code because of the aforementioned text insertion cursor problem. The best I could do with the standard Tk scrollbar is color it to make it look kind of "cool" at least, so I made it all black and grey to fit the theme of the rest of my GUI.
But then I figured out I can mix and match the widgets. I could import the Scrollbar from ttk while importing all the other widgets from Tkinter. The result?
That's better.
I probably won't create a full CyanChat client in Python because I really don't care about CyanChat much anymore, so this was mostly just me messing around with Tk and seeing how practical it is for certain use cases. But here's the source code anyway.
There's a few interesting things in the code, like I created my own "Scrolled" class for wrapping a widget in a scrollbar (works with Text and Listbox), so it's kinda like Python's ScrolledText module, but it's really more like Perl's Tk::Scrolled module in that it can wrap arbitrary widgets, not just Text.
Also, Tkinter's Text widget can't be made read-only. You can make a text box disabled, but that also prevents programmatic insertions/deletions as well. So I made a little function for inserting text that would first re-enable it, then insert text, then disable it again.
#!/usr/bin/env python

"""My test script for Python/Tk experimentation."""

import Tkinter as tk
from Tkinter import Tk, StringVar, Frame, Label, Text, Entry, Button, Listbox, END
from ttk import Scrollbar


class ChatClient(object):
    def __init__(self):
        # Styles
        self.style = MainWindowStyles()

        self.setup()

    def setup(self):
        self.mw = Tk()
        self.mw.title("Python CyanChat Client")
        resize_and_center(self.mw, 640, 480)

        # Variables
        self.nickname = StringVar(self.mw, "Kirsle")
        self.message = StringVar(self.mw, "--disabled--")

        # Top Frame (name entry box, buttons, conn status)
        self.login_frame = Frame(self.mw, **self.style.Frame)
        self.lower_frame = Frame(self.mw, **self.style.Frame)
        self.login_frame.pack(side="top", fill="x")
        self.lower_frame.pack(side="top", fill="both", expand=1)

        # The lower left (message entry, chat history) and lower right
        # (who lists)
        self.left_frame = Frame(self.lower_frame, **self.style.Frame)
        self.right_frame = Frame(self.lower_frame, **self.style.Frame)
        self.right_frame.pack(side="right", fill="y")
        self.left_frame.pack(side="right", fill="both", expand=1)

        # The message entry & chat history frames
        self.message_frame = Frame(self.left_frame, **self.style.Frame)
        self.dialogue_frame = Frame(self.left_frame, **self.style.Frame)
        self.message_frame.pack(side="top", fill="x")
        self.dialogue_frame.pack(side="top", fill="both", expand=1)

        ###
        # Top Frame Widgets
        ###

        self.name_label = Label(self.login_frame,
            text="Name:",
            **self.style.Label
        )
        self.name_entry = Entry(self.login_frame,
            textvariable=self.nickname,
            width=20,
            **self.style.DarkEntry
        )
        self.enter_exit_button = Button(self.login_frame,
            text="Enter chat",
            **self.style.Button
        )
        self.status_label = Label(self.login_frame,
            text="Connected to CyanChat",
            **self.style.ConnectedLabel
        )
        self.name_label.pack(side="left", padx=5, pady=5)
        self.name_entry.pack(side="left", pady=5)
        self.enter_exit_button.pack(side="left", padx=5, pady=5)
        self.status_label.pack(side="left")

        ###
        # Message Frame Widgets
        ###

        self.message_entry = Entry(self.message_frame,
            textvariable=self.message,
            state="disabled",
            **self.style.Entry
        )
        self.message_entry.pack(
            side="top",
            fill="x",
            padx=10,
            pady=10,
            expand=1,
        )

        ###
        # Who Frame Widgets
        ###

        self.who_label = Label(self.right_frame,
            text="Who is online:",
            anchor="w",
            **self.style.Label
        )
        self.who_label.pack(side="top", fill="x")

        self.who_list = Scrolled(self.right_frame, Listbox,
            attributes=self.style.Listbox,
            scrollbar=self.style.Scrollbar,
        )
        self.who_list.pack(side="top", fill="both", expand=1)

        for i in range(200):
            self.who_list.widget.insert(END, "Anonymous{}".format(i))

        ###
        # Dialogue Frame Widgets
        ###

        self.dialogue_text = Scrolled(self.dialogue_frame, Text,
            attributes=self.style.Dialogue,
            scrollbar=self.style.Scrollbar,
        )
        self.chat_styles(self.dialogue_text.widget)
        self.dialogue_text.pack(side="top", fill="both", padx=10, pady=0, expand=1)

        # Dummy junk
        messages = [
            [["[Kirsle]", "user"], [" Hello room!"]],
            [["\\\\\\\\\\", "server"], ["[Kirsle]", "user"], [" <links in from comcast.net Age>"], ["/////", "server"]],
            [["[ChatServer] ", "server"], ["Welcome to the Cyan Chat room."]],
            [["[ChatServer] ", "server"], ["There are only a few rules:"]],
            [["[ChatServer] ", "server"], ["   Be respectful and sensitive to others"]],
            [["[ChatServer] ", "server"], ["   And HAVE FUN!"]],
            [["[ChatServer] ", "server"], [""]],
            [["[ChatServer] ", "server"], ["Termination of use can happen without warning!"]],
            [["[ChatServer] ", "server"], [""]],
            [["[ChatServer] ", "server"], ["Server commands now available, type !\\? at the beginning of a line."]],
            [["[ChatServer] ", "server"], ["CyanChat Server version 2.12d"]],
        ]
        for i in range(80):
            messages.append([["[ChatClient]", "client"], [" Connecting..."]])
        messages.reverse()
        for line in messages:
            self.insert_readonly(self.dialogue_text, 0.0, "\n")
            line.reverse()
            for part in line:
                self.insert_readonly(self.dialogue_text, 0.0, *part)
        #self.insert_readonly(self.dialogue_text, END, "[Admin]", "admin")

    def chat_styles(self, widget):
        """Configure chat text styles."""
        # User colors
        widget.tag_configure("user", foreground="#FFFFFF")
        widget.tag_configure("guest", foreground="#FF9900")
        widget.tag_configure("admin", foreground="#00FFFF")
        widget.tag_configure("server", foreground="#00FF00")
        widget.tag_configure("client", foreground="#FF0000")

    def insert_readonly(self, widget, *args):
        """Insert text into a readonly (disabled) widget."""
        widget.widget.configure(state="normal")
        widget.widget.insert(*args)
        widget.widget.configure(state="disabled")

    def start(self):
        self.mw.mainloop()


class MainWindowStyles(object):
    """Simple Python class to hold style-related configurations for widgets."""
    Frame = dict(
        bg="#000000",
    )

    BaseLabel = dict(
        font="Verdana 8",
    )
    Label = dict(
        bg="#000000",
        fg="#CCCCCC",
        **BaseLabel
    )
    ConnectedLabel = dict(
        bg="#000000",
        fg="#00FF00",
        **BaseLabel
    )

    BaseFormCtrl=dict(
        highlightthickness=0, # Removes stupid border around the widget
    )

    BaseEntry = dict(
        insertwidth=1,
        selectborderwidth=0,
        selectbackground="#0099FF",
        font="Verdana 8",
        **BaseFormCtrl
    )
    Entry = dict(
        bg="#FFFFFF",
        fg="#000000",
        disabledbackground="#000000",
        disabledforeground="#666666",
        insertbackground="#000000",
        **BaseEntry
    )
    DarkEntry = dict(
        bg="#000000",
        fg="#CCCCCC",
        insertbackground="#FFFFFF", # Text insertion blinking cursor
        **BaseEntry
    )

    Listbox = dict(
        bg="#000000",
        fg="#CCCCCC",
        **BaseFormCtrl
    )

    Dialogue = dict(
        bg="#000000",
        fg="#CCCCCC",
        #disabledbackground="#000000",
        #disabledforeground="#CCCCCC",
        wrap=tk.WORD,
        state="disabled",
        **BaseEntry
    )

    Button = dict(
        bg="#000000",
        fg="#CCCCCC",
        activebackground="#000000",
        activeforeground="#0099FF",
        **BaseFormCtrl
    )

    # If using the Tkinter scrollbar, uncommon these. If using the ttk
    # scrollbar, use ttk's theming system instead.
    Scrollbar = dict(
        #relief="flat",
        #troughcolor="#000000",
        #bg="#606060",
        #activebackground="#999999",
        #borderwidth=1,
        #width=12,
        #highlightthickness=0,
    )


class Scrolled(object):
    """My own implementation for adding a scrollbar to a widget. Similar in
    principal to Python's ScrolledText module, but it works on other widgets too
    (this script uses it on Listbox too). So it's more like the Perl/Tk module
    Tk::Scrolled in that it can wrap any widget, in theory."""

    def __init__(self, master, widget_class, attributes=None, scrollbar=None):
        """
        master is the parent widget
        widget_class is the class, like Text or Listbox
        attributes are attributes for the widget
        scrollbar are attributes for the scrollbar
        """
        if attributes is None:
            attributes = []
        if scrollbar is None:
            scrollbar = []

        self.master = master

        # Parent frame to hold the widget + scrollbar
        self.frame  = Frame(master)

        # The scrollbar
        self.scrollbar = Scrollbar(self.frame, **scrollbar)

        # The widget itself
        self.widget = widget_class(self.frame,
            yscrollcommand=self.scrollbar.set,
            **attributes
        )
        self.scrollbar.configure(command=self.widget.yview)

        self.scrollbar.pack(side="right", fill="y")
        self.widget.pack(side="right", fill="both", expand=1)

    def widget(self):
        """Get at the inner widget."""
        return self.widget

    def scrollbar(self):
        """Get at the scrollbar widget."""
        return self.scrollbar

    def pack(self, **kwargs):
        """Wrapper so that pack() works as you'd expect."""
        self.frame.pack(**kwargs)


def resize_and_center(win, width, height):
    """Resize a window and center it on the screen."""
    screen_w = win.winfo_screenwidth()
    screen_h = win.winfo_screenheight()
    geometry = "{}x{}+{}+{}".format(
        width,
        height,
        screen_w / 2 - width / 2,
        screen_h / 2 - height / 2,
    )
    win.geometry(geometry)


if __name__ == "__main__":
    app = ChatClient()
    app.start()
The most recent feature I added to my website's CMS: multi-file uploads for the photo albums. I've been wanting to get around to this for a while so I can actually upload photo albums in bulk and make better use of that feature on my site. ;)
So I did some research and found some bits of example code here and there, and put together a pure HTML5 multiple-file uploader with progress bar. No Flash, no Java, no Internet Explorer 9 or lower. ;)
A lot of the existing bits of code I found out there weren't quite written in a way that was useful for my purposes. Their code tended to run the upload immediately after getting ahold of the files, i.e. they'd set up an HTML5 drag-and-drop spot and/or a multiple-file <input> box, and as soon as the user drops their pictures or selects them, the JavaScript would go right to work uploading them one by one to the back-end.
On my CMS I wanted to hold off on the uploading, because there's other form elements to take care of too, i.e. what album to put the pictures into or to apply a caption to them all. So I set up handlers for my file input box and drag-drop site to just put all the File objects into an array and wait for the submit button to be pushed.
So in my implementation, all the pictures are uploaded at once to the back-end, and there's only one progress bar (for the entire upload). It's possible to have one upload event per individual file, and therefore get progress bars on a file-by-file basis, but this didn't fit into my existing code structure.
Something I think is cool though is, on the back-end I'm using the exact same endpoint to handle uploads using Ajax (for those with JavaScript turned on) and when being POSTed to directly, i.e. for users with NoScript enabled. In both cases, they hit the /photos/upload on the server to send the form and images.
When the Ajax is the one doing it, it adds an extra __ajax form parameter. In this case, the back-end responds with a JSON response telling what the next URL is, and the JavaScript initiates a redirect to that URL. In case the user has JavaScript turned off, and the form POSTs to the back-end directly, the web server sends an HTTP redirect to the next URL.
Anyway, I threw together a quick Python/Flask app to mess with this stuff and figure it all out so I didn't have to worry about trying to wrangle existing code into doing something new. I have it hosted on Github here: https://github.com/kirsle/flask-multi-upload
The real interesting part is in the JavaScript source - only 184 lines of code, including comments and whitespace. Pretty straightforward. The same basic front-end code could be used regardless of the back-end, i.e. it could be uploading to a PHP script or something instead of a Python app. The Python part of the source is pretty short and sweet too.
I've made an update to my Rophako CMS that powers Kirsle.net: it now supports Markdown!
Blog posts can be either written in Markdown, or direct HTML (the old way). In Markdown mode, HTML is currently escaped from the post. I may change this and make it only escape HTML in comments if I find it to be a PITA in the future. ;) Oh, and emoticons still work (they're rendered after Markdown is done).
Markdown works in comments, too, but with some limitations, like I don't allow embedding images. Also, you can write entire pages on your site in Markdown. Just create a page named with a .md file extension that contains Markdown code and it "just works" (there's a built-in markdown.inc.html file in the default site that wraps your rendered document in your web design's layout).
Best of all, I'm using a handful of extensions to the Python Markdown module to enable a lot of Github style Markdown features, such as code highlighting. Here's a Python example:
def render_markdown(body, html_escape=True):
    """Render a block of Markdown text.

    This will default to escaping literal HTML characters. Set
    `html_escape=False` to trust HTML."""

    args = dict(
        lazy_ol=False, # If a numbered list starts at e.g. 4, show the <ol> there
        extensions=[
            "fenced_code",  # GitHub style code blocks
            "tables",       # http://michelf.ca/projects/php-markdown/extra/#table
            "smart_strong", # Handles double__underscore better.
            "codehilite",   # Code highlighting with Pygment!
            "nl2br",        # Line breaks inside a paragraph become <br>
            "sane_lists",   # Make lists less surprising
        ],
        extension_configs={
            "codehilite": {
                "linenums": False,
            }
        }
    )
    if html_escape:
        args["safe_mode"] = "escape"

    return markdown.markdown(body, **args)
I'll be revisiting all my old blog posts that have code pasted in them and reformatting them in Markdown for easier maintenance. My old way of pasting code in a blog post was to open the code in vim, and then run commands like,
:let html_use_css=1
:TOhtml
... which would output an HTML file that syntax highlights the code, and then I'd cut and paste all that junk into my blog. Blech. Markdown will be much cleaner. :D
The reasons for the switch-over are numerous:
index.cgi on Kirsle.net was sucking up so much memory. ;)I named the new project Rophako, because I was sitting at the Github "new repository" screen for a half hour trying to think of a name, and ended up just making use of my Azulian Translator to come up with a name. So, Rophako is Azulian for "Website." I'm a clever genius, I know. ;)
You can check out Rophako on Github: https://github.com/kirsle/rophako. The "default website" that comes with it isn't very polished yet; I literally just finished writing the code to support Kirsle.net. So, sometime later I'll tidy up the default website and have a working copy of it running on some subdomain like rophako.kirsle.net.
Anyway, this is the new CMS. I ported over all my old blog posts, comments, comment subscriptions, and things of the sort. All the old URLs should work too, due to my kirsle_legacy.py module in Rophako. If anybody finds any broken links or issues with the site, let me know. :)
Update (4/9/14):
I've polished up Rophako's default site and have an example running here: http://rophako.kirsle.net/
That's the site you'd get if you download and install Rophako (minus the blog posts and photos ;) ). So... the project is officially in "beta" status now and is usable!
It's a Python app that wraps the Minecraft server and makes the server console available over a separate TCP socket (with password authentication, of course).
This allows you to telnet in to this TCP port, provide the password (or a challenge-response hashed version of it), and then you get access to the Minecraft server console. Anything the server outputs is broadcasted to all authenticated clients, and anything the clients send is sent to the Minecraft server. But the real strength in this isn't necessarily just being able to see and type commands into the server console (you can do this at the local shell running the server normally); it's for programs to do this automatically!
For example, you can have a whitelist of users who aren't operators, but you want them to be able to say for example !creative in the server chat window, and have their game mode switched to creative. This is one of the example scripts I included in my project, actually!

And as a more eccentric example, I connected a simple RiveScript bot to this so that it can chat with players using the in-game chat system:

You can get the source code and play around with this yourself at minecraft-control on GitHub!
0.0017s.
![]()