Kirsle.net
I blog about anything I find interesting, and since I have a lot of varied interests, my blog entries are kind of all over the place. You can browse my tags to sort them by topic and see which ones I frequently write about, or the archive has a complete history of my posts, dating back to 2008!
Besides my blog, I have pages for my creative projects, which are linked to on the navigation bar.
I write a lot about Linux and Android, Minecraft, and I like to rant about stuff. Generally anything that makes me curious. Also check out my Bookmarks for all sorts of cool websites about various topics I'm interested in.
For the geeks: this website respects your privacy and doesn't run any third party ads or analytics. This site speaks HTTP and doesn't require any JavaScript to work.
Secure IM ConceptThe base concept I was thinking of would be that usernames on this system would be numeric, a bit like ICQ numbers. People apparently didn't mind being assigned some "random" number that they logged in with and gave out to friends. But, unlike ICQ numbers, the numeric IDs on this system would actually serve a purpose (instead of being simply the auto-incrementing primary key in ICQ's database).
Each user's client would generate an RSA public/private key pair, which is obviously the foundation for any sort of secure messaging platform. Then, you'd take the fingerprint of the public key (a short hexadecimal string, which could look for example like "45:2f:a5:d8:13:95:ba:03:51:c4:8d:ac:82:a8:4c:6a"), and you'd turn that into an integer number. Then you'd take, say, the first and last 5 digits of the number to create a 10 digit "screen name" number.
For the sake of continuing my description, let's pretend that the number came out to 567-8426-789. When setting up the chat client for the first time, it generates keys behind the scenes, and says "Your login number is 567-8426-789. You can give this out to your friends so they can add you to their buddy lists."
This idea stems from the general practice where, suppose you downloaded a Linux OS DVD, and you wanna verify the download so you look up the sha256sum for it. You're not going to compare the two SHA-256 hashes character by character; you'll check that the first 5 or 6 digits are the same, and the last 5 or 6 too. If those are, you can reasonably assert that your copy of the DVD is the same as the intended one. The numeric login ID of this secure IM network would be similar.
By giving out your ID number to a friend, they're automatically verifying your identity, since your ID is based off your public key. If somebody was trying to impersonate you (with a completely different RSA key pair), they wouldn't likely end up with the same numeric ID so it wouldn't work. ;)
Of course, the IM clients themselves would include features to do a more thorough verification of the friend you just added, like allowing you to see their full hexadecimal fingerprint, and also show a visual fingerprint to make it even easier to verify at a glance that your friend is who you expect them to be.
Anyway, this is just the basic idea I had. As far as syncing other devices to use the same account goes, it would probably need something like the old/current method Firefox Sync uses, i.e. needing to enter a "random" code from one device into the other so that your private key can be securely transferred between them without a third party in the middle being able to see. Alternately, the system would be federated (so you could host your own servers, like XMPP), and your local server may be trusted with an encrypted copy of your private key, encrypted using your log-in password. But these are all details to be figured out later.
You can read the rest of this blog post for all the examples, but the main key difference is that the EntityId tag has been removed and you need to do SpawnData:{id: EntityIdHere} instead, replacing "EntityIdHere" with the entity ID you want (Zombie, Skeleton, PigZombie, VillagerGolem, etc.)
So, for the /setblock command:
| Old way: | /setblock ~ ~ ~ mob_spawner 0 replace {EntityId:Zombie} |
| New way: | /setblock ~ ~ ~ mob_spawner 0 replace {SpawnData:{id:Zombie}} |
And for the /give command:
| Old way: | /give @p mob_spawner 1 0 {BlockEntityTag:{EntityId:Skeleton}, display:{Name:Skeleton Spawner}} |
| New way: | /give @p mob_spawner 1 0 {BlockEntityTag:{SpawnData:{id:Skeleton}}, display:{Name:Skeleton Spawner}} |
So when you see examples below, translate them into the new format for Minecraft 1.9. I may eventually write a new version of this blog post that contains only 1.9 commands, but for now you'll have to rewrite them manually.
Edit 2: there seems to be a bug in 1.9 where a spawner given with the /give command will only spawn its monster one time before reverting to a pig spawner. The SpawnPotentials seems to be the culprit; when the block is placed it gets initialized to a list that only includes pigs. The list is supposed to be empty by default, so explicitly setting it to empty seems to work:
/give @p mob_spawner 1 0 {BlockEntityTag:{SpawnData:{id:Skeleton},SpawnPotentials:[]}}
The original blog post follows.
--Updated on 3/17/2016
/summon, /setblock, and an extended syntax for /give, so that you could summon any entity, and attach a ton of NBT Tags on it to control attributes like what equipment it's wearing or whether it's invulnerable. ;)I was excited about this because not only could I spawn an Enderdragon in the overworld (this never ends well), but it would open up the possibility to just give myself custom monster spawners, like those typically found in a zombie/skeleton/spider dungeon.
Unfortunately, the Update: since writing this I found the syntax for giving a mob spawner with /give command doesn't seem to allow you to add a monster spawner to your inventory. At most, you'll get a Pig Spawner, which has always been the default monster if you would /give yourself a spawner in the past. But, if you use /setblock you can just set a block to be a monster spawner and do it that way./give. Example:
/give @p mob_spawner 1 0 {BlockEntityTag:{EntityId:Skeleton}, display:{Name:Skeleton Spawner}}
This gives a Skeleton Spawner in your inventory. The display: stuff is just to give it a custom name, otherwise it will call itself "Mob Spawner" in your inventory. If you're gonna carry multiple spawners, the names will help differentiate them. Everything inside the BlockEntityTag part are the same tags from the /setblock examples below.Now back to the original post...
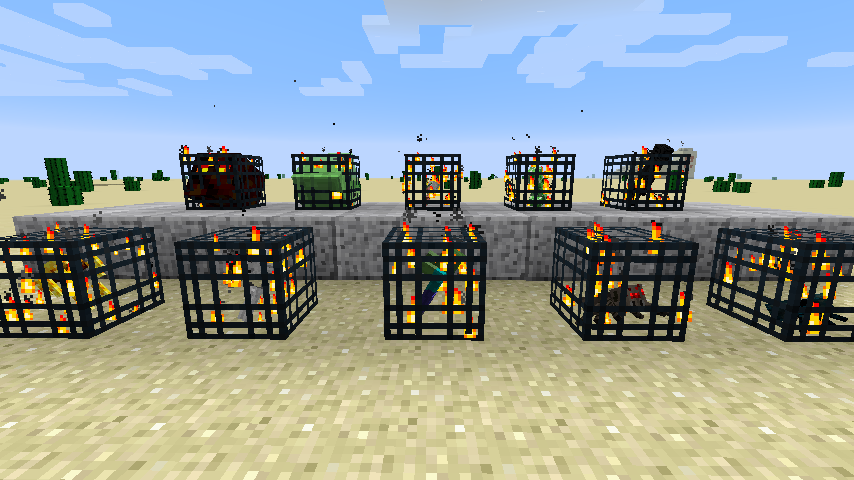
Pictured above are your "naturally occurring" monster spawners along the bottom: Blaze (in Nether Fortresses), Skeleton, Zombie, Spider, and Cave Spider (in abandoned mineshafts). I've also created spawners along the top for: Magma Cube, Slime, Zombie Pigman, Creeper, and Enderman.
The basic command syntax is along these lines:
/setblock ~ ~ ~ mob_spawner 0 destroy {EntityId:Zombie}
Replace the value for EntityId for any other valid entity. There's a list of Entity IDs on the Minecraft Wiki. You can create a monster spawner for pretty much every monster in the game, including the bosses like the Enderdragon and Wither.
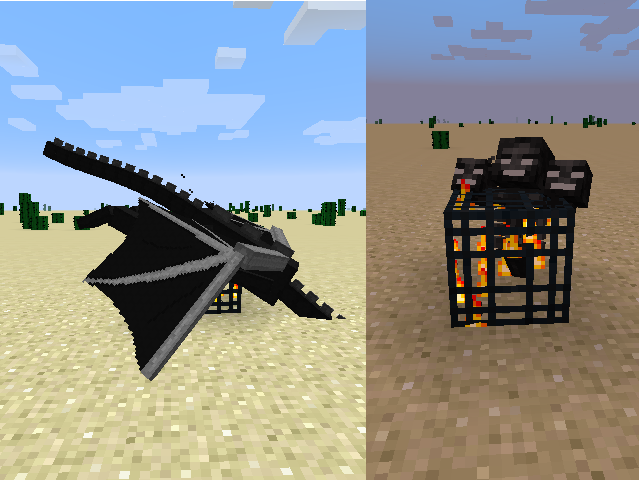
/setblock ~ ~ ~ mob_spawner 0 destroy {EntityId:EnderDragon}
/setblock ~ ~ ~ mob_spawner 0 destroy {EntityId:WitherBoss}
Things to watch out for: the Enderdragon will destroy every block it touches except for Bedrock, Obsidian, and End Stone (a.k.a. the only three types of blocks that naturally occur in the End Dimension), so it will destroy its own spawner, and if you create one in the overworld or the Nether, it will ruin everything it touches. You can mitigate this by turning off monster griefing with the command /gamerule mobGriefing false.
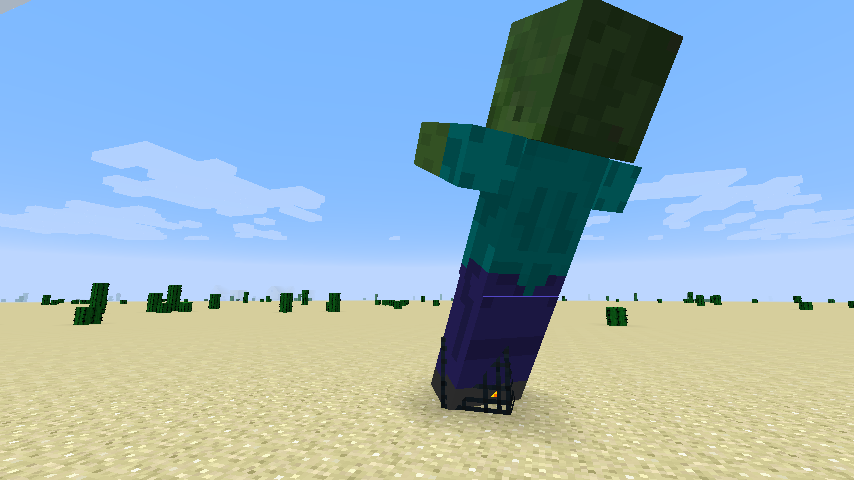
With this command you can also create a spawner for the Giant. This monster has been in the game for ages but never officially used. It's a super-huge zombie. However, I couldn't get this spawner to actually create a Giant for me. :( Your mileage may vary. You'll probably be better off summoning it directly with /summon Giant.
/setblock ~ ~ ~ mob_spawner 0 destroy {EntityId:Giant}
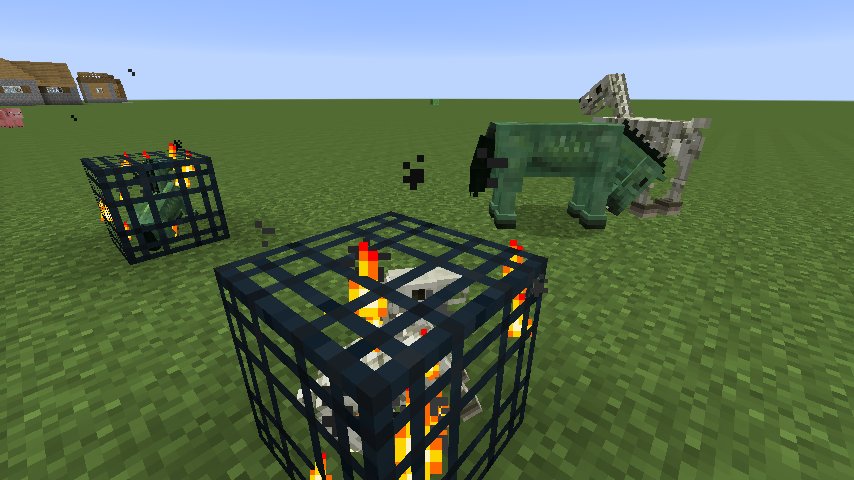
You can also create a mob spawner for horses! (edit/warning: this worked for me when I originally wrote this post, but others have reported that horse spawners tend to crash their games. I can reproduce this behavior now too in Minecraft 1.7.10 and a few others I tried (1.7.9, 1.7.2). There's a Minecraft bug ticket for this. YMMV. It seems to work in snapshot 14w31a (screenshot) so may be fixed for 1.8)
The zombie and skeletal horses aren't naturally occurring in-game, and they cannot be tamed normally like other horses. You'll want to make sure the "Tame" flag is set when spawning these so that players can ride them. They can equip saddles, but not armor.
Zombie: /setblock ~ ~ ~ mob_spawner 0 destroy {EntityId:EntityHorse,SpawnData:{Type:3,Tame:1}}
Skeletal: /setblock ~ ~ ~ mob_spawner 0 destroy {EntityId:EntityHorse,SpawnData:{Type:4,Tame:1}}
Again, warning: horse spawners with SpawnData may crash your game. It's a known bug in several versions of Minecraft. If this happens, and your game managed to save the world before the crash, so that it instantly crashes again when rejoining the game, you'll have to use a third-party tool like MCEdit to delete the offending spawner.That "SpawnData" attribute from the previous command is how you can attach NBT data to the spawned entity. Horses take a Type attribute and Tame, among some others. You can see all the relevant NBT tags at "Chunk format" on the Minecraft Wiki.
Here's a more advanced command that creates a Zombie spawner where the zombies are all equipped with Diamond Swords. I found this one from the Minecraft forums (I don't know or care too much about the NBT format; I usually just create simple spawners as listed above in this post).
/setblock ~ ~1 ~ minecraft:mob_spawner 0 replace {EntityId:Zombie,SpawnData:{Equipment:[{id:276,Count:1}]},SpawnPotentials:[{Type:Zombie,Weight:1,Properties:{Equipment:[{},{},{},{},{id:46,Count:1}]}}],SpawnCount:2}
Note: You'll have to paste that into a Command Block (/give <your_name> command_block) because the command is too long for the chat console. Attach a button to the command block with Shift+RightClick, push it and the spawner will appear above the block.
I liked the idea of some of Bukkit's plugins, though, so I'm always trying to find creative ways to get similar results using just the vanilla server. Here's a few tricks I figured out myself or heard about from Reddit.
Upon creating a new world, give yourself a compass and follow it to find the center of the world spawn region. I usually put a block here to visually remind myself where the center is, because the spawn region is important for a couple of reasons.
Firstly, the spawn region is always kept loaded in memory, along with the 5x5 chunk radius surrounding the spawn point (where a chunk is a 16x16 block section of the world). This is important because it means that if you set up any Redstone devices that run on a loop, they'll run all the time even if all the players wander far away from the spawn area. So it's a good place to incorporate command block circuits to enforce global "rules" on your server.
The other important thing is the spawn protection radius, which is the number of blocks around the spawn point (where the compass points) in which non-operator players are not allowed to place or destroy blocks, or interact with most items. By default the radius is set to 16 blocks, and is configurable in the server.properties file.
In the spawn protection radius, non-op players can't place or destroy blocks, and they can't use any devices except for pressure plates and trip wires. They can't even open or close wooden doors, they can't use crafting tables or furnaces, etc. Only the server operators have rights in the protection radius.
However, the protected area is not safe from monsters or outside interference, so for example if a player lures a Creeper into the spawn region it can still blow up blocks (unless you turn off mob griefing with /gamerule mobGriefing off, which prevents Creepers and other mobs from changing blocks). Clever players can also fling TNT in from outside the protected region to destroy blocks inside. When in doubt, encase your Redstone circuits in bedrock bunkers and keep them hidden away from view. ;)
/clear @a minecraft:tnt.All your command block redstone circuits should use a clock circuit of some kind (one that will run in an infinite loop). Ideally, the circuit should be self-starting, especially if the circuit is NOT within the 5x5 chunk spawn radius. This is because when the chunks that contain a redstone circuit are unloaded, the circuit stops running, and when the chunks are reloaded (because a player walks closer to them), you want your circuit to automatically start back up.
See clock circuits for some ideas. An example I use is where you have a redstone torch that powers a circuit, and the circuit eventually extends a piston over an earlier part of the circuit to interrupt its own power. With the power interrupted, the piston retracts, allowing the circuit to be powered again by the redstone torch, and so on.
Outside the spawn region, a useful tip I saw on Reddit is to apply the Mining Fatigue V effect to all players within a certain radius of your building. For example, create a redstone clock near the middle of your building that runs a command block to run this command:
/effect @a[r=60,m=0] 4 3 5This will apply an affect to all players (
@a), who are within 60 blocks of the command block and who are in Survival Mode (m=0), the Mining Fatigue effect (ID 4), for 3 seconds, at level 5. Mining Fatigue level 5 basically makes it 100% impossible for the player to mine a block, even if they have a diamond pickaxe, even if it's enchanted. The player can't even break a flower under this condition.The 3 second interval would be adjusted depending on how frequently your clock runs the command. You want it to only affect players while they're within the general area of your building, and lift the effect quickly if they leave.
On one of my servers, I wanted all players to appear in the center of a room when they joined the server (or died without a bed) so that I could somewhat randomly disperse them around the world by having them pick a pressure plate that would teleport them somewhere. See my blog post "Fun with Command Blocks".
Basically, if you go this route, the actual world spawn point will not be used. Instead you'll just have a command block running on a clock that teleports anyone who appears in the spawn region to a destination somewhere else (you should make sure you teleport them far away from the spawn region, so that they'll be outside the radius of the command block that teleported them... otherwise you get caught in an infinite loop of teleportation!)
Example command for this command block to run:
/tp @a[m=0,r=25] X Y ZSubstitute X, Y and Z for the coordinates to teleport to. This command would snipe all users within a 25 block radius of the command block and teleport them off to those coordinates. Also make sure to include the "
m=0" -- this will make it only teleport Survival Mode players away. This way, you (the operator) can switch your mode to Creative and be able to get close enough to the command block to edit it or whatever you need to do. But it will keep all the other players away by teleporting them to your designated "spawn location".
What I did was encased the End Dimension Spawn Platform in bedrock, with the only exits to either go back through the Exit Portal, or step on a pressure plate that would teleport them into the Parkour course (if somebody destroys the pressure plate, then nobody can get into the parkour course, but it's better than allowing them to vandalize the course itself).
The pressure plate would run a few command blocks - one would clear all their inventory with /clear, another one would change their game mode to Adventure with /gamemode 2 @p, and the last one would finally teleport them into the course.
A command block clock in the overworld would set all adventure mode players back to survival in case they died and respawned, with /gamemode 0 @a[m=2].
The thing to know about Adventure Mode, though, is that it's basically "Strict" Survival Mode. If a block requires a specific class of tool to break it (stone needs a pickaxe, wood needs an axe), then only that tool is allowed to be used. If you swing an axe at stone, or a pickaxe at dirt, then your player just swings once as if hitting air, and then nothing.
You don't necessarily need to use the right material of tool, just the right tool. For example Adventure Mode allows you to destroy obsidian using a wooden pickaxe, even though the wooden pickaxe won't drop the obsidian block. So for Adventure Mode to work, you basically need to remove ALL tools from their inventory.
Even without tools, blocks that can be broken by hand are still vulnerable. So avoid using glass, torches, flowers, redstone devices (including buttons) which are in reach of the player, etc., as they can break these without needing any tools at all.
Update (8/14/15): As of Minecraft 1.8, the Adventure Mode behavior has been changed. Briefly:
/clear their inventory either!
I ran into this problem a couple different times on different machines running Fedora over the span of about the last 6 months. I had to Google it both times to find a solution (which wasn't easy to find), so here's the solution that ended up working for me each time.
~/.config/google-musicmanager~/Music folder (if you already downloaded songs from Google, move them to some other place). You'll see why in step #8.
Also, if you can't get the Music Manager to start at all in the first place, try running it from a terminal window with the google-musicmanager command and see what it says. On Fedora, it told me "error while loading shared libraries: libQtWebKit.so.4", and I just had to yum install qtwebkit to fix it (the MusicManager RPM didn't correctly list this dependency). When you see this or similar errors in Fedora, you can use a command similar to yum provides '*/libQtWebKit.so.4' and see what packages provide the missing file, and know what to install from there.
One of the big features of the Raspberry Pi edition of Minecraft was that they provided a scripting API, so that you could write Python code to manipulate the blocks in the MineCraft world.
The scripting API hasn't officially come to the desktop version of Minecraft, but version 1.7 includes a handful of fun new server commands, like /setblock, /summon, and an extended interface for /give, so you can now summon any type of entity you want, including Ender Dragons, or summoning a Wither Skeleton riding on top of a Skeleton Horse while wearing fully enchanted diamond armor and holding a diamond sword.
But this post is going to focus on the /setblock command, which lets you change a block somewhere in your map by giving the coordinates to it and setting what type of block you want to put there.
When you're running a Minecraft server, you can enter server commands either in-game (if you're the operator), or directly into the terminal that's running the server. Using the latter, you can have a third party program (a Python script for example) write stuff into the terminal running the server, to automatically run server commands!
I made a quick proof-of-concept Python script to demonstrate this. This script will create a cube of stone of any dimensions you want somewhere in your Minecraft 1.7 server.

#!/usr/bin/python

# makecube.py - Proof of concept for scripting Minecraft 1.7
#
# Usage: makecube.py <screen_name> <size> <x> <y> <z>
#
# Works for Unix-like OS's only and depends on the `screen` command.
# Setup:
# [bash]$ screen -S minecraft
# [screen]$ java -jar minecraft_server.jar
# (in another terminal)
# [bash]$ makecube.py minecraft 25 0 60 0

from sys import argv
import os

material = "stone"
if len(argv) != 6:
    print "Usage: makecube.py <screen_name> <size> <x> <y> <z>"
    quit()

screen = argv[1]
size, x, y, z = map(lambda arg: int(arg), argv[2:])

def setblock(x, y, z):
    cmd = "screen -x {0} -X stuff '/setblock {1} {2} {3} stone 0 replace\x0D'"\
          .format(screen, x, y, z)
    os.system(cmd)

# Generate the cube's coords.
coords = list()
x1 = int(x - size/2)
y1 = int(y - size/2)
z1 = int(z - size/2)
for x2 in range(x1, x1 + size):
    for y2 in range(y1, y1 + size):
        for z2 in range(z1, z1 + size+1):
            coords.append([ x2, y2, z2 ])

# Send all the /setblock commands.
for coord in coords:
    setblock(*coord)
It also has a feature to import a heightmap file, which is a grayscale image where brighter shades of white represent higher mountains, and lower shades are the lower elevations of the map. With this, you could design a terrain in a variety of different tools, export a heightmap of your terrain, and through WorldPainter, convert it into a Minecraft map. You can paint in the biomes and other features first in WorldPainter, of course.
I decided to test this using a heightmap I found of Myst Island (I found it on this Myst Online forum thread). Here's the original heightmap:

The image is 500x500 pixels, and the brightest shade of white is about 253, so if we imported this into WorldPainter as-is, half the island would be flooded (with the default water level of 62), and that mountain would reach higher than the clouds. So, first, I adjusted the levels in GIMP (Photoshop or something could've been used instead) to raise the lowest shade of black to just below the water level and lower the brightest shade to something more reasonable.
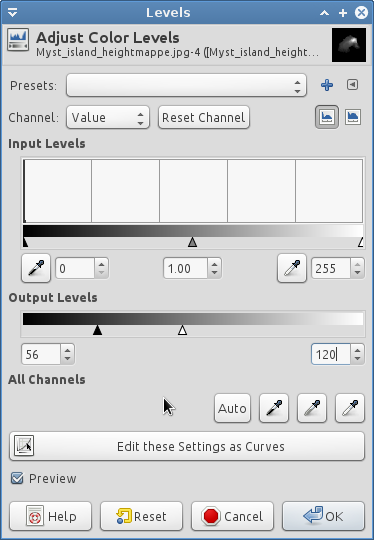
Because the heightmap included some underwater hilly structures, I brought the lowest level up to 52 instead of 0, and lowered the highest level down to 120 from ~255. This resulted in the following image:

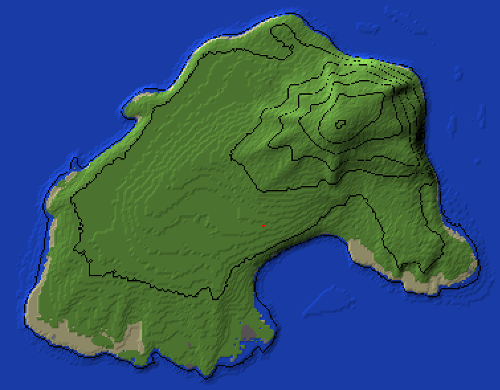
After importing it into WorldPainter (via File->Import->Height map), this is how the map looked:
I exported the map immediately to see how it would look in-game. I found that the original scale of the heightmap made the island a little bit too large, so I tried again but scaled it down to 50% when importing the heightmap. Here you can see the difference (click for larger versions):
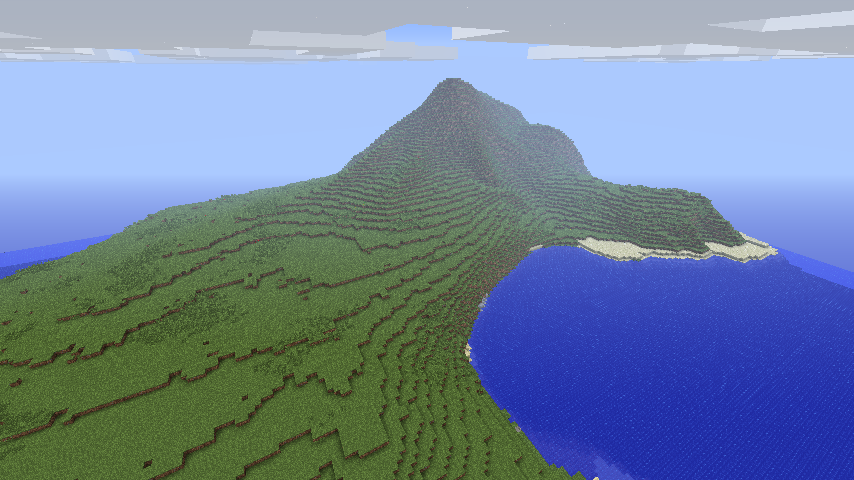
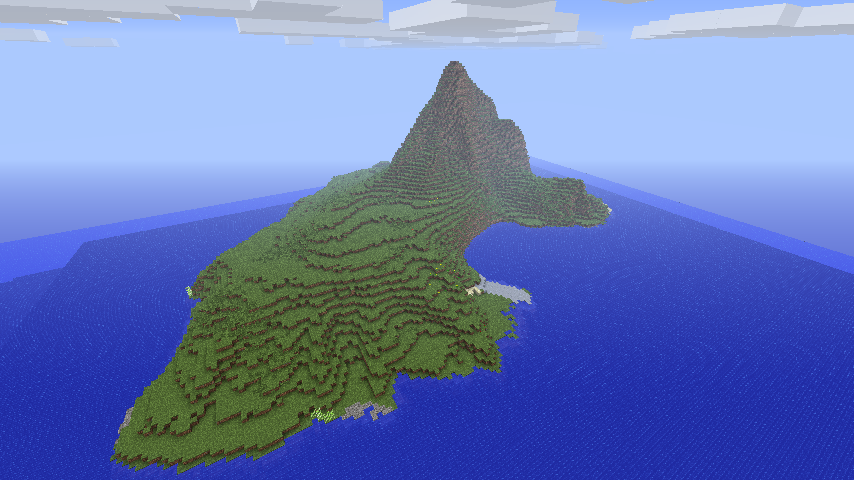
It's all a trial-and-error kind of thing. I had to tweak the levels of the heightmap a handful of times to get it to look just right, and scaling it down to 50% might not even be the perfect scale either (but you wouldn't know until you started trying to build on it). This is a pretty neat tool anyway. I'd probably recommend making your own terrains rather than trying to use someone else's (for example Myst Island), because then you'll get a lot fewer headaches when trying to build on the map and trying to get the scale just right and everything.
But, the entire rest of the Internet totally sucks. I'm using Google's DNS (because Time Warner Cable's have been absolutely useless, like making me wait several minutes just to resolve a domain name), so that's not part of the problem either. It seems also that on the general Internet, the entire network drops in pulses every 30 seconds for 5 seconds at a time. So if I'm on Reddit, and click to expand a dozen imgur links with my RES extension... all of the links take a while to load, and then all of a sudden they all load at the exact same time.
I was reasonably sure that Time Warner Cable was using traffic shaping to "put on a good show" for Speedtest.net, and throttling my network speeds for all the other sites. So that if I called and complained about my slow Internet, they'd say "go to Speedtest.net and see for yourself that you're getting your 15-20 megs down that you're paying for" when instead, they're cheating on speed tests and slowing me down on every other site in the world.
I just had to find a way to prove it. The idea I came up with was to proxy my speed test through a fast web server. My web server, though, wouldn't cut it. My server got 900 megs down, but only like 12 megs up... which I thought was absurd, because a web server's entire purpose in life is to upload web content to the end users. A server's upload speed is the bottleneck that controls your maximum download speed when downloading data off of it.
I migrated to a new web server that gets much better results on speed tests, and its upload speed is higher than my quoted download from my ISP. So, I used it to try and test whether my ISP is cheating on me.
The tools I used: speedtest-cli, a command line Speedtest.net client (so I don't have to worry about trying to proxy Adobe Flash traffic, which is notoriously difficult to do), and proxychains, a Unix tool that lets you force any other program through a proxy regardless if the program wants it or not. This way I could proxy speedtest-cli to run through my web server instead of directly hitting up Speedtest.net.
My web server is hosted in Kansas City, MO, which is a bit of a drive away from Los Angeles, so to remove any geographical bias from the equation, when I ran my speed tests from my web server, I selected Speedtest servers here in Los Angeles. This showed me that my web server was able to download and upload reasonably fast from Kansas City to LA, and that the opposite should be true as well.
I'll let the results speak for themselves (note: I'm hosting these images here locally because I'm not sure speedtest.net hosts the results on their server forever. Clicking the images though will take you to the link that speedtest.net gave me). I did two rounds of tests for redundancy.
| PC Speedtest | Server to LA | Proxychains |
|---|---|---|

|

|

|

|

|

|
wget initially spiked to about 500 some entire kilobytes per second (about 4,000 kilobits or 3.9 megabits) before quickly dropping to between 100 and 200 KB/s (or 800-1600 kilobits/s) for the remainder of the file transfer. Overall it took 22 minutes, 46 seconds to download. Given my quoted download speed of ~17 Mbps, and my server's upload speed of 35 Mbps upload to Los Angeles, this is inexcusable.For those who like the dirty details, I copy/pasted my terminal outputs from speedtest-cli and you can see them here: speedtest-cli.txt. So you understand what you're looking at:
aerelon is my local PC.debian is my web server.proxychains ./speedtest-cli --share is me running the proxy through my web server.[kirsle@aerelon ~]$ cat .proxychains/proxychains.conf | grep -v '^#' strict_chain quiet_mode proxy_dns tcp_read_time_out 15000 tcp_connect_time_out 8000 [ProxyList] socks5 127.0.0.1 8080Where
127.0.0.1:8080 is a SOCKS5 proxy over SSH to the web server.
My Minecraft servers are being rearranged as well. This new machine has 5 IPv4 addresses, and each of my MC servers will get its own IP and hostname instead of having to juggle port numbers.
I'm going to compare it to Raspbian, which is the usual OS that people install on their Raspberry Pi's.
As far as speed goes, Fedora 18 runs pretty well on this device. I haven't directly compared it side-by-side with Raspbian, but I haven't noticed any real annoying slow-downs at all. They've optimized Fedora 18 to run well and take full advantage of the floating point unit on the Pi, which previous versions of Fedora didn't do.
One huge plus with Fedora over Raspbian is that the NetworkManager applet comes installed and set up by default (as it does on all Fedora OS's). It was super easy to connect to my wifi network with it. Under Raspbian, there's only the wpa_gui, and it doesn't work very well for me and I have to click the "Connect" button a dozen times before it finally connects. The NetworkManager applet is a huge improvement.
The Pidora distro comes with the XFCE desktop environment, as opposed to Raspbian's LXDE desktop (on my Raspbian, I had gone ahead and installed XFCE anyway). On my setup, audio was working how I want it to out-of-the-box. I have my Pi connected to a DVI monitor, using an HDMI to DVI adapter. In Raspbian, I had to uninstall Pulse and hack ALSA up to make it send audio out the analog jack instead of HDMI, so that I could connect it to some proper speakers. In Pidora, Pulse wasn't even installed by default, and ALSA already knew to send the audio through the analog jack.
I also managed to get Minecraft: Pi Edition to run on Pidora. I just needed to install libpng12 and SDL, and fix the permissions on the vchiq device (using instructions I found on the Raspbian Quake3 page), and I was good to go.
The biggest downside to Pidora is that there is no RPMFusion for it. They rebuilt pretty much all of the standard Fedora packages for the ARMv6 architecture, but upstream Fedora doesn't include anything non-free, like MP3 support, and so Pidora doesn't have that available in their repos either. Raspbian is a better bet if you need MP3 and video codec support, unless you want to compile the software yourself.
I think I'll stick with Pidora though. It's a lot more familiar since I run Fedora on all my other computers, and pretty much everything about Fedora is exactly the same in Pidora. :)
To get the basics out of the way first:
My particular laptop (the 13.3" variety) includes a 500GB hard drive and a 32GB SSD drive, which apparently is the ExpressCache drive. This is important.
So first, how to get Windows 8 to actually attempt to install. You can't just boot a vanilla DVD or USB, because the installer will see the OEM product key baked into the BIOS, and complain because it's for Core Edition and you're trying to install Pro Edition.
You need to make a USB installer for Windows 8 using the "Windows 7 DVD/USB Tool" (Google it). This is because you have to add a text file to the USB. You might be able to modify an ISO to add the text file to it, but you're on your own there.
Open Notepad, and create a text file named "PID.txt", and put this in as its contents:
[PID]
Value=XXXXX-XXXXX-XXXXX-XXXXX-XXXXX
Substitute the X's for your Windows 8 Pro product key. Place the text file in the Win8 USB under the "sources" directory, for example
D:\sources\PID.txtNow when you boot from the USB, Windows will use that product key instead of looking in the BIOS. And the installation will continue as normal.
But, it won't boot from disk after the installation is done. This is because the Windows Installer saw the 32GB ExpressCache disk, and it installed its bootloader onto that disk instead of onto the primary hard drive. The problem with this is that the BIOS on the laptop can't see the ExpressCache disk, and so it can't boot Windows from it.
I saw a couple solutions floating around the Internet for this. One solution said to format the ExpressCache disk with a Mac OS X file system, so that Windows wouldn't make use of it for its bootloader. You could probably format it with a Linux filesystem as well and get the same result. In this case, Windows 8 would've installed the bootloader directly onto the primary hard drive, and the BIOS would be able to boot it. This isn't much help to you, though, if you don't already have Windows installed to be able to format this partition.
What I did instead when I got to this point was... go ahead and install Linux. When I installed Windows 8, I gave it a 128GB partition on the hard drive. I gave Linux the remaining space to partition up as it pleases. When Linux installs the GRUB bootloader, it installs it onto the primary hard drive. This means the BIOS is able to boot GRUB... and, GRUB is able to see the Windows 8 Bootloader on the ExpressCache disk. Score! So now you can boot either Linux or Windows from GRUB.
This is what worked for me, anyway. If you don't wish to dual-boot Linux on your laptop, you may want to just boot a Linux LiveCD/USB, format the ExpressCache disk (/dev/sdb, probably) with a Linux filesystem like ext4, and then run the Windows installer again. Theoretically, Windows won't touch the ExpressCache disk to install its bootloader, and will install it on the primary disk. No guarantees that will work, though, as I haven't tested it.
0.0018s.