Kirsle.net
I blog about anything I find interesting, and since I have a lot of varied interests, my blog entries are kind of all over the place. You can browse my tags to sort them by topic and see which ones I frequently write about, or the archive has a complete history of my posts, dating back to 2008!
Besides my blog, I have pages for my creative projects, which are linked to on the navigation bar.
I write a lot about Linux and Android, Minecraft, and I like to rant about stuff. Generally anything that makes me curious. Also check out my Bookmarks for all sorts of cool websites about various topics I'm interested in.
For the geeks: this website respects your privacy and doesn't run any third party ads or analytics. This site speaks HTTP and doesn't require any JavaScript to work.
Android can apparently delete your Camera folder without warningSo I took a few pics with my Nexus 5 this morning, and when viewing them in the Gallery app they appeared to have not saved correctly (there was a solid dark grey placeholder image for each one I took). If I opened the Camera app and swiped over to see them, there they were. But the Camera app also popped up a toast saying "Insert an SD card to save photos."
The Nexus 5 has no SD card.
And then I probably shouldn't have rebooted my phone (the Camera was being an idiot, so I thought rebooting would fix it), cuz when the phone came back up, the Camera folder was entirely deleted. Like, it didn't show up in the Gallery, and swiping in the Camera app did nothing. /mnt/sdcard/DCIM/Camera didn't exist anymore. Take a new picture, and the Camera folder was remade but only had the one new picture in it.
So, Life Pro Tip: Android can do this sometimes. If you get those kind of symptoms, hopefully try making a backup of the Camera folder (using like Astro or Root Browser), before rebooting the phone. You'll probably still lose the newly taken/corrupted pictures but at least Android shouldn't delete all your other camera pictures.
I think the Camera app was still able to see the pictures even though they weren't saved because they were kept in some sort of temporary in-memory cache of the Camera app. Probably the best way to save them would've been to take screenshots of them from within the Camera app.
All the other folders that had pictures in them were left alone, i.e. pictures saved through Snapchat and other photo albums.
I used a recovery program to restore all the deleted photos/videos on my phone. Site I used. Some of the pictures were corrupted but I was able to get all the ones I cared about back. :) Most of the deleted files were Snapchats that I already had non-deleted copies of.
Also, the selfies that I took this morning that "caused" this whole entire mess were recovered as well, so that's double-good-news. :P One of the pics that literally broke my camera:

The most recent feature I added to my website's CMS: multi-file uploads for the photo albums. I've been wanting to get around to this for a while so I can actually upload photo albums in bulk and make better use of that feature on my site. ;)
So I did some research and found some bits of example code here and there, and put together a pure HTML5 multiple-file uploader with progress bar. No Flash, no Java, no Internet Explorer 9 or lower. ;)
A lot of the existing bits of code I found out there weren't quite written in a way that was useful for my purposes. Their code tended to run the upload immediately after getting ahold of the files, i.e. they'd set up an HTML5 drag-and-drop spot and/or a multiple-file <input> box, and as soon as the user drops their pictures or selects them, the JavaScript would go right to work uploading them one by one to the back-end.
On my CMS I wanted to hold off on the uploading, because there's other form elements to take care of too, i.e. what album to put the pictures into or to apply a caption to them all. So I set up handlers for my file input box and drag-drop site to just put all the File objects into an array and wait for the submit button to be pushed.
So in my implementation, all the pictures are uploaded at once to the back-end, and there's only one progress bar (for the entire upload). It's possible to have one upload event per individual file, and therefore get progress bars on a file-by-file basis, but this didn't fit into my existing code structure.
Something I think is cool though is, on the back-end I'm using the exact same endpoint to handle uploads using Ajax (for those with JavaScript turned on) and when being POSTed to directly, i.e. for users with NoScript enabled. In both cases, they hit the /photos/upload on the server to send the form and images.
When the Ajax is the one doing it, it adds an extra __ajax form parameter. In this case, the back-end responds with a JSON response telling what the next URL is, and the JavaScript initiates a redirect to that URL. In case the user has JavaScript turned off, and the form POSTs to the back-end directly, the web server sends an HTTP redirect to the next URL.
Anyway, I threw together a quick Python/Flask app to mess with this stuff and figure it all out so I didn't have to worry about trying to wrangle existing code into doing something new. I have it hosted on Github here: https://github.com/kirsle/flask-multi-upload
The real interesting part is in the JavaScript source - only 184 lines of code, including comments and whitespace. Pretty straightforward. The same basic front-end code could be used regardless of the back-end, i.e. it could be uploading to a PHP script or something instead of a Python app. The Python part of the source is pretty short and sweet too.
Time for another Minecraft tutorial using command blocks to do something pretty neat using the vanilla version of the game (no plugins necessary). I used Minecraft version 1.7.9.
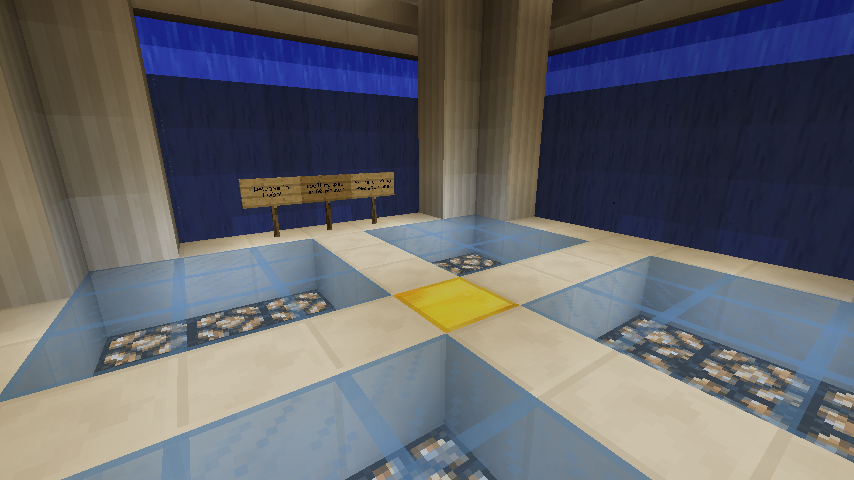
In this mini tutorial, I'm showing off how I created a "Limbo Dimension" that players are sent to after death, where they must remain for 60 minutes before being respawned in the overworld again.
I've made an update to my Rophako CMS that powers Kirsle.net: it now supports Markdown!
Blog posts can be either written in Markdown, or direct HTML (the old way). In Markdown mode, HTML is currently escaped from the post. I may change this and make it only escape HTML in comments if I find it to be a PITA in the future. ;) Oh, and emoticons still work (they're rendered after Markdown is done).
Markdown works in comments, too, but with some limitations, like I don't allow embedding images. Also, you can write entire pages on your site in Markdown. Just create a page named with a .md file extension that contains Markdown code and it "just works" (there's a built-in markdown.inc.html file in the default site that wraps your rendered document in your web design's layout).
Best of all, I'm using a handful of extensions to the Python Markdown module to enable a lot of Github style Markdown features, such as code highlighting. Here's a Python example:
def render_markdown(body, html_escape=True):
    """Render a block of Markdown text.

    This will default to escaping literal HTML characters. Set
    `html_escape=False` to trust HTML."""

    args = dict(
        lazy_ol=False, # If a numbered list starts at e.g. 4, show the <ol> there
        extensions=[
            "fenced_code",  # GitHub style code blocks
            "tables",       # http://michelf.ca/projects/php-markdown/extra/#table
            "smart_strong", # Handles double__underscore better.
            "codehilite",   # Code highlighting with Pygment!
            "nl2br",        # Line breaks inside a paragraph become <br>
            "sane_lists",   # Make lists less surprising
        ],
        extension_configs={
            "codehilite": {
                "linenums": False,
            }
        }
    )
    if html_escape:
        args["safe_mode"] = "escape"

    return markdown.markdown(body, **args)
I'll be revisiting all my old blog posts that have code pasted in them and reformatting them in Markdown for easier maintenance. My old way of pasting code in a blog post was to open the code in vim, and then run commands like,
:let html_use_css=1
:TOhtml
... which would output an HTML file that syntax highlights the code, and then I'd cut and paste all that junk into my blog. Blech. Markdown will be much cleaner. :D
A while after the Heartbleed SSL vulnerability made headlines, Wired.com ran an article titled "It's Time to Encrypt the Entire Internet" urging everyone to deploy SSL/TLS encryption on their sites.
SSL certificates tend to be pretty expensive, though, which is one reason I hadn't looked into it that closely in the past. In a Reddit comment thread about that Wired article some people mentioned Namecheap as a good option for simple SSL certs. So, I got a simple domain-level certificate for $9 for Kirsle.net. :) So all kirsle.net URLs are now running over https! This blog post is about the experience of setting up SSL and wrestling with various applications in the process.
The simplest guide I found that I followed to make a certificate was Generate CSR - Apache OpenSSL. One command creates a passphrase-protected key file, the next one generates the signing request:
openssl genrsa –des3 –out kirsle.key 2048
openssl req -new -key kirsle.key -out kirsle.csr
You apparently need a 2048-bit RSA key these days before a Certificate Authority will consider your signing request. I pasted in my CSR file and filled out some forms, got an e-mail verification sent to the address on my WHOIS record for my domain, and before I knew it I was e-mailed a zip file containing my certificate and the Comodo CA certificates.
Various apps will need your Certificate Authority's chain to be in a single file. You can create this file by catting the certificates into one file in "reverse" order, with your site's certificate on top, and the root certificate on bottom. Comodo gave me these files (and this is also the order for the chain file):
www_kirsle_net.crtCOMODORSADomainValidationSecureServerCA.crtCOMODORSAAddTrustCA.crtAddTrustExternalCARoot.crtSo I generated the chain as follows:
cat www_kirsle_net.crt COMODORSADomainValidationSecureServerCA.crt \
    COMODORSAAddTrustCA.crt AddTrustExternalCARoot.crt > cacert.pem
I'm running a Debian server, so I just symlinked the ssl.load and ssl.conf files from my /etc/apache2/mods-available into my mods-enabled, and then edited the ssl.conf. All I changed in it was to uncomment the SSLHonorCipherOrder on line.
I removed the sites-enabled/default-ssl and then edited my Kirsle.net config file to add a <VirtualHost *:443> version. I had to look at the default-ssl file to get an idea which options were needed (if I missed any, Apache would fail to start!)
Relevant SSL options for my VirtualHost:
    # SSL
    SSLEngine on
    SSLCertificateChainFile /etc/ssl/crt/cacert.pem
    SSLCertificateFile /etc/ssl/crt/www_kirsle_net.crt
    SSLCertificateKeyFile /etc/ssl/crt/kirsle.key
    SSLOptions +StdEnvVars
    BrowserMatch "MSIE [2-6]" nokeepalive ssl-unclean-shutdown downgrade-1.0 force-response-1.0
    BrowserMatch "MSIE [17-9]" ssl-unclean-shutdown
Note: if you leave out the chain file, web browsers will still behave fine (because they're smart enough to download the intermediary certificates themselves), but other things will break. For example, the Python requests module will throw an SSL exception if the server doesn't give it the intermediary certificates!
After making sure https://www.kirsle.net/ was working, I made an update to my Rophako CMS to support SSL sites better and then made the switch-over. Any requests going to my HTTP Kirsle.net are redirected to the SSL version and given a Strict Transport Security header.
As a fun side note, Apache supports Perfect Forward Secrecy by default (using the default SSLCipherSuite option of HIGH:MEDIUM:!aNULL:!MD5).
Starting or restarting Apache requires you to enter the SSL key's passphrase at the command line. For simple config updates, service apache2 graceful will reload them without needing a full restart, so you don't need to enter the passphrase then.
I use Dovecot for my IMAP mail server on Kirsle.net, and I wanted it to use my shiny new SSL certificate. Before this, I was using a self-signed certificate, and apparently Thunderbird doesn't even warn you if that self-signed certificate changes at any point. After the Heartbleed vulnerability was fixed, I re-generated new self-signed certs and was shocked that Thunderbird happily accepted the new certificate without even telling me. It would've been extremely easy to Man-in-the-Middle my e-mail server. (I had since then installed an extension in Thunderbird to police SSL certificates for me as a workaround).
So, configuration is pretty simple, just edit /etc/dovecot/conf.d/10-ssl.conf and enter in the new paths to your chain file and private key. Note that if you use just your domain's certificate, clients like Thunderbird that support SSL properly will complain about the certificate being insecure, and unlike web browsers, Thunderbird doesn't bother downloading the intermediary certificates itself.
One catch with Dovecot is that if your private key file is encrypted with a passphrase like mine is, doing service dovecot restart won't work. Dovecot will start in a way where it won't support TLS but will otherwise appear to function normally.
To start Dovecot with a passphrase, you need to run dovecot -p (as root) to start the service. It will prompt for your passphrase at the command line and then start up. The service can be stopped normally using service dovecot stop.
This one I'm a bit upset about. Postfix has absolutely NO support for using a passphrase protected TLS key file! Even their official documentation states that the key file must not be encrypted.
That is so full of wtf. Postfix is a widely deployed SMTP server for Linux, and it has to use insecure, unprotected TLS key files. So, I'm still using a self-signed certificate for Postfix (and my Thunderbird add-on will tell me if this certificate ever changes, so don't get any ideas!). I don't send outgoing mail very often, anyway, and if I care enough I'll PGP encrypt. But, I'll be looking into an alternative SMTP server sometime soon.
The reasons for the switch-over are numerous:
index.cgi on Kirsle.net was sucking up so much memory. ;)I named the new project Rophako, because I was sitting at the Github "new repository" screen for a half hour trying to think of a name, and ended up just making use of my Azulian Translator to come up with a name. So, Rophako is Azulian for "Website." I'm a clever genius, I know. ;)
You can check out Rophako on Github: https://github.com/kirsle/rophako. The "default website" that comes with it isn't very polished yet; I literally just finished writing the code to support Kirsle.net. So, sometime later I'll tidy up the default website and have a working copy of it running on some subdomain like rophako.kirsle.net.
Anyway, this is the new CMS. I ported over all my old blog posts, comments, comment subscriptions, and things of the sort. All the old URLs should work too, due to my kirsle_legacy.py module in Rophako. If anybody finds any broken links or issues with the site, let me know. :)
Update (4/9/14):
I've polished up Rophako's default site and have an example running here: http://rophako.kirsle.net/
That's the site you'd get if you download and install Rophako (minus the blog posts and photos ;) ). So... the project is officially in "beta" status now and is usable!
UPDATE (June 12 2022): I wrote this blog post originally in 2014 and it's highly likely that Grindr's data folder on Android doesn't look anything like this anymore. I haven't rooted my Android phones in a long time and haven't run Grindr in several years either. I sometimes get emails from people asking for help getting into their Grindr cache -- I can't help you, and don't ask me about this. This blog post is very outdated, Grindr has gone thru several complete re-designs in the last 8 years and they've probably changed everything about their data folder layout.A long time ago, the Grindr for Android app used to store its photo cache on your SD card, but lately they hid them away in the app's private space to make them slightly more difficult to get to. I decided to go exploring using Root Browser and see what I could find out.What you can do if you want to look into this yourself is: root your Android phone, look in your /data/data folder for Grindr's app data, copy it out to your PC and go thru it yourself. The
filecommand on a macOS or Linux terminal can tell what type of file something is regardless of its extension (in this post, many JPEG photos were named with ".1" file extensions instead of .jpeg and Linux easily ferreted this out).Also note that rooting your Android phone may require a factory reset of the phone, so if it's your existing Grindr cache you want to get into, you may be out of luck. Google Pixel phones for example officially support unlocking the bootloader (necessary for flashing custom ROMs and root), but this action forces a factory reset for privacy (e.g. a thief stole your phone and wants to root it, which would let them bypass your lock screen, Google wants the phone to mandatorily reset to factory defaults before it can be rooted). Some phones with shadier root exploits may not need the factory reset. You're on your own either way. Don't ask me for support in rooting your phone or helping you hack Grindr.
When I say "photo cache" I mean the place where Grindr downloads pictures locally so that it doesn't need to keep redownloading everyone's pictures all the time and consuming a lot of unnecessary bandwidth. Grindr caches both profile pictures and pictures received over chat messages. They both go into the same place. So if you have access to that place, you can get high resolution copies of all pictures received over chat and have them on your PC. :)
First of all, you'll need a rooted Android device for this, because the Android OS normally doesn't allow apps to get into each other's private data folders. The Root Browser app is a file browser that's root-aware (so it will prompt for root permission when you attempt to open a folder that ordinarily you can't open without root).
So, without further ado, Grindr's photo cache is located at /data/data/com.grindrapp.android/cache/picasso-cache/. This folder may contain a lot of files, mine had 3,458 and so Root Browser took a while to load that folder. You can copy it somewhere under /mnt/sdcard and then get to your files from a PC that way. Make sure the files are no longer owned by "root" when put in the SD card part, or you may run into issues when accessing them from your PC.
Most of the files in this folder have hexadecimal names that appear to be hashes of some sort, and the names usually come in pairs, one with a ".0" file extension and the other with a ".1", for example one I found on my phone was 4e21d675447678d0493bc8cb41a56e8d.0.
The ".0" file is a plain text file, and most of the ".1" files are the JPEG images. I use Linux, and my file browser automatically identified the types of all the files and showed thumbnail images for all the ".1" files. So, most of the time if you rename one of the ".1" files to have a ".jpg" extension you can see the images under Windows.
Some of the .1 files aren't images though. Some are more text files, and I peeked inside one to see what it was:
$ cat c1749deee81d4fece16d836e177c5852.1

[{"messageId":16970,"title":"Calling All DJs & Bartenders","body":"Are you one of the sexiest DJs or bartenders and able to work a paid event on the afternoon of April 27th in Palm Springs?  If so, send us your information and a link to your website to [email protected] or simply tap 'More' to email us directly. ","actionTitle":"More", "dismissTitle":null, "expirationDate":1396853940000, "url":"mailto:[email protected]"}]
These appear to be the broadcasted pop-up messages shown in the app sometimes.
Now, the other interesting files are the ones with the ".0" extensions. These appear to be debug information, and they're basically the full HTTP request dump used to download the ".1" file. Here's what the one looked like for my profile picture (in case the Grindr CDN link stops working and you're curious, it's this picture):
$ cat 4e21d675447678d0493bc8cb41a56e8d.0
http://cdns.grindr.com:80/images/profile/1024x1024/d8dfd4eb2abd9c4d29653587cc87912b393bac97
GET
0
HTTP/1.1 200 OK
14
Accept-Ranges: bytes
Content-Length: 72057
Content-Type: image/jpg
Date: Fri, 04 Apr 2014 20:09:05 GMT
Etag: "98af07f8697f854734874296a90c640f"
Last-Modified: Sat, 01 Mar 2014 22:05:22 GMT
Server: ECS (lax/2851)
x-amz-id-2: [REDACTED]
x-amz-request-id: [REDACTED]
X-Android-Received-Millis: 1396642144430
X-Android-Response-Source: CONDITIONAL_CACHE 200
X-Android-Selected-Transport: http/1.1
X-Android-Sent-Millis: 1396642144347
X-Cache: HIT
I edited-out the "x-amz" headers because I'm not sure how secret those are supposed to be.
When browsing through my cache folder I also saw some pictures that weren't profile pics, but were sent over chat messages. These always seem to be the full resolution of the original pic sent, i.e. not thumbnails or anything. The ".0" file looks the same as for a profile picture, except the URL downloaded begins with "http://cdns.grindr.com:80/grindr/chat/" and the server headers respond with a "Content-Type: binary/octet-stream" (which causes a web browser to download the picture to disk instead of displaying it in the browser).
Some of the ".1" files are actually empty (0 bytes), and their .0 files indicate that these are the ad banners (requesting a URL from googleads.g.doubleclick.net). So it looks like whatever system in Grindr is responsible for downloading pictures also sorta deals with downloading ad banners, except it doesn't actually save the banner into the cache folder.
The last somewhat not-very-interesting file in the cache folder is called "journal", and it's a text file. By reading the first couple lines, it appears to be part of libcore.io.DiskLruCache, a bit of Java code that provides a rotating offline cache. This probably means that, if Grindr's cache folder fills up, it will automatically remove old files to make room for new ones, so it can keep its overall disk usage under control automatically. The journal file appears to list the hash names of all the other files in the folder, along with words like "CLEAN", "DIRTY", and "REMOVE".
That's right, the Windows Live Messenger protocol is still perfectly alive and well today. A while back, I booted my Windows OS on my PC where I still had Pidgin set up to sign me into MSN, and surprisingly it still worked. One of my Skype contacts sent me a message over Pidgin, and their "MSN e-mail address" had an "@SkypeDomain.fakedomain" domain part. It seems that now, though, while the MSN servers are still up, they at least block non-Chinese users from authenticating (Pidgin says "invalid response from server").
The Skype/MSN merger was done in a pretty half-assed way by Microsoft:
I don't get why Microsoft doesn't just pull the plug on MSNP completely, and force everyone to get a Skype name if they don't already have one linked with their MSN accounts.
It requires you to have operator rights on the server, and it involves command blocks. Give yourself a command block by typing the command /give your_name command_block, and place it somewhere in the center of the area you don't want being griefed. I usually will hide it just below the ground, or in a small hidden-away room in the middle of a building or something. Right-click it, and enter this command:
effect @a[m=0,r=36] 4 2 5 trueWhen activated, this command will apply a status effect to all Survival Mode players (
m=0), within a radius of 36 blocks from the command block (r=36). The effect will be Mining Fatigue (effect ID 4), level 5, which will last for 2 seconds. The word "true" at the end will hide the particle effects (supported in Minecraft 1.8+; for older versions, remove the word "true" from the command). See Status effect on the Minecraft wiki for details.Mining Fatigue slows down the player's mining speed by 20% per level, so at level 5 your speed is slowed by 100%. What this basically means is that nobody can break anything while under Mining Fatigue 5. You can't even break a dandelion using a diamond axe. It makes the area completely grief-proof.
Adjust the radius to however large you think you'll need to cover the entire area you want protected. If the area is very large (i.e. so that the command block might end up being unloaded from memory when its chunk goes away), you'll need multiple command blocks positioned around the area to make sure the Mining Fatigue is still in effect.
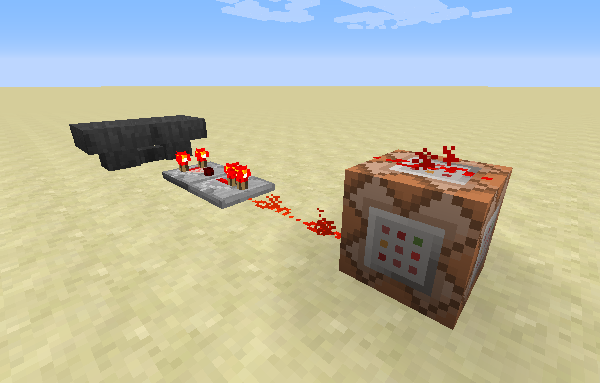
Anyway, now you just need to hook up the command block to a redstone clock so that it's triggered repeatedly. My favorite is to just use a hopper clock. A comparator clock has too fast of a pulse and the command block will never be executed.
With a hopper clock, just place two hoppers that connect to each other. For example, place a normal block like stone, and then with a hopper, right-click on the side of the stone block so the bottom of the hopper connects to the side. Remove the stone block, go to the side where it used to be, and hold down Shift and right-click the hopper to attach the second one.
Edit for 1.8: It seems the timing has been changed in hoppers on Minecraft 1.8, and a two-hopper clock is "too fast" and won't trigger the command block repeatedly (it will trigger it one time and then never again). Instead of using 2 hoppers that feed into each other, you can use 4 hoppers that feed in a circle, each one connecting to the next one. This slows down the rate that the command block gets executed by 50% but it still works in Minecraft 1.8.
Put a single item into one of the hoppers. If it worked, the item should disappear from the hopper's GUI and then reappear shortly after; the item is being passed back and forth between the hoppers. Now, pick one hopper and put a comparator and then a repeater next to it. Whenever this hopper has the item, the comparator will get a signal and the repeater will amplify it. And there you go. Here's a screenshot of the full setup:
What about creepers and endermen?
Even if you prevent players from destroying blocks manually, they could still lure a creeper in and cause it to explode and damage the nearby blocks. In Minecraft 1.8+ you can select entities by type using command blocks, so you may wanna add some more command blocks to killl any creepers or endermen that get too close (the endermen are optional, but if your build involves a lot of natural blocks like dirt and sand you may wanna keep them away too):
Creepers: kill @e[type=Creeper,r=36]
Endermen: kill @e[type=Enderman,r=36]
You may also be able to do the same for the `PrimedTnt` entity but that may be trickier considering the speed at which TNT can be launched. You'd need a particularly fast redstone clock to keep up.
It's a Python app that wraps the Minecraft server and makes the server console available over a separate TCP socket (with password authentication, of course).
This allows you to telnet in to this TCP port, provide the password (or a challenge-response hashed version of it), and then you get access to the Minecraft server console. Anything the server outputs is broadcasted to all authenticated clients, and anything the clients send is sent to the Minecraft server. But the real strength in this isn't necessarily just being able to see and type commands into the server console (you can do this at the local shell running the server normally); it's for programs to do this automatically!
For example, you can have a whitelist of users who aren't operators, but you want them to be able to say for example !creative in the server chat window, and have their game mode switched to creative. This is one of the example scripts I included in my project, actually!

And as a more eccentric example, I connected a simple RiveScript bot to this so that it can chat with players using the in-game chat system:

You can get the source code and play around with this yourself at minecraft-control on GitHub!
0.0013s.