Update (Oct 2021): while this blog post is obviously VERY old now, describing a version of Android from almost a decade ago, the basic steps still apply; android-x86.org still produces Android x86 images for modern versions of Android and they still install the same.This information is a little hard to find on the Internet. This is how to install Android 4.0 (Ice Cream Sandwich) in VirtualBox, in a "do it yourself" way (installing from an ISO image). There are some people who have made pre-installed VirtualBox images, but one problem you may run into going that route is that the Android serial number will match everybody else who's using the same image as you, since Android generates this number on its first boot.Sometimes they include Gapps out of the box, sometimes not, google around if they don't and you need them. I haven't played with Android-x86 in some years now, the last image I did install (around 2019) had Gapps and I used this VM to manage my Google WiFi routers because my primary Android phone was de-googled and could not use the Google WiFi app. Your mileage may vary.
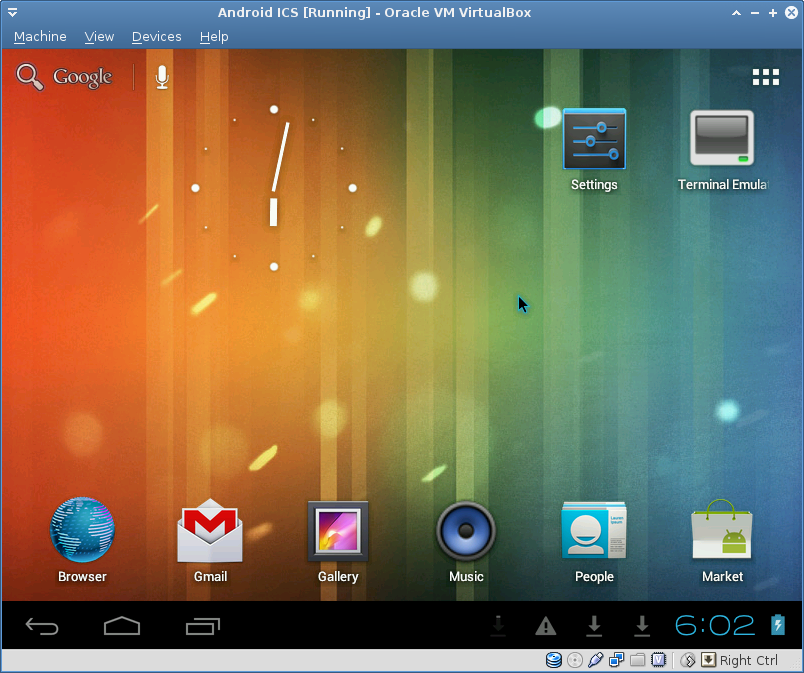
Screenshot of my Android VM. Click for bigger version.
Apparently, the official Release version of Android 4.0 from android-x86.org should work completely out-of-the-box in VirtualBox: android-4.0-r1. I have an older development release linked later in this post that was built specifically for VirtualBox, which is what this post was originally written about. The Release version of Android 4.0 also contains Google Play and the other Google apps out of the box, so you can skip the part about installing the Google apps later. Thanks @DrDeve for pointing this out!
(Update 8/30/13)
This blog post is about a very particular build of Android 4.0 that is linked to later in this post. The instructions that follow are known to work when installing from that ISO image. There does exist Android 4.3 ISOs from android-x86.org and when I tested them, a lot of stuff seemed to just work out of the box in VirtualBox, but this blog post isn't about Android 4.3.
Also, if you're using a different Android 4.0 ISO you found somewhere else, there's no guarantees it will work very well for you. Networking and audio are some of the biggest problems I've seen in Android virtualization. So, before you ask me for help with installing or getting the networking to work (hint: networking should just work with no extra fuss), make sure you're actually using the ISO image linked later in this blog and not some other random one. The one I have was designed specifically for VirtualBox and it works.
The folks at Android-x86 have been making x86 builds of the Android OS for quite a while now, and none of this would be possible without them. They have ISO images for various versions of Android available, but most of them don't work very well in VirtualBox. For example, their "eeepc" image for Android 4.0 has issues with the audio drivers and the network (it has no Ethernet support built in, etc.)
So this means using one of the Android-x86 images from there won't get you too far because audio and networking won't work. Fortunately, somebody has put together an ISO image that's been custom tailored to VirtualBox. I don't remember where I found this ISO image; if it's yours, leave me a comment and I'll edit this post. ;) I found the ISO here: android-x86 VirtualBox/VMWare support (thanks @jakimfett!)
I have a copy of this ISO hosted here: android-x86-vm-20120130.iso (244MB). This ISO works much better.
Make sure you add the SATA Controller if it does not appear, when you setup the virtual box and then add the ISO image and virtual disk image to this.It worked for me as listed above (IDE CD drive, SATA hard disk), but this is something to keep in mind if you have any issues booting the CD or installing it to disk.If you try and add the ISO image and virtual disk image to the IDE Controller this will not work at.
This information maybe useful to someone making this mistake.
cfdisk.
Internet not working is often because the kernel has no driver for your NIC and / or you are in bridged mode(Update: 8/30/2013) This is a common question people have, is how does the Android VM's connection to the Internet work?The AMD-PCnet is the standard for virtual drivers for VB and VMware - including the heavy iron VmWare ESX -- no matter what you have installed switch VB settings to the PCnet driver and use NAT -- IT WILL JUST WORK IF YOU DO! Native drivers often dont start until you open VB settings box - quirky -- use the de-facto standard PCNET NIC driver.
I'd refer you to the VirtualBox documentation about networking, but briefly: configure your guest OS's network to use NAT mode. This is the simplest way to do it.
What happens in NAT mode is, Android will boot up, see an imaginary router handing out IP addresses, and get one. And, it doesn't matter what your real life network layout looks like (whether your physical computer is connected to Ethernet, Wifi, a 4G LTE dongle, dial-up modem, VPN), the Android virtual machine will always think it's connected to Ethernet. So, questions of "how do I connect to my Wifi?" don't make any sense when you understand how VirtualBox (and most other virtualization systems) work. If your host computer has an Internet connection, the virtual machine should have it as well, automatically.
This may be a bit confusing for Android users though because Android typically doesn't use Ethernet. The lock screen in the Android VM will say "No Internet connection", and in your settings, Wifi will probably be turned off and resist turning on. Completely ignore both of these things. The VM is using Ethernet for its connection, so just try opening the web browser and point to kirsle.net or something and see if it loads.
The Escape key on your keyboard corresponds to the Back key in Android. The context menu key on your keyboard corresponds to the Menu button in Android (the context menu key is usually next to the right Windows key).
To power off the VM, press HostKey+H. This will cause Android to pop up the shutdown dialog that you'd expect on a real phone. You can also use the "Machine->Send Shutdown Signal" to do the same.
Update (9/3/2013): @DrDeve mentions how to get out of the lock screen when Android's Powersave kicks in:
OK, one more thing I forgot -- PowersaveFor some darn reason you cant bring a VB ICS 4.0.4 build out of powersave (hybernation for my Windows friends) by clicking on the video screen.
So if your VM goes into lockscreen while you are playing a game or something, after stopping for about 2 min (time to lock is configuratble in Settigns)
You will need to press on the right menu key several times, once only shows a lockscreen "ping"
the menu key is the key between the right hand alt and Ctrl keys on most modern keyboards
have fun
The Doctor
You may notice that this Android VM doesn't include the Android Market, GMail, or Google Maps. These are some of the Google Apps and due to some licensing restrictions Android-x86 doesn't include them "out of the box".
On a real Android device that's been rooted and flashed with a custom ROM, you'd install the Google apps by flashing them in recovery mode. But you can't get into recovery mode on VirtualBox. Thus, the method for installing the Google Apps is kinda sketchy, but it works (and if you know of a better way, feel free to tell me).
You'll need a file with a name like "gapps-ics-20120304-signed.zip". These are the Google apps (the date part might be different). You can Google them, but I have a copy of them here to download too.
You don't really need the entire Google Apps file, actually. Just the "system" folder inside the zip file. Create a new tar file of the "system" folder so that it will be easy to get it into your Android device. I have a prepared "system.tar.gz" for you if you just want to use mine.
$ cd /sdcard/Download
$ tar -xzvf system.tar.gz
$ su
# cd /sdcard/Download
# cp -rf system/* /system/
Pay special attention to the
cp -rf command. Make sure the slashes and *'s are in the right places.Note: in my experience, the Market app will be somewhat unstable. When you start the app, it will Force Quit after 10 or 15 seconds. However, if you're fast enough you should be able to quickly search for a specific app you'd like and begin the download process before Market crashes, and the app will continue to download and install regardless.
I imagine that the unorthodox way of installing the Google Apps might be partly to blame for the Market being unstable. The other Google apps seem to work fine though.
The general steps are as follows. Substitute 1024x768 with whatever resolution you want. You can add multiple video modes by changing "CustomVideoMode1" to be "CustomVideoMode2", etc.
VBoxManage setextradata "Android ICS" "CustomVideoMode1" "1024x768x32"UVESA_MODE=1024x768 to the end of the boot arguments (make sure to hit Space first), and press Enter.Update (9/3/2013): @DrDeve mentions in the comments:
If you install GRUB bootloader you can hit e to edit like you say, or a, then press space and type vga=ask then press enter.a long list of VESA modes (and the color bits from 8-32) will be displayed. Not all will ork, so selecting one here, resetting the VM if it doesnt work BEFORE editing the config files may save you from bricking your new toy!
Each entry is a thre char hex value, follwed by the resolution, like 1024x768x32, etc.
Once you find a mode that works, THEN modify the config using the hex value that worked using the methods above.
You can als edit the GRUB menu.lst to add the value from the sceen above
- convert the hex value that worked to decimal (i.e. 360 becomes 864, etc).
- open terminal
- su
- cd /mnt/grub
- vi menu.lst
- add vga=864 to the end of the line that startes with "kernel", or if one is there, modify it
- save the file by entering :wqif you havent used vi before you might need a guide open beside you look here http://www.cs.colostate.edu/helpdocs/vi.html
Your mileage may vary.
I don't know how I missed this, but apparently VirtualBox finally supports a "Scale Mode."
I've always wanted this feature. Why, you ask?
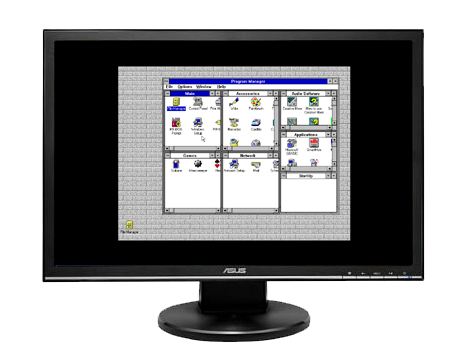
One easy example is for running an old operating system (older than Windows 2000) that isn't supported by VirtualBox, so that there are no Guest Additions for it. Guest Additions for supported OS's install extra drivers for the virtual machine, so that when you put VirtualBox into "Full Screen" mode, the guest OS will automatically increase its screen resolution to fit your display. When it can't do that, it will just display the screen at its literal resolution and put a black margin to fill in the extra space.
Here is an expertly Photoshopped demonstration of what I'm talking about. If you were running a Windows 3.1 virtual machine at an 800x600 screen resolution, and you put the VM full-screen, this is what it would look like on your 1366x768 monitor:
Another example: even on supported guests, running an older game like Starcraft (which runs in a resolution of 640x480) had this problem too: if the VM is running Full Screen and you start Starcraft... instead of the game's display stretching across your whole monitor, it stays at 640x480 pixels and is centered on the screen. This sucks.
So it seems VirtualBox has finally added Scale Mode (available in the "Machine" menu along side Full Screen and Seamless modes). There's one quirk to it, though: Scale Mode and Full Screen don't work together. On my system, going into Scale Mode put the virtual machine into a window on my screen. This window could be maximized, but it couldn't be made full screen. So that sorta sucks.
Luckily, my Linux window manager (xfwm4, the window manager of the XFCE desktop environment) supports putting any window full screen, whether the window wants it or not. This means the window decorations are taken away and the contents of the window are resized to fill the display. Success! I can now run full screen, scaled resolution guest operating systems. :)

Scale mode with xfwm4's full-screen option gives you a "native" experience.
With no 3D acceleration, the results are the same as before: a mostly black screen, can't really do very much with it. With VirtualBox's 3D acceleration enabled, it's similar to the result I had before... very frequently the majority of the desktop (besides a box around my desktop icons) and the whole shapes of windows have that "striped" blue texture all across them.
I say most of the time because it's sometimes possible to get a window to show its true contents and become usable by dragging it around and playing with it for a bit, but the effects usually don't last very long before the window loses its textures again. The scale effect of bringing up the main menu in GNOME Shell usually fscks up all windows you have open again.
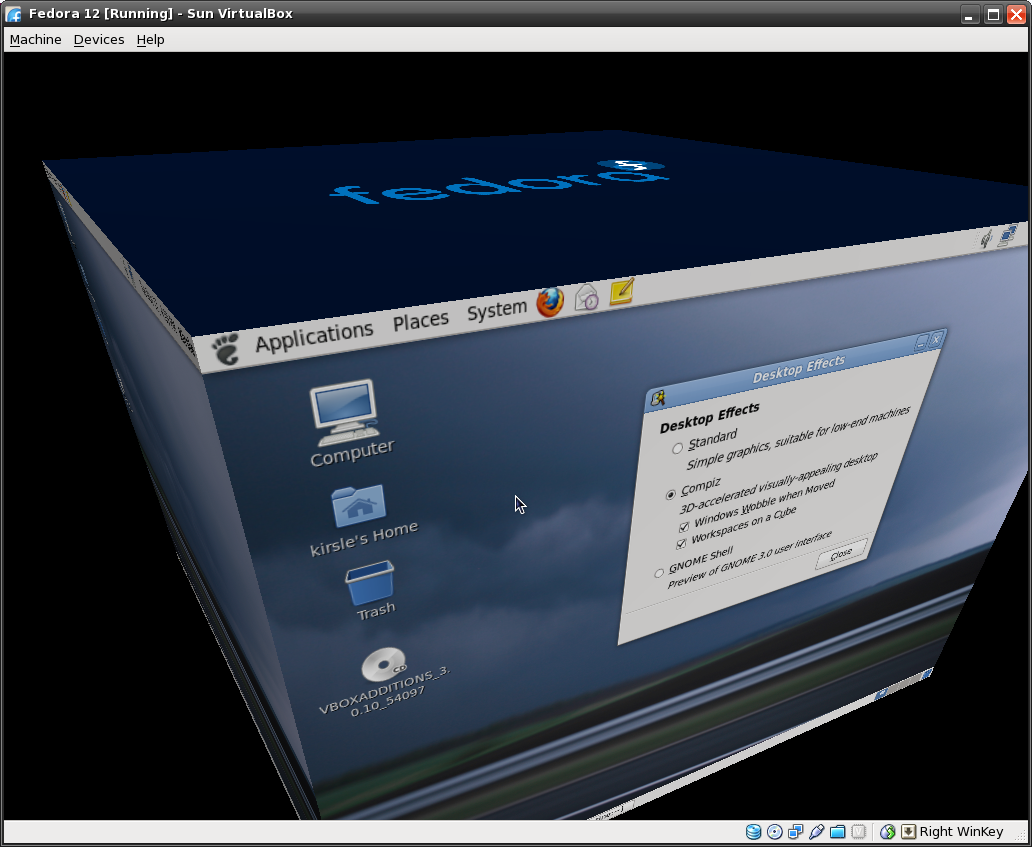
But the reason for this particular blog entry is that I also decided to test Compiz Fusion inside VirtualBox, on Fedora 12, under the same conditions as the GNOME Shell. I couldn't do this before because the beta version of Fedora 12 had some dependency issues, and Compiz conflicted with GNOME Shell; they couldn't co-exist together.
In Fedora 12 they can co-exist, and the Desktop Effects GUI window gives options to select either Compiz or GNOME Shell. Anyway, here's a screenshot. This is a real screenshot of Fedora 12 running in VirtualBox with full desktop effects active, including the 3D Cube effect.
vboxusers group.I remember that the ability to share USB devices with virtual machines used to be working "out-of-the-box" with VirtualBox and older versions of Fedora, but Fedora 11 complicates things a bit.
By default USB devices in virtual machines don't work; the menu lists all your USB devices as being greyed-out while the machine is running. It comes down to a permissions issue with the user you're logged on as. To fix:
1) Make sure your user belongs to the vboxusers group. Older versions of VirtualBox made this an absolute necessity (virtual machines wouldn't boot otherwise), but VirtualBox 3.0 seems to only create this group but not actually require your user to belong to it for the most part. Update: with current VirtualBox, this is all that's required; USB should be working after you do this and log out and back in. If not, continue reading.
2) Create a mount point directory for usbfs (I did mkdir /usbfs as root).
3) Edit /etc/fstab to add a line that mounts usbfs, giving the vboxusers group write permissions to the mount point. In my case vboxusers had a group ID of 501; check in /etc/group to see what your group's GID is:
# VirtualBox USB support
none  /usbfs  usbfs  rw,devgid=501,devmode=664 0 0
Change
/usbfs to the mount point you created in step 2, and change 501 to the group ID of the vboxusers group.
Now, you can either reboot or run mount -a as root (to reload the data from /etc/fstab). If you had to add your user to the vboxusers group because it didn't already belong to the group, you'll need to log out and back in again.
And now your virtual machines can access the USB devices.
0.0017s.
![]()