To get the basics out of the way first:
My particular laptop (the 13.3" variety) includes a 500GB hard drive and a 32GB SSD drive, which apparently is the ExpressCache drive. This is important.
So first, how to get Windows 8 to actually attempt to install. You can't just boot a vanilla DVD or USB, because the installer will see the OEM product key baked into the BIOS, and complain because it's for Core Edition and you're trying to install Pro Edition.
You need to make a USB installer for Windows 8 using the "Windows 7 DVD/USB Tool" (Google it). This is because you have to add a text file to the USB. You might be able to modify an ISO to add the text file to it, but you're on your own there.
Open Notepad, and create a text file named "PID.txt", and put this in as its contents:
[PID]
Value=XXXXX-XXXXX-XXXXX-XXXXX-XXXXX
Substitute the X's for your Windows 8 Pro product key. Place the text file in the Win8 USB under the "sources" directory, for example
D:\sources\PID.txtNow when you boot from the USB, Windows will use that product key instead of looking in the BIOS. And the installation will continue as normal.
But, it won't boot from disk after the installation is done. This is because the Windows Installer saw the 32GB ExpressCache disk, and it installed its bootloader onto that disk instead of onto the primary hard drive. The problem with this is that the BIOS on the laptop can't see the ExpressCache disk, and so it can't boot Windows from it.
I saw a couple solutions floating around the Internet for this. One solution said to format the ExpressCache disk with a Mac OS X file system, so that Windows wouldn't make use of it for its bootloader. You could probably format it with a Linux filesystem as well and get the same result. In this case, Windows 8 would've installed the bootloader directly onto the primary hard drive, and the BIOS would be able to boot it. This isn't much help to you, though, if you don't already have Windows installed to be able to format this partition.
What I did instead when I got to this point was... go ahead and install Linux. When I installed Windows 8, I gave it a 128GB partition on the hard drive. I gave Linux the remaining space to partition up as it pleases. When Linux installs the GRUB bootloader, it installs it onto the primary hard drive. This means the BIOS is able to boot GRUB... and, GRUB is able to see the Windows 8 Bootloader on the ExpressCache disk. Score! So now you can boot either Linux or Windows from GRUB.
This is what worked for me, anyway. If you don't wish to dual-boot Linux on your laptop, you may want to just boot a Linux LiveCD/USB, format the ExpressCache disk (/dev/sdb, probably) with a Linux filesystem like ext4, and then run the Windows installer again. Theoretically, Windows won't touch the ExpressCache disk to install its bootloader, and will install it on the primary disk. No guarantees that will work, though, as I haven't tested it.
I tend to prefer playing vanilla Minecraft and try to get away with it as much as I can, and as such I've been electing not to run Bukkit or any other custom servers ever since about Minecraft 1.4 came out.
Minecraft has Command Blocks nowadays, and you can do a lot of creative things with them to replicate the behavior you could get by using Bukkit plugins. I recently started a new "Swampcore" server... the name is borrowed from a popular server on Reddit when they set up a swamp superflat temporarily while they waited for Bukkit plugins to get updated for the latest version of Minecraft.
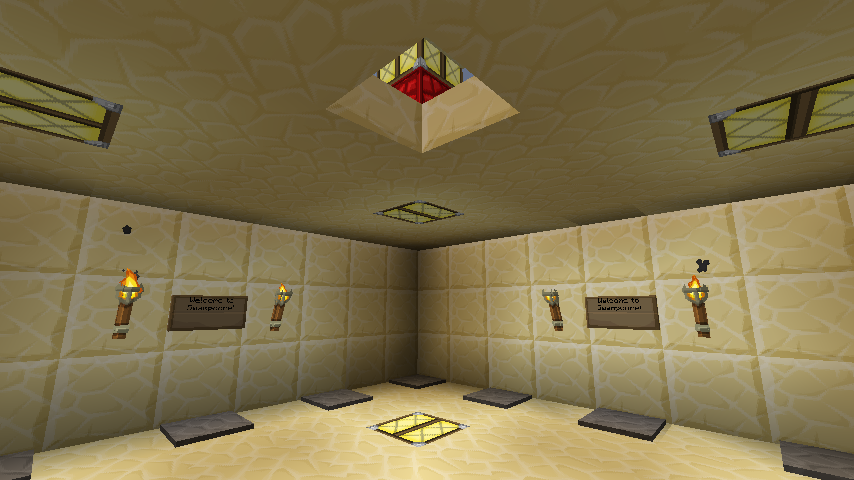
Their version of Swampcore had you spawn in a small enclosed room, lined with pressure plates by the walls which would teleport you to an unpredictable location within a large radius on the overworld. The idea was to evenly distribute the players, so that people wouldn't build too close to the spawn point and therefore be open to griefing by newly joining players. Also, Swampcore had a 24/7 thunderstorm, which prevents mobs from burning up during the day and even allowed them to spawn in the middle of the day. I've managed to more or less copy all of this behavior using nothing more than the vanilla server, and here's how I did it:
First, the superflat preset I'm using is this:
2;0,49,1,2x7,3,2;6;biome_1,decoration,lake,lava_lakePut simply, from the bottom up you have: 1 layer of air, 1 layer of obsidian, 1 layer of stone, 2 layers of bedrock, 1 layer of dirt, and 1 layer of grass. It's set in a swamp biome, with lakes and lava lakes, and sometimes the stone blocks (around lava lakes for example, or in the stone layer) might spawn ores.
So, go into creative mode and find the world's spawn point (give yourself a compass and go to where the needle points to, until you get to the point where the needle flips the opposite direction when you cross onto the next block). This is the center of the spawn point.
The server's spawn protection radius should be reasonably large (16 blocks should do). The protection radius basically prevents any users who aren't the operator from being able to change any blocks (destroy or place any). It also prevents them from activating any redstone devices except for pressure plates. They couldn't even open wooden doors in the protection zone.
Build a bunker out of bedrock. Here's what mine looked like:
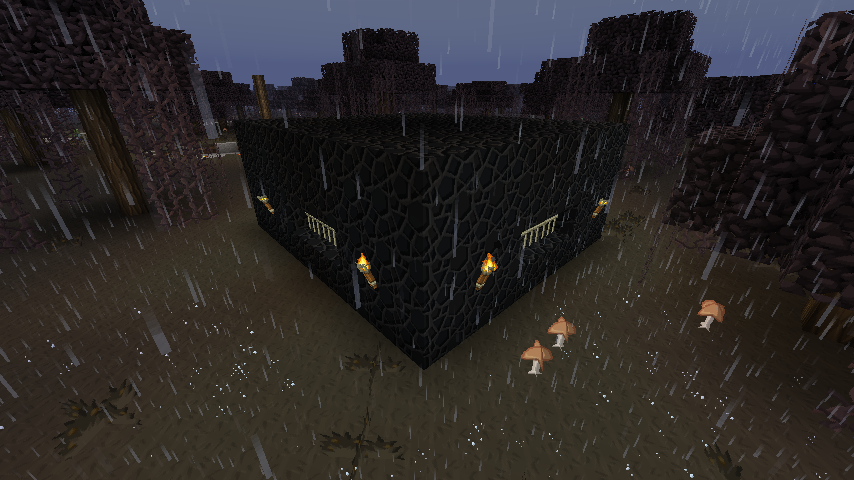
(Click this and other screenshots for full size versions)
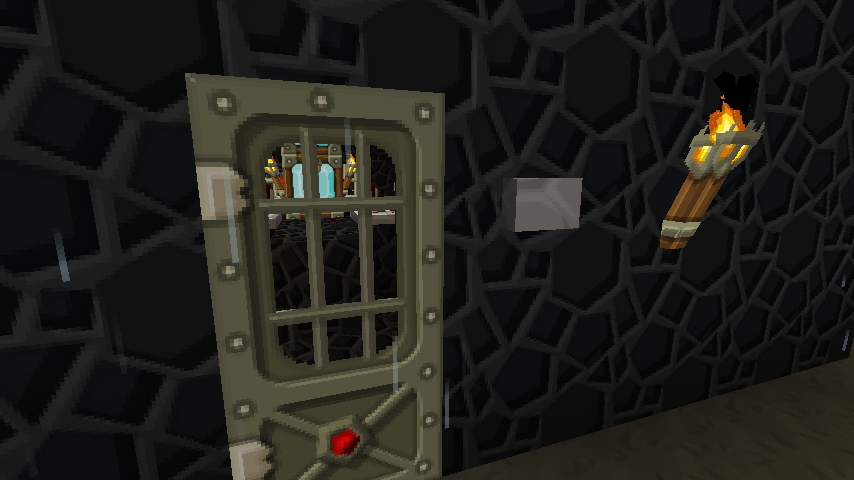
I put an iron door on my bunker and have a stone button that opens it. The button couldn't be activated by a non-operator, and as you'll see shortly, it should be unreasonably difficult for a non-operator to grief your bunker by having a creeper explode next to it.
Inside the bunker, build a redstone circuit designed to run on an infinite loop. I put a bunch of repeaters around, all set to the longest delay (right click 3 times), to keep the loop from bunching up on itself. When you're ready (not yet!), you'll place a redstone torch on the raised bedrock block and then immediately destroy it, so that it's only there long enough to give a quick pulse to the circuit and get it started.
Pro Tip: the 5x5 chunk radius surrounding the spawn point is always loaded in memory. Any redstone circuit that runs there will never be unloaded from memory even if all the players wander far away, so it's a good place to put your infinitely looping circuits that enforce "rules" on your server. The spawn protection radius is icing on the cake as well, as it automatically protects your circuit from being interfered with by other players (note that creepers and TNT launched from outside the protected zone can still damage the protected blocks).
In part of the circuit, make sure the redstone runs over the top of a command block. Use /give <your name> 137 to give yourself a command block to place. You'll definitely need to be an operator and in creative mode to set the command on the block. Hint: you can place redstone on top of the block by holding down the Shift key while you place the redstone.
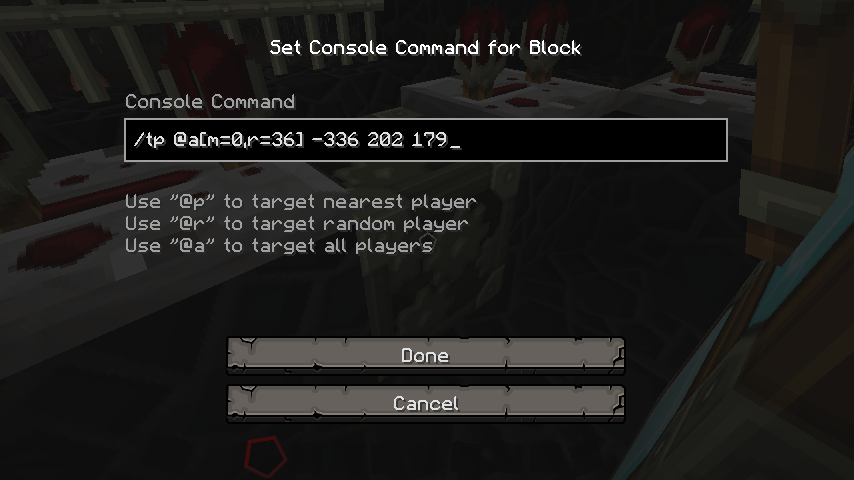
The command I have here is this:
/tp @a[m=0,r=36] -336 202 179This command will teleport all Survival Mode players (m=0), within a radius of 36 blocks from this command block, up to the coordinates -336, 202, 179. These coordinates in my case are, the spawn point, 202 blocks up into the sky.
The radius is set to 36 to make sure it fully encompasses the entire spawn region of the server. So anybody who joins the server or dies without a bed, they'll spawn on the surface (probably) within this radius and be immediately sniped up to the teleport spot. Players in Creative Mode are not affected, so that the operator can still get into the bedrock bunker to restart the redstone circuit in case it fails for any reason, or whatever.
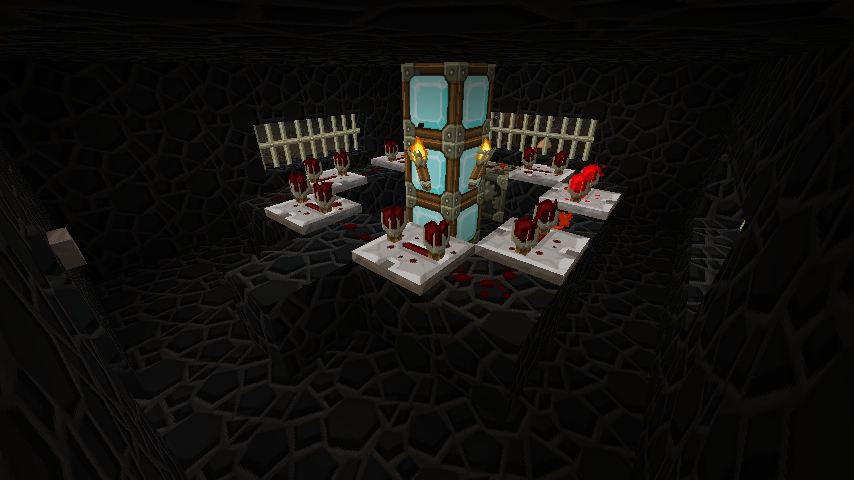
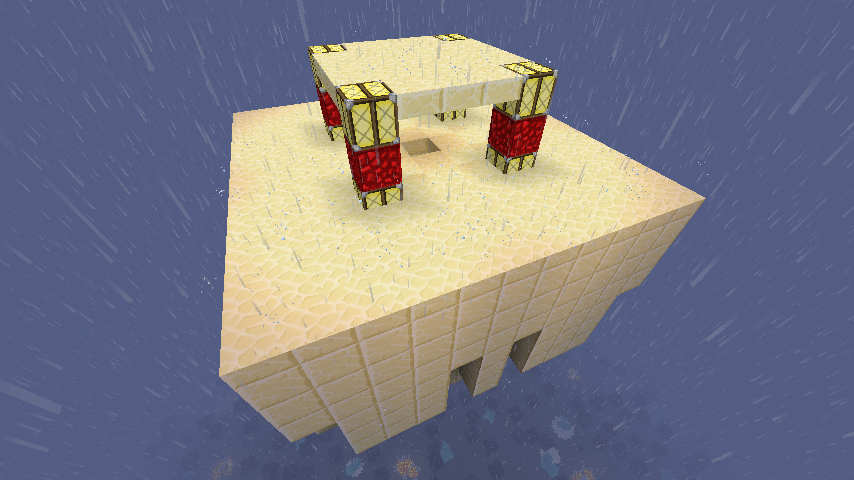
Up in the sky above the spawn point, I built this floating room:
The floor of this room is at Y=200... I set the command block on the surface to teleport players to Y=202 just to have them off the floor a little bit. YMMV.
This room is a lot like their Swampcore server. It's a radially symmetrical room (looks the same on all 4 sides) with command blocks surrounding the perimeter. This is so that when you die and respawn and come back to this room, it won't be easy to know which pressure plate you used the last time. Even if you remember you "used the one in the middle", you still only have a 25% chance of guessing the same exact one as last time. The pressure plates are all rigged to command blocks to teleport players to a spot within a large radius, to evenly distribute them across the overworld.
Here is a view of this floating room from above. I put a roof area and a hole to drop down into the room just in case a user happens to spawn on top of the roof, instead of somewhere on the surface near the bedrock bunker. Hey, it happens. Note that since this room is still within the spawn protection zone, the blocks can't be destroyed or altered by the players unless they're operators. And since the room is so high in the air, the odds of getting a creeper up here, or launching TNT into the spawn region from outside to damage the room are extremely low.
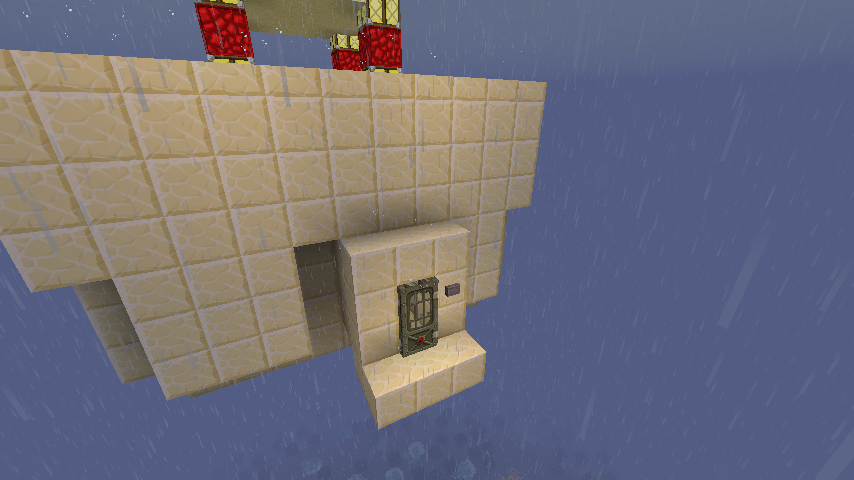
Just like with the bedrock bunker, I have an iron door with a stone button for maintenance work (if needed) for the server operator. Even if a survival mode player spawns on the roof and drops down to this door, they can't get inside because of the protection radius.
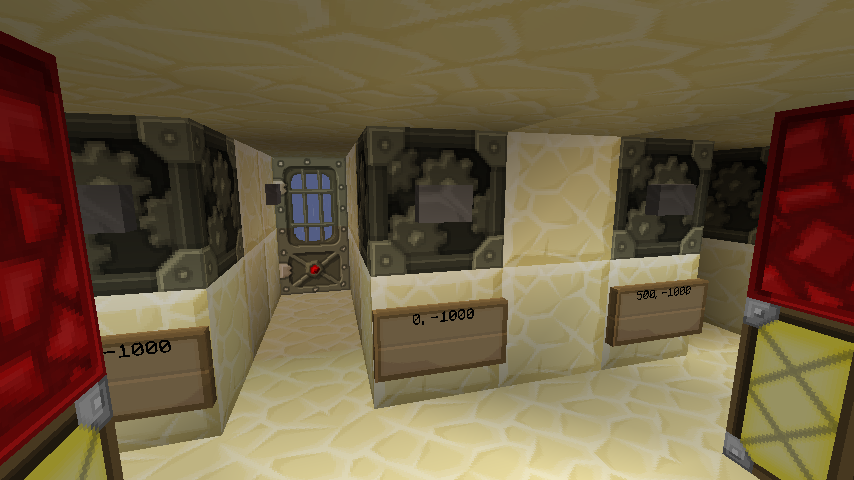
This is a view from inside the maintenance room, directly below the main spawn room. These are all the command blocks that are positioned underneath the pressure plates above. I placed wooden signs under each command block that tells me the coordinates that the block will teleport you to. I also placed stone buttons on the side of the block (hint: hold down Shift to place the buttons), for testing purposes. Both the button and the pressure plate above will activate the command block.
The commands I used on these blocks are along these lines:
/tp @p 500 7 -1000This teleports them to Y=7 (the level of the surface in my world), at the X/Y coordinates that are mentioned on the wooden signs below the command block. The
@p targets the nearest player, which will usually be the one standing on the pressure plate above.And that's all there is to it. If players find their way back to the spawn region, they can't get anywhere near the bunker without being teleported back up to the welcome room. The only way they could attack the bunker would be to somehow fling TNT over 36 blocks towards the bunker (an amazing feat in itself), but it being made of bedrock they wouldn't be able to do a whole lot of damage to it. The only way they could attack the welcome room would be to build up a super large tower to the top of the world, build a bridge as close as they're allowed to (within what the spawn protection radius will allow), and then fling TNT from all the way over there. If you set your radius high enough, even this will be highly impractical.
As for the 24-hour thunder storm... you could use another command block down in the bedrock bunker that does /weather thunder to make sure the weather stays tempestuous. Personally, I have a cron job that runs my make-it-rain script every 2 minutes. This is my cron entry for anyone interested:
*/2 * * * * /home/minecraft/bin/make-it-rain swampcore thunder 9000
pp is the best fully-open-source way to build a stand-alone .exe file from a Perl script, which doesn't require a Perl installation to run). I had installed pp on Windows a long time ago, but the process seems to have changed a bit so here's my experience doing it now, what problems I ran into, and how I fixed them.Versions:
ppm install Win32-Exe.
nmake binary from Microsoft, which replaced the usual make command from Unix. But, it seems Microsoft has pulled this download offline and they want you to install some kind of Visual Studio Express app that provides a newer version of nmake. I ended up finding a copy of nmake somewhere else on the Internet, which I've hosted here: nmake15.zip (NOTE: You might not need nmake, I later found out ActivePerl comes with dmake which worked for installing other modules, YMMV).
The only modules I needed to manually install (perl Makefile.PL; nmake; nmake install) were Module::ScanDeps and PAR::Packer, but running nmake gave this rather cryptic error message:
to undefined at C:/Perl/lib/ExtUtils/Install.pm line 1208I found this relevant Perlmonks article. What I needed to do was open the Makefile (not Makefile.PL; the one with no extension) in Wordpad, and do a Find/Replace of
{{@ARGV}} to {@ARGV}, and then nmake ran just fine.For my project I needed to manually install Template::Toolkit, and the Makefile.PL told me to run dmake. Running this worked just fine without requiring me to manually modify the Makefile. If this is available, I imagine it would probably work better for you then nmake.
Anyway, after installing PAR::Packer's dependencies, PAR::Packer installed and ran just fine.
/etc/yum.repos.d directory, and then yum install steam. When I originally wrote this post, Spot's steam repo was gone (that link gave a 404).
Just a quick post about how to install the Steam for Linux client on 64-bit Fedora Linux.
This works for Fedora 17 x64. I'm not sure it will work in Fedora 18 or later versions when they come out, but I'll probably test that at some point too and update this post.
NOTE: It should go without saying, but the terminal commands I list below begin with a $ sign -- you don't type this symbol. That represents your prompt. So when it says "$ yum install ..." you just type "yum install ..."
steam.deb Ubuntu package (currently, Steam only officially supports Ubuntu 12.04) - link that works as of the time of this writing.file-roller. Extract data.tar.gz from the .deb file.data.tar.gz somewhere like ~/steam - put it in an empty folder, so after extracting, this folder will only contain the directories "etc" and "usr"$ sudo cp -r * /$ sudo yum -y install libpng.i686 libpng-compat.i686 gtk2.i686steam command in your terminal, or via your application menu.xorg-x11-drv-nvidia-libs.i686 for recent NVIDIA video cards (assuming of course you're using kmod-nvidia and not the default nouveau drivers!). You're on your own here though, but this Crossover Wiki page may help.
$HOME/.local/share/Steam/ubuntu12_32env LD_LIBRARY_PATH="$PWD:$LD_LIBRARY_PATH" ldd steamui.so | grep "not found"libgtk-x11-2.0.so.0 => not found", run this command to identify the package in Fedora that provides that file:yum provides '*/libgtk-x11-2.0.so.0'
gtk2-2.24.10-1.fc17.i686 : The GIMP Toolkit (GTK+), a library for creating GUIs for X (there will also be a ".x86_64" version, but we don't care about those because we need the 32-bit libraries).sudo yum install gtk2.i686 -- make sure to include the .i686 part, otherwise Fedora will just assume you want 64-bit because it matches your current architecture.Update (Oct 2021): while this blog post is obviously VERY old now, describing a version of Android from almost a decade ago, the basic steps still apply; android-x86.org still produces Android x86 images for modern versions of Android and they still install the same.This information is a little hard to find on the Internet. This is how to install Android 4.0 (Ice Cream Sandwich) in VirtualBox, in a "do it yourself" way (installing from an ISO image). There are some people who have made pre-installed VirtualBox images, but one problem you may run into going that route is that the Android serial number will match everybody else who's using the same image as you, since Android generates this number on its first boot.Sometimes they include Gapps out of the box, sometimes not, google around if they don't and you need them. I haven't played with Android-x86 in some years now, the last image I did install (around 2019) had Gapps and I used this VM to manage my Google WiFi routers because my primary Android phone was de-googled and could not use the Google WiFi app. Your mileage may vary.
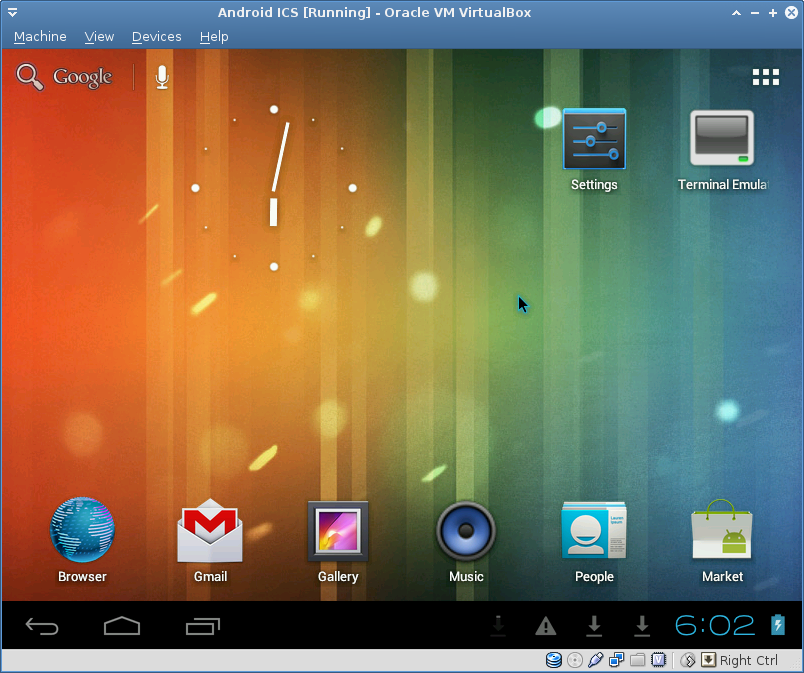
Screenshot of my Android VM. Click for bigger version.
Apparently, the official Release version of Android 4.0 from android-x86.org should work completely out-of-the-box in VirtualBox: android-4.0-r1. I have an older development release linked later in this post that was built specifically for VirtualBox, which is what this post was originally written about. The Release version of Android 4.0 also contains Google Play and the other Google apps out of the box, so you can skip the part about installing the Google apps later. Thanks @DrDeve for pointing this out!
(Update 8/30/13)
This blog post is about a very particular build of Android 4.0 that is linked to later in this post. The instructions that follow are known to work when installing from that ISO image. There does exist Android 4.3 ISOs from android-x86.org and when I tested them, a lot of stuff seemed to just work out of the box in VirtualBox, but this blog post isn't about Android 4.3.
Also, if you're using a different Android 4.0 ISO you found somewhere else, there's no guarantees it will work very well for you. Networking and audio are some of the biggest problems I've seen in Android virtualization. So, before you ask me for help with installing or getting the networking to work (hint: networking should just work with no extra fuss), make sure you're actually using the ISO image linked later in this blog and not some other random one. The one I have was designed specifically for VirtualBox and it works.
The folks at Android-x86 have been making x86 builds of the Android OS for quite a while now, and none of this would be possible without them. They have ISO images for various versions of Android available, but most of them don't work very well in VirtualBox. For example, their "eeepc" image for Android 4.0 has issues with the audio drivers and the network (it has no Ethernet support built in, etc.)
So this means using one of the Android-x86 images from there won't get you too far because audio and networking won't work. Fortunately, somebody has put together an ISO image that's been custom tailored to VirtualBox. I don't remember where I found this ISO image; if it's yours, leave me a comment and I'll edit this post. ;) I found the ISO here: android-x86 VirtualBox/VMWare support (thanks @jakimfett!)
I have a copy of this ISO hosted here: android-x86-vm-20120130.iso (244MB). This ISO works much better.
Make sure you add the SATA Controller if it does not appear, when you setup the virtual box and then add the ISO image and virtual disk image to this.It worked for me as listed above (IDE CD drive, SATA hard disk), but this is something to keep in mind if you have any issues booting the CD or installing it to disk.If you try and add the ISO image and virtual disk image to the IDE Controller this will not work at.
This information maybe useful to someone making this mistake.
cfdisk.
Internet not working is often because the kernel has no driver for your NIC and / or you are in bridged mode(Update: 8/30/2013) This is a common question people have, is how does the Android VM's connection to the Internet work?The AMD-PCnet is the standard for virtual drivers for VB and VMware - including the heavy iron VmWare ESX -- no matter what you have installed switch VB settings to the PCnet driver and use NAT -- IT WILL JUST WORK IF YOU DO! Native drivers often dont start until you open VB settings box - quirky -- use the de-facto standard PCNET NIC driver.
I'd refer you to the VirtualBox documentation about networking, but briefly: configure your guest OS's network to use NAT mode. This is the simplest way to do it.
What happens in NAT mode is, Android will boot up, see an imaginary router handing out IP addresses, and get one. And, it doesn't matter what your real life network layout looks like (whether your physical computer is connected to Ethernet, Wifi, a 4G LTE dongle, dial-up modem, VPN), the Android virtual machine will always think it's connected to Ethernet. So, questions of "how do I connect to my Wifi?" don't make any sense when you understand how VirtualBox (and most other virtualization systems) work. If your host computer has an Internet connection, the virtual machine should have it as well, automatically.
This may be a bit confusing for Android users though because Android typically doesn't use Ethernet. The lock screen in the Android VM will say "No Internet connection", and in your settings, Wifi will probably be turned off and resist turning on. Completely ignore both of these things. The VM is using Ethernet for its connection, so just try opening the web browser and point to kirsle.net or something and see if it loads.
The Escape key on your keyboard corresponds to the Back key in Android. The context menu key on your keyboard corresponds to the Menu button in Android (the context menu key is usually next to the right Windows key).
To power off the VM, press HostKey+H. This will cause Android to pop up the shutdown dialog that you'd expect on a real phone. You can also use the "Machine->Send Shutdown Signal" to do the same.
Update (9/3/2013): @DrDeve mentions how to get out of the lock screen when Android's Powersave kicks in:
OK, one more thing I forgot -- PowersaveFor some darn reason you cant bring a VB ICS 4.0.4 build out of powersave (hybernation for my Windows friends) by clicking on the video screen.
So if your VM goes into lockscreen while you are playing a game or something, after stopping for about 2 min (time to lock is configuratble in Settigns)
You will need to press on the right menu key several times, once only shows a lockscreen "ping"
the menu key is the key between the right hand alt and Ctrl keys on most modern keyboards
have fun
The Doctor
You may notice that this Android VM doesn't include the Android Market, GMail, or Google Maps. These are some of the Google Apps and due to some licensing restrictions Android-x86 doesn't include them "out of the box".
On a real Android device that's been rooted and flashed with a custom ROM, you'd install the Google apps by flashing them in recovery mode. But you can't get into recovery mode on VirtualBox. Thus, the method for installing the Google Apps is kinda sketchy, but it works (and if you know of a better way, feel free to tell me).
You'll need a file with a name like "gapps-ics-20120304-signed.zip". These are the Google apps (the date part might be different). You can Google them, but I have a copy of them here to download too.
You don't really need the entire Google Apps file, actually. Just the "system" folder inside the zip file. Create a new tar file of the "system" folder so that it will be easy to get it into your Android device. I have a prepared "system.tar.gz" for you if you just want to use mine.
$ cd /sdcard/Download
$ tar -xzvf system.tar.gz
$ su
# cd /sdcard/Download
# cp -rf system/* /system/
Pay special attention to the
cp -rf command. Make sure the slashes and *'s are in the right places.Note: in my experience, the Market app will be somewhat unstable. When you start the app, it will Force Quit after 10 or 15 seconds. However, if you're fast enough you should be able to quickly search for a specific app you'd like and begin the download process before Market crashes, and the app will continue to download and install regardless.
I imagine that the unorthodox way of installing the Google Apps might be partly to blame for the Market being unstable. The other Google apps seem to work fine though.
The general steps are as follows. Substitute 1024x768 with whatever resolution you want. You can add multiple video modes by changing "CustomVideoMode1" to be "CustomVideoMode2", etc.
VBoxManage setextradata "Android ICS" "CustomVideoMode1" "1024x768x32"UVESA_MODE=1024x768 to the end of the boot arguments (make sure to hit Space first), and press Enter.Update (9/3/2013): @DrDeve mentions in the comments:
If you install GRUB bootloader you can hit e to edit like you say, or a, then press space and type vga=ask then press enter.a long list of VESA modes (and the color bits from 8-32) will be displayed. Not all will ork, so selecting one here, resetting the VM if it doesnt work BEFORE editing the config files may save you from bricking your new toy!
Each entry is a thre char hex value, follwed by the resolution, like 1024x768x32, etc.
Once you find a mode that works, THEN modify the config using the hex value that worked using the methods above.
You can als edit the GRUB menu.lst to add the value from the sceen above
- convert the hex value that worked to decimal (i.e. 360 becomes 864, etc).
- open terminal
- su
- cd /mnt/grub
- vi menu.lst
- add vga=864 to the end of the line that startes with "kernel", or if one is there, modify it
- save the file by entering :wqif you havent used vi before you might need a guide open beside you look here http://www.cs.colostate.edu/helpdocs/vi.html
Your mileage may vary.
That said, onward to the blog post...
This information is ridiculously hard to find on the Internet.
I was playing with Chromium OS using the Lime build provided by Hexxeh. The Lime build is the same as the Vanilla build (i.e. upstream Chromium source code built daily), but it has more driver support, and it's the only build that works with the wifi on my Dell Mini 9.
Getting it onto a flash drive and booting from it was easy enough just following the directions on Hexxeh's site, but actually installing it to the hard drive was a bit more difficult. It was hard to find any up-to-date information online; most bloggers were talking about Hexxeh's old "Flow" builds, so the instructions were outdated. When I specifically googled how to install the Lime build, I was still finding outdated instructions.
Everyone was saying that you just hit Ctrl-Alt-T to get a shell prompt, and run the install command. Not that easy. The only way I could get into any form of text mode was by hitting Ctrl-Alt-F2 (which I only knew to try because I'm a Linux user). But this got me into a text mode login prompt and it took me a while to figure out the right username/password combination.
The username is chronos and the password is facepunch. After that, I was stuck in a really primitive shell that doesn't support anything I'm used to (not even ls), so I went out on a limb and tried running the command bash (which got me into a more familiar Bash shell).
But the install command was no good in Bash -- it was running the GNU install command instead of the one to install Chromium to the disk. After some more tinkering, I found that if I ran crosh (Chrome shell) and then run the install command from there, it did what I want. So, I was finally able to install it to disk.
It didn't end up working out though. The system doesn't boot after installation. Oh well. But hopefully this blog post will help others find out how to install the darn thing.
tl;dr: here's how I figured out to install Chromium OS to disk:
chronos / facepunchcrosh, hit enter.install, hit enter.Ctrl-Alt-T doesn't work here, so I had to use Ctrl-Alt-F2 to get to the text mode login prompt.chronos / dell1234 (the "dell" user didn't work). Then I was able to start bash and then execute /etc/install_wl.sh to install the wifi.Ctrl-Alt-T works. :)install from Dell's image did the trick too, and I now have Chromium installed on the internal hard drive on my Dell Mini 9. :)Interestingly, the UI of Dell's image looks different to the Lime and Vanilla builds. The Lime and Vanilla builds had what looked like a sort of primitive desktop (complete with a wallpaper), and the Chromium browser windows could be resized and moved around the screen. Where you'd expect the task bar to be on a Windows system, was what looked more like the Mac dock, with icons representing all your opened Chromium windows (plus a couple other icons, one that brings up a menu and one that has the Chromium icon and didn't appear to do anything).
Screenshots of UI differences:
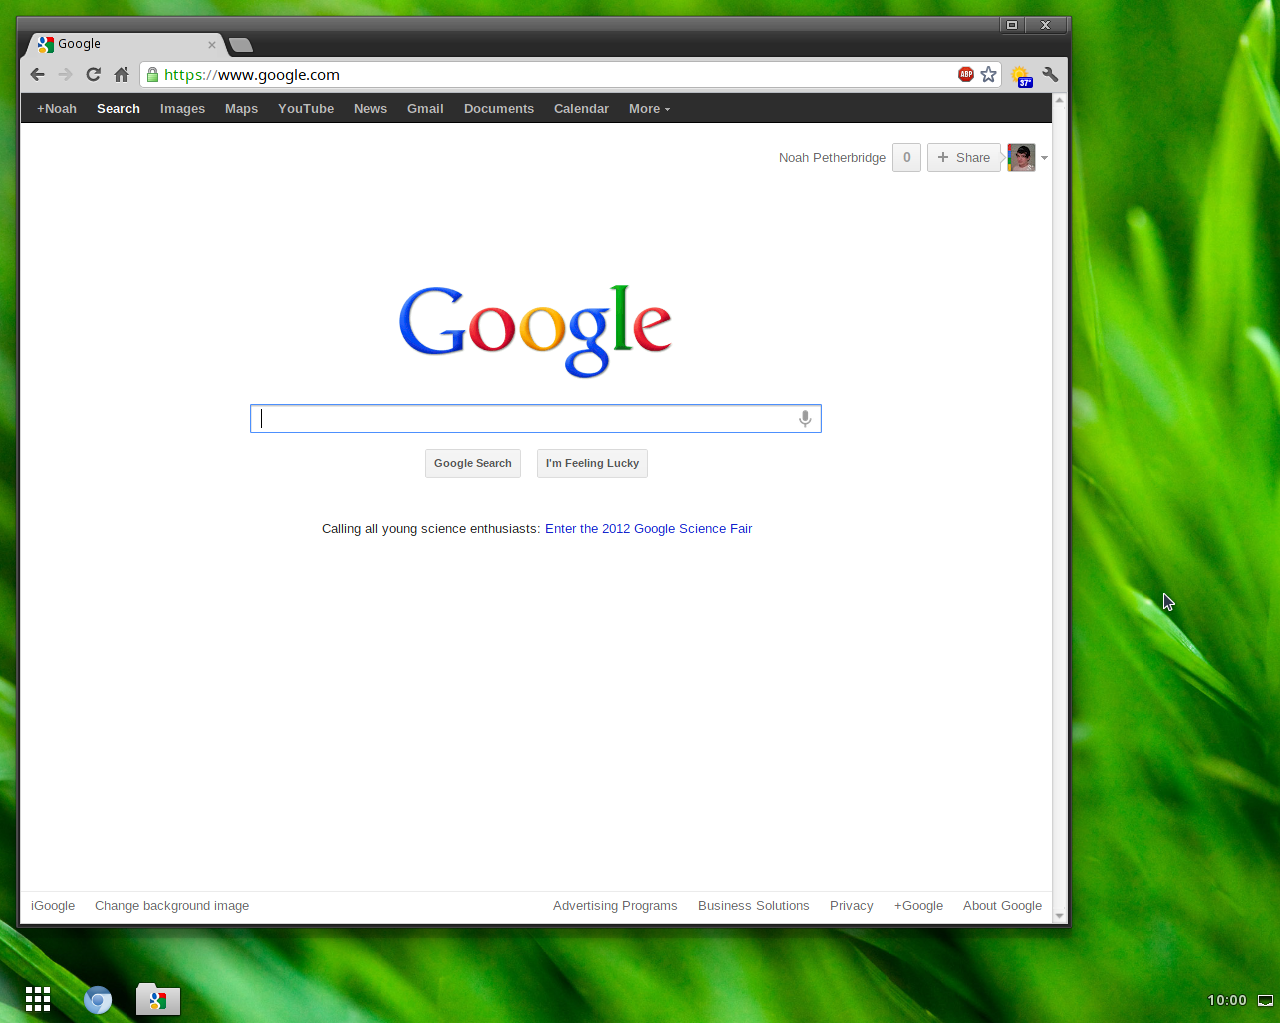
Chromium Lime (and Vanilla)
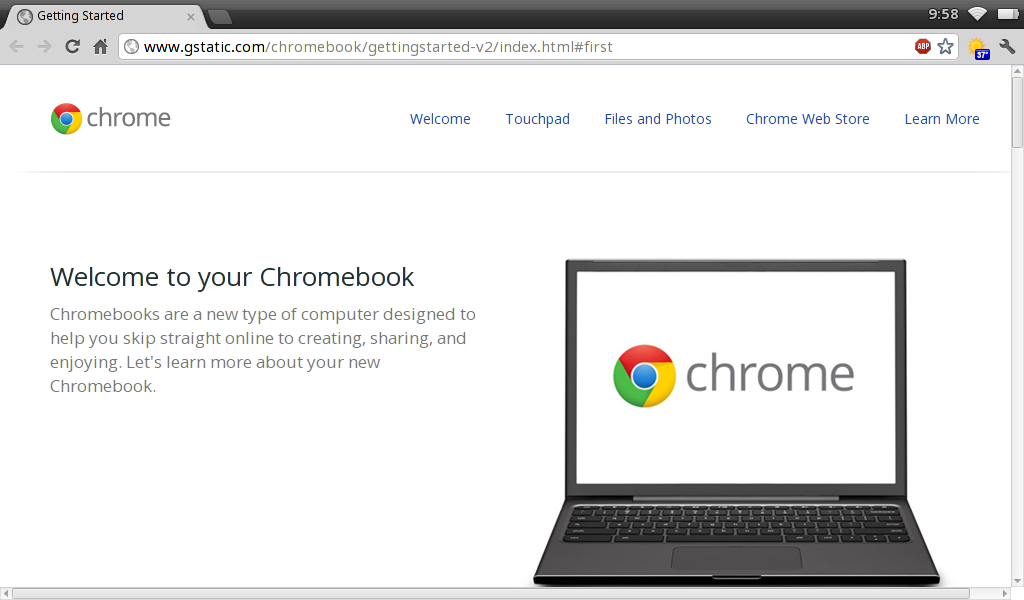
Dell's Chromium build
Dell's build looks more like the Chrome OS I've always seen screenshots of, so I think maybe the Lime and Vanilla builds are customized a bit (or else it's just a super new UI change and Dell's January image isn't up-to-date enough).
In my case I wanted MSN 2011 to connect using a socks proxy (using SSH port forwarding to use an SSH tunnel as SOCKS 5 proxy).
To set the proxy settings, go to the "Connection" page in the preferences of MSN Messenger, click Advanced Settings and enter your proxy details.
The problem is, MSN will only use your proxy settings if it can't normally connect to MSN without them (i.e. if your default TCP internet connection will work, MSN will always use that instead of your proxy settings). This is how you can force MSN to use the proxy settings.
You have to block MSN from being able to connect to its authentication servers without the proxy. To do this, we have to tamper with the Hosts file.
The Hosts file on Windows is kept at C:\Windows\System32\drivers\etc\hosts (note that it doesn't have a file extension). Open this in a text editor like Notepad or the edit command in Command Prompt (I prefer the latter approach because you can open a Command Prompt window as Administrator and then editing the file is a snap without having to deal with permission issues when saving changes).
Add these lines to the Hosts file:
127.0.0.1       messenger.hotmail.com
127.0.0.1       msgr.hotmail.com
127.0.0.1       gateway.messenger.hotmail.com
127.0.0.1       login.gateway.hotmail.com
And then restart MSN and it should have difficulty connecting without the proxy settings (if using a SOCKS proxy, attempt to sign into MSN before you open the proxy to be sure that it fails to connect. Then start the proxy and see that it successfully signs in).
This works by routing all the MSN Messenger hostnames to the loopback address and blocks MSN from being able to authenticate. But with the SOCKS proxy, it can connect because it would do the DNS lookups from the SSH server instead of the local system.
Hope this helps someone!
How to get a Gnome-like panel layout on Windows XP (and Windows 2000 and some older versions as well). Here's what the end result will look like:
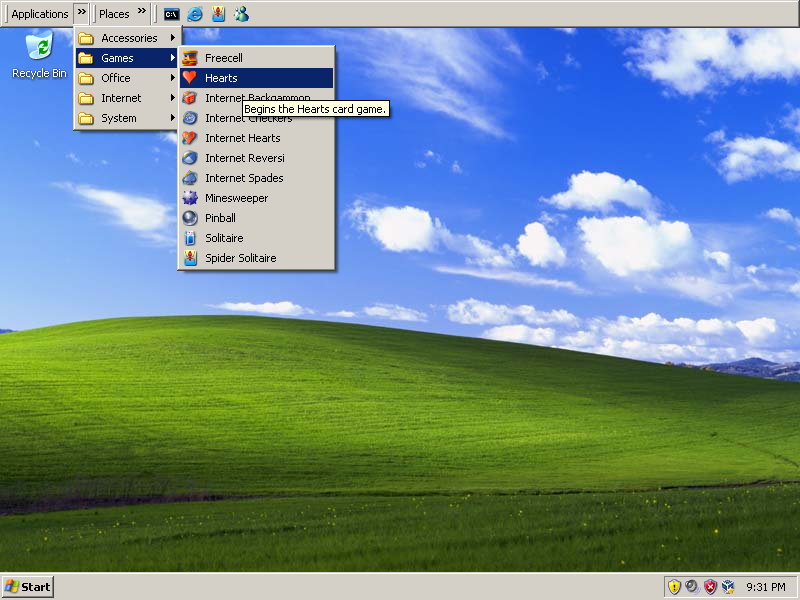
Click for a bigger screenshot (800x600).
The how-to:
Right click the panel and choose "Always on top" and your panel will always be visible even when you have a maximized window open.
This doesn't work on Windows Vista or Windows 7, because toolbars aren't allowed to be separated from the task bar anymore in these systems. :(
0.0021s.
![]()