This command will turn off the monitor on a Linux box from the command line (sorta like what happens when you have your power saving options configured to do this automatically after a length of time):
xset dpms force offThe monitor turns off until you hit a keyboard button or move the mouse. With this info you could set up a keyboard shortcut to run this command and have something like a "lock screen button" on your netbook, to turn off the display on command and conserve battery life for a little bit longer than usual.
For a "lock screen button" that also locks the screen in addition to turning it off, a pair of commands like this may be handy:
xset dpms force off; xscreensaver-command --lock
That said, onward to the blog post...
This information is ridiculously hard to find on the Internet.
I was playing with Chromium OS using the Lime build provided by Hexxeh. The Lime build is the same as the Vanilla build (i.e. upstream Chromium source code built daily), but it has more driver support, and it's the only build that works with the wifi on my Dell Mini 9.
Getting it onto a flash drive and booting from it was easy enough just following the directions on Hexxeh's site, but actually installing it to the hard drive was a bit more difficult. It was hard to find any up-to-date information online; most bloggers were talking about Hexxeh's old "Flow" builds, so the instructions were outdated. When I specifically googled how to install the Lime build, I was still finding outdated instructions.
Everyone was saying that you just hit Ctrl-Alt-T to get a shell prompt, and run the install command. Not that easy. The only way I could get into any form of text mode was by hitting Ctrl-Alt-F2 (which I only knew to try because I'm a Linux user). But this got me into a text mode login prompt and it took me a while to figure out the right username/password combination.
The username is chronos and the password is facepunch. After that, I was stuck in a really primitive shell that doesn't support anything I'm used to (not even ls), so I went out on a limb and tried running the command bash (which got me into a more familiar Bash shell).
But the install command was no good in Bash -- it was running the GNU install command instead of the one to install Chromium to the disk. After some more tinkering, I found that if I ran crosh (Chrome shell) and then run the install command from there, it did what I want. So, I was finally able to install it to disk.
It didn't end up working out though. The system doesn't boot after installation. Oh well. But hopefully this blog post will help others find out how to install the darn thing.
tl;dr: here's how I figured out to install Chromium OS to disk:
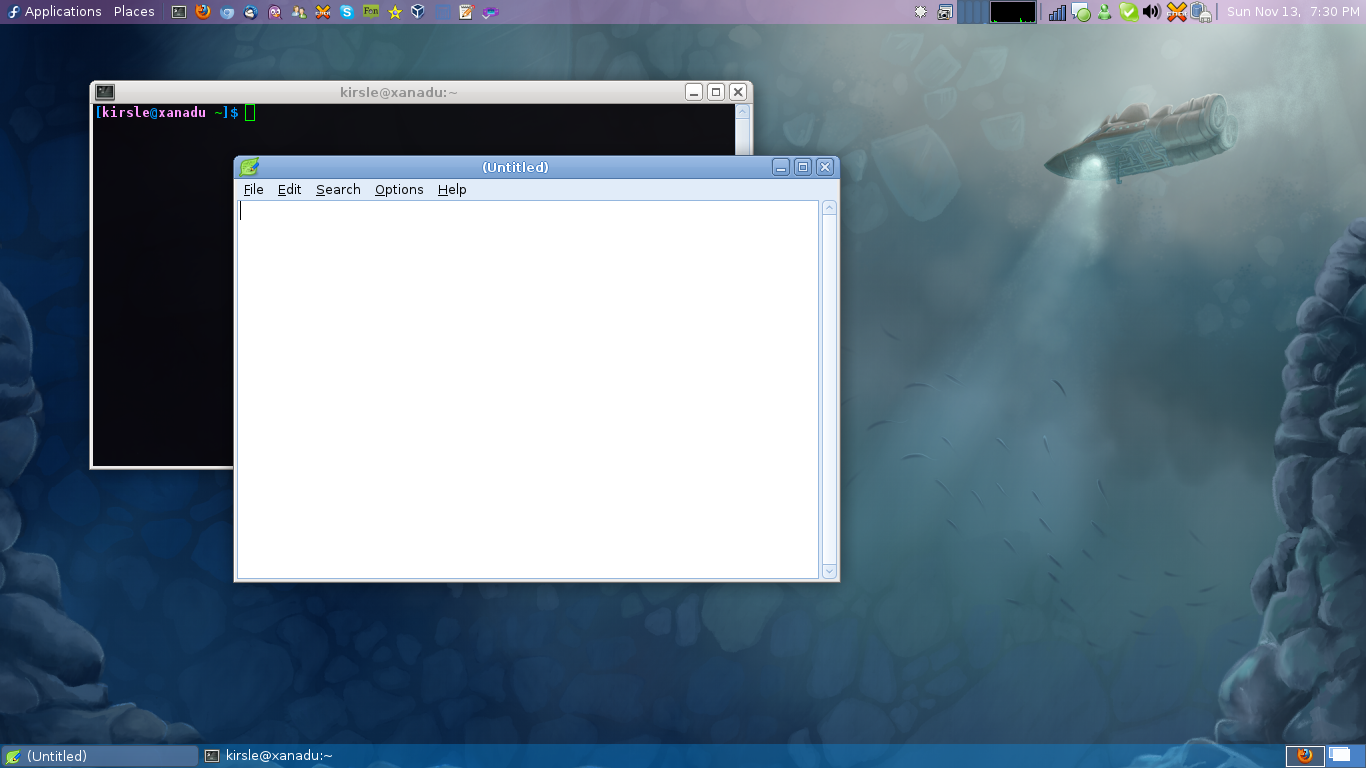
chronos / facepunchcrosh, hit enter.install, hit enter.Ctrl-Alt-T doesn't work here, so I had to use Ctrl-Alt-F2 to get to the text mode login prompt.chronos / dell1234 (the "dell" user didn't work). Then I was able to start bash and then execute /etc/install_wl.sh to install the wifi.Ctrl-Alt-T works. :)install from Dell's image did the trick too, and I now have Chromium installed on the internal hard drive on my Dell Mini 9. :)Interestingly, the UI of Dell's image looks different to the Lime and Vanilla builds. The Lime and Vanilla builds had what looked like a sort of primitive desktop (complete with a wallpaper), and the Chromium browser windows could be resized and moved around the screen. Where you'd expect the task bar to be on a Windows system, was what looked more like the Mac dock, with icons representing all your opened Chromium windows (plus a couple other icons, one that brings up a menu and one that has the Chromium icon and didn't appear to do anything).
Screenshots of UI differences:
Chromium Lime (and Vanilla)
Dell's Chromium build
Dell's build looks more like the Chrome OS I've always seen screenshots of, so I think maybe the Lime and Vanilla builds are customized a bit (or else it's just a super new UI change and Dell's January image isn't up-to-date enough).
tl;dr version: it seems that the gstreamer-ffmpeg package is required for Thunar (or tumblerd, specifically) to render thumbnails of video files on the XFCE desktop for Fedora 16. This package is provided by RPM Fusion yum repository (rpmfusion-free-updates specifically).
It seems to be pretty hard to find this information online. None of my Fedora XFCE systems were able to render thumbnails of videos, and this caused me some headaches with removable drives (when I'd be done with the drive and want to unmount it, I wouldn't be able to because "the device is still busy"... and lsof /media/Cyro would show that tumblerd was the culprit... it was trying to render thumbnails of any video files I may have seen while browsing in Thunar and wasn't having much luck with it).
The usual set of packages that provide all the video codecs for me didn't do the job (vlc, smplayer, gstreamer-plugins-{good,bad,ugly}), I even tried installing ffmpegthumbnailer and no luck. Finally I installed gstreamer-ffmpeg, and after doing a killall thumblerd and then visiting a folder full of videos in Thunar, it finally worked and started making thumbnails.
Click the screenshot for the full size version.
Along the top panel I have my Applications and Places menus, app launchers for my commonly used programs, my CPU usage graph, notification area and clock. On the bottom panel are my task bar and workspace switcher. These are all standard Xfce panel applets.
The details for anyone who's interested (the only panel applet options shown are the ones that differ from the default options):
Add a Launcher applet, set it to launch the Settings Manager (xfce4-settings-manager), rename the launcher to "System", and on the Advanced tab of the Launcher applet, check the box to "Show label instead of icon".

This won't get you a drop-down menu, but it will complete the Gnome 2 look for your main menu part of the panel. :)
How to get a Gnome-like panel layout on Windows XP (and Windows 2000 and some older versions as well). Here's what the end result will look like:
Click for a bigger screenshot (800x600).
The how-to:
Right click the panel and choose "Always on top" and your panel will always be visible even when you have a maximized window open.
This doesn't work on Windows Vista or Windows 7, because toolbars aren't allowed to be separated from the task bar anymore in these systems. :(
That being said, here's how to get Fonality HUD to run on Linux using Wine (a compatibility layer that runs Windows executables on non-Windows platforms).
There are two methods: using your system version of Wine, or use PlayOnLinux which can manage multiple versions of Wine for you.
# For Fedora/RedHat users
$ sudo yum install wine

# For Ubuntu users
$ sudo apt-get install wine
2) Install Java Runtime Environment in Wine
I recommend creating a new wine prefix specifically for HUD, just to keep it separate from any other Wine apps you may use. HUD will require the Java Runtime Environment to be installed. The installer for HUD will normally try to install this automatically, but in my experience the installer might not work, so it's best to get Java manually.
Get the Windows JRE installer from here (or else Google it). I've had better luck using the Offline installer so I recommend using that.
Install Java in your wine prefix:
# Using a wine prefix:
$ mkdir ~/.HUD3
$ env WINEPREFIX="$HOME/.HUD3" wine jre-6u25-windows-i586.exe

# Not using a wine prefix:
$ wine jre-6u25-windows-i586.exe
3) Install HUD
Now use Wine to run the HUD installer.
# Using a wine prefix:
$ env WINEPREFIX="$HOME/.HUD3" wine hud-*.exe

# Not using a wine prefix:
$ wine hud-*.exe
The launchers for HUD in the menu may or may not work, if you have trouble with them I recommend just creating your own launcher. These details should work fine:
env WINEPREFIX="/home/kirsle/.HUD3" wine 'C:\Program Files\Fonality\HUD3.5\HUD.exe'
~/.local/share/icons folder, so browse around for it.Now hopefully everything should "just work."
If not, you may need to use PlayOnLinux instead, because sometimes particular Wine versions don't get along very well with HUD.
1) Get PlayOnLinux
Visit PlayOnLinux.com and install it.
2) Begin installing HUD
1. In the PlayOnLinux window, click "Install"
2. Click "Install a .pol package or an unsupported application" at the bottom of the Install window
3. Choose "Manual Installation"
4. "Install a program in a new wine prefix"
5. Name it "HUD3"
6. Check "Assign a Wine version to the program"
7. Select a Wine version to use. You can manage and download Wine versions from PlayOnLinux by going to "Tools -> Manage Wine Versions" from the main window.
8. It will create the wine prefix.
3) Install Java
For now, ignore the PlayOnLinux window. Get the Java JRE installer, and install it under the wine prefix created by PlayOnLinux:
$ env WINEPREFIX="$HOME/.PlayOnLinux/wineprefix/HUD3" wine jre-6u25-windows-i586.exe4) Continue installing HUD in PlayOnLinux
Go back to the PlayOnLinux window and continue following the prompts. Browse to the HUD installer when it asks. If it asks you to "Choose a file to exec the game", browse to the HUD3.exe from the installed application.
Some common bugs I've found and how to work around them:
To add to the reasons why GNOME 3 impacts other areas of the Linux ecosystem in ways I wish it wouldn't, they have changed the behavior of zenity and removed a feature just because it no longer makes sense for GNOME 3.
Zenity, btw, is a command line program for displaying simple dialog boxes and things that may be useful for bash scripts. It can pop up alerts, progress bar windows, open/save dialogs, etc.
One feature it used to have was --notification, which let you put an icon in the Notification Area ("system tray") on your desktop. But now, since GNOME 3 doesn't have the same concept of the Notification Area as other desktop environments, Zenity's --notification option no longer puts an icon in the Notification Area.
Now it uses GNOME 3's style of notification... which is, the same behavior as notify-send - it pops up a Growl-like black bubble in the corner of your screen with a temporary message (like "New updates are available").
This sucks.
I was playing with writing a desktop Google Voice app for Linux, which would have an icon in the Notification Area and notify about new texts and things. I was going to just use Tk for the GUI (even though it's ugly as sin on Linux) and use Zenity only for the notification icon. But I can't do that now! Now I might as well make my GUI in GTK+ so I can use the Gtk2 module for the notification icon.
GNOME developers, the universe does not revolve around GNOME. If Zenity's --notification is just going to duplicate the functionality of notify-send, you might as well just have switched to notify-send and leave Zenity how it was before.
I'd written a Perl script a while back that would act as a super simple front-end to Mednafen, an NES and GameBoy emulator. It just used Zenity to open a file select dialog to let you browse for a ROM to load.
But now, Zenity's file selection dialog doesn't have any way of letting you specify which directory it should look in by default. It used to start in whatever the script's current working directory was, but now it ignores all that and always starts in the "Recently Opened Files" list.
Do we need to fork Zenity now? This is so ridiculous.
I've been very sceptical about GNOME 3 and gnome-shell (as I've talked about here, here and here). So, I had jumped ship to XFCE a couple years ago and will not be a GNOME user in the foreseeable future.
Now that Fedora is finally shipping GNOME 3, though, the GNOME dev team has again impacted me in ways I wish they wouldn't.
The first impact of GNOME on the rest of the software ecosystem is that they moved to GTK+ 3.0 and everybody else is still catching up. How this affects XFCE?

Setting any custom theme in XFCE makes all GNOME apps look ugly because there is no matching GTK 3 theme. Oh well, you think, just don't run GNOME desktop apps in XFCE?
The problem is that Red Hat and Fedora drink so much of the GNOME kool-aid, that all their other apps that aren't GNOME specific are also using GTK 3. This includes: the Network Manager (seen in the screenshot), and all the PackageKit GUIs (for graphically installing updates). There are probably other things too. This means that, to use XFCE or basically anything besides GNOME, you have to deal with ugly themes on a lot of "core" Fedora GUIs.
This problem should hopefully go away in the next release or two of Fedora, as XFCE and other apps are updated to GTK 3. I just hope Firefox doesn't decide to make the switch too early, though... that would drive me nuts if Firefox started looking this ugly.
My temporary hack of a workaround is that I made a symlink for gtk-3.0 for my current theme that points to the default theme's gtk-3.0, so at least GTK 3 apps don't look ugly... but they still don't "fit in" with my GTK 2 apps.
This is all gone now.
Why? Oh, because GNOME Shell has its own volume control icon built right into the desktop GUI directly, and it therefore has no need for a Notification Area based applet anymore. Never mind that other desktop environments like XFCE would find such a thing useful. Now I'm forced to go back to the old school "Mixer" applet in XFCE, which is nowhere near as elegant as the GNOME volume control applet used to be.
I'm tired of this "the whole universe revolves around GNOME" mentality that the GNOME developers exhibit. Most other desktop environments play nice with each other, most try to follow Freedesktop.org standards, but GNOME... GNOME wants to be your desktop environment; it wants to be your entire operating system.
gnome-volume-control-applet to gnome-sound-applet, provided by the package control-center rather than gnome-media. Right-clicking the icon to go to the Sound Preferences brings up a GTK-3 GUI that includes a volume slider that goes to 150%.So all hope is not lost, yet.
The old (but still the current) version of the Adobe Flash plugin (10.2) would simply save all Flash videos (.flv files) in /tmp with names like "/tmp/Flash########" where the #'s are random numbers and letters. You could simply buffer a video on YouTube or any other video hosting site, then go to /tmp in your file browser and copy these files somewhere else. They typically get deleted when Flash exits.
The new version of the flash plugin (10.3) tries to be a little more clever. It still creates the files under /tmp, but then it deletes them immediately while still keeping them open. In Linux, if an opened file is deleted, the OS postpones deletion of the file until the process using it lets it go. So the file can't be seen when you look in /tmp, but the flash plugin can still use it until it's done with it.
So how do you get the FLV files from it now?
1) Get the process ID of the flash plugin
$ ps aux | grep flash
kirsle    3324  3.3  1.5 281488 44716 ?        Sl   12:01  10:41 /usr/lib/xulrunner-2/plugin-container /home/kirsle/.mozilla/plugins/libflashplayer.so -grebase /usr/lib/xulrunner-2 -appbase /usr/lib/firefox-4 3164 true plugin
2) Look at the process's open file descriptors in /proc
$ cd /proc/3324/fd3) List the files to find the FLV file (it will be a symbolic link to a "deleted" /tmp/Flash* file)
$ ls -hal | grep Flash
lr-x------ 1 kirsle kirsle 64 Apr  5 12:01 17 -> /tmp/FlashXX9ew4CF (deleted)
4) Copy it (by ID) somewhere else
$ cp 17 ~/videoname.flvEasy. One could trivially write a shell script that does this automatically too.
This method should work for the foreseeable future, unless Adobe finds some really clever way to stop this, like encrypting video files somehow, or holding them completely in RAM (not likely because some video files can be pretty large). Processes can't hide anything under /proc. :)
More info about /proc.
UPDATE (May 17 2011): I've written a quick Perl script that copies all active Flash videos to your home directory. It doesn't care about the process name; it just loops through all PIDs in /proc, looking for any that owns a "/tmp/Flash*" name, and copies them to $HOME. It works even when you have multiple videos buffered at the same time.
Download it from: sh.kirsle.net/flashget.
This method can also work for Google Chrome (the above was for Firefox/other browsers that use the old Flash plugin system). In Chrome, the Pepper API is used for the Flash plugin instead.
1) Get the PID of the Pepper plugin for Flash
$ ps aux | grep ppapi
noah     14152 25.1  1.4 980444 87828 ?        Sl   15:37   0:05 /opt/google/chrome/chrome --type=ppapi --channel=13618.24.1890984534 --ppapi-flash-args --lang=en-US
2) Get into this PID's file descriptors
*NOTE:* This one requires root access, unlike for the Firefox instructions above.
$ sudo -i
# cd /proc/14152/fd
# ls -hal
[...cut...]
24 -> /home/noah/.config/google-chrome/Default/Pepper Data/Shockwave Flash/.com.google.Chrome.p9GBU8 (deleted)
Look for the file descriptor that points to a "deleted" Flash file (in this example, it's file descriptor #24).
3) Copy it somewhere else
# cp 24 ~your_user/24.flv
# chown your_user:your_user ~your_user/24.flv
So, the process is similar for doing it for Firefox, except:
ppapi process instead of the plugin-container or libflashplayer.so/root instead of your main user's home folder).
But surprisingly, I'm not going to direct my rant toward GTK+ themes. Everybody who's ever used Linux knows that 99% of the crap on gnome-look.org isn't worth using. I've very rarely used a GTK+ theme that correctly solves the problem of, "your panel background image tiles across the shutdown dialog so you can't read the text of the dialog," but I digress.
No, this is about XFCE window manager themes. Themes for XFWM4.
XFWM4's themes are quite simple, or at least if you're making a flat pixmap theme they are. All you need to do is have a folder full of XPM files with certain file names, and XFWM4 does the rest. It's easy! So why does everybody screw this up?
The window manager theme I wanted on XFCE most recently was Clearlooks. Yes, the standard Metacity theme that comes with every single GNOME based distribution ever. I wanted it on XFCE, but couldn't find a good version of an XFWM4 theme for it that didn't suck.
I found one that got kind of close. Clearlooks-Xfce-Colors, in fact. It looks good, except he made a mistake putting the theme together: the maximize/restore button behavior is broken. Apparently, he couldn't figure out how XFWM4 handles the "Restore" button on a maximized window. So, for the active focused window, the "Maximize/Restore" button will always use Maximize, and every inactive window will always use Restore instead.
So for the active window, there's NO way of telling whether it's maximized or not, because the button always shows the exact same icon. Same goes for inactive windows.
The official XFWM4 theme how-to explains how this works. You just need file names like "maximize-toggled-active.xpm" or "maximize-toggled-inactive.xpm". That's it. Now your "Restore" button works fine.
Another common problem I've seen. Take for example the Vista Basic theme here. It looks good in the screenshots, yes? That's because the title is centered.
When you uncenter the title, or even just have a narrow window open (my Pidgin buddy list for example), huge problems with the theme become apparent. If you left-align the title, there's a huge margin (in the realm of 60 pixels) on the left of the title. WTF? And on a narrow window like Pidgin's buddy list, the title will be completely devoured by the margins to the point you can't see the title anymore.
Why is this? XFWM4 themes have five different title images. Appropriately named "title-1-active.xpm" through "title-5-active.xpm". These 5 images make up the title. If title-1 is 60 pixels wide, it means your title will have a 60 pixel margin on the left. So, make your title images as thin as you possibly can (4 pixels is great) unless you explicitly have a need to do something fancy with your titles.
I have never once installed a third party XFWM4 theme that has been high enough quality. The usual procedure when I really want a certain style is: find one that's close, find out it fails super hard because the creator is a complete noob and didn't even bother to read the official documentation before making his theme, and then either try to hack it until it works OR just scrap it and create my own from scratch. And then re-release the theme back to xfce-look.org for others to use.
So, here are my better copies of various window manager themes for XFWM4:
End of rant. Now, about those GTK+ themes...
0.0017s.
![]()