For the past few years, on and off (sometimes more off than on), I've been working on a videogame called Sketchy Maze and had been taking screenshots of it along the way. This blog post will be a bit of a retrospective and a series of screenshots showing it from its very first prototype up to the state that it's in now.
I wasn't even sure I was going to get very far on this project. I had once attempted programming a game in Perl and lost steam after barely having a working prototype. I had dabbled a few times getting started programming a game but then decided my brilliant idea of an RPG game wasn't worth all the programming. Stubbornly, I never wanted to just use a game engine like Unity or Unreal but wanted to program it all myself. And programming from scratch is considerably the harder way to go, so your game idea had better be worth it in the end!
The game idea that won out is a personal and nostalgic one. Back in the 90's when I was growing up with videogames like Sonic the Hedgehog and Super Mario Bros., I would often draw my own "mazes" or levels like on a 2D platformer game, with pencil and paper and then "play" it with my imagination. I'd imagine the player character advancing through my maze, collecting keys that unlock doors, pushing buttons that activate traps somewhere else on the page. I'd write little annotations about which button did what, or draw a dotted line connecting things together. My mazes borrowed all kinds of features from videogames I liked, all your standard platformer stuff: buttons, trapdoors, conveyor belts, slippy steep slopes, spikes and water and whatever I wanted.
So my game concept was basically:
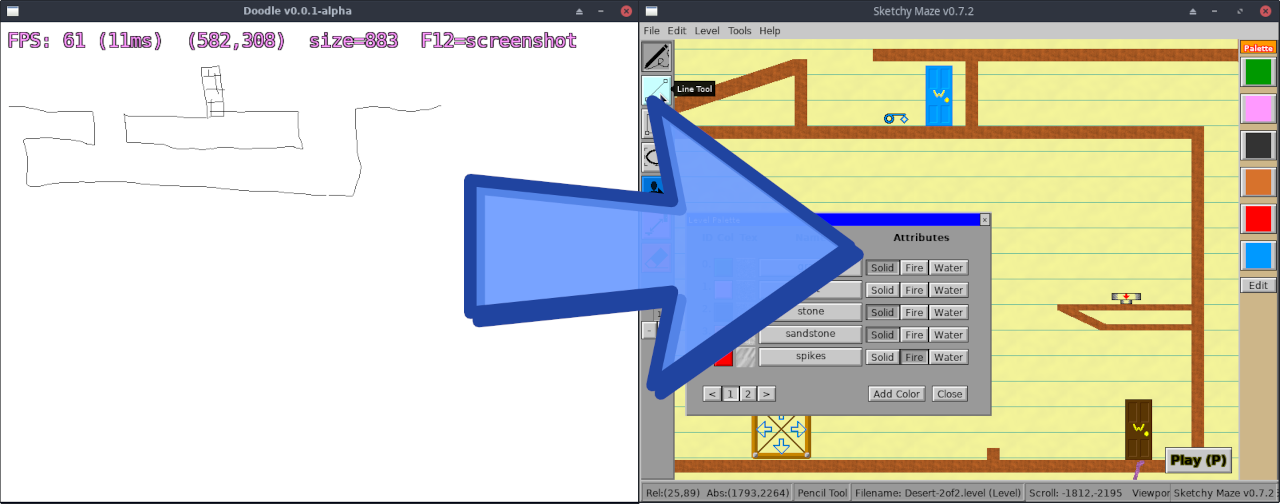
See the full blog post to read how I even got this started and see screenshots of progression between the "Before and After" pictured below. My first target goal was just a stupid simple white window that I can click on to turn pixels black and save it as a PNG image. If I could get that far, I could do all the rest.
Thinking too much about the "big picture end result" of my game would probably have paralyzed me into not even getting started.
So at first I just set some very simple goals for myself. I'm not making a game yet, I'm just playing around with some minimal possible prototypes, something with a clear spec in mind and a clear definition of "done."
I just wanted a blank white window that I can click on to turn pixels black.
This is the very first screenshot of my project:
For my choice of software stack I chose the Go programming language and the SDL2 library for handling graphics, controller inputs and audio. SDL2 provides a rather low level and barebones API to handle getting pixels on a screen; nothing fancy, just functions like DrawPoint, DrawLine, DrawRect and loading and copying bitmap images to a window. It takes care of all the really low-level tedium of dealing with various kinds of basic hardware devices, but it doesn't offer you much in the way of making a game on top of it. All the heavy lifting is still up to you; particle effects and fancy features like that won't come to my game unless I feel up for programming those algorithms myself.
But, I do enjoy having that level of control and learning how game fundamentals actually function, instead of just "checkbox for Gravity" like Unity would give me and I don't know how it works.
My actual notes to self about my first milestone of "basic SDL2 paint program" read as follows:
F12 key to take a screenshot of your drawing.Renderer.DrawLine() and my own algorithm or
the anti-aliasing.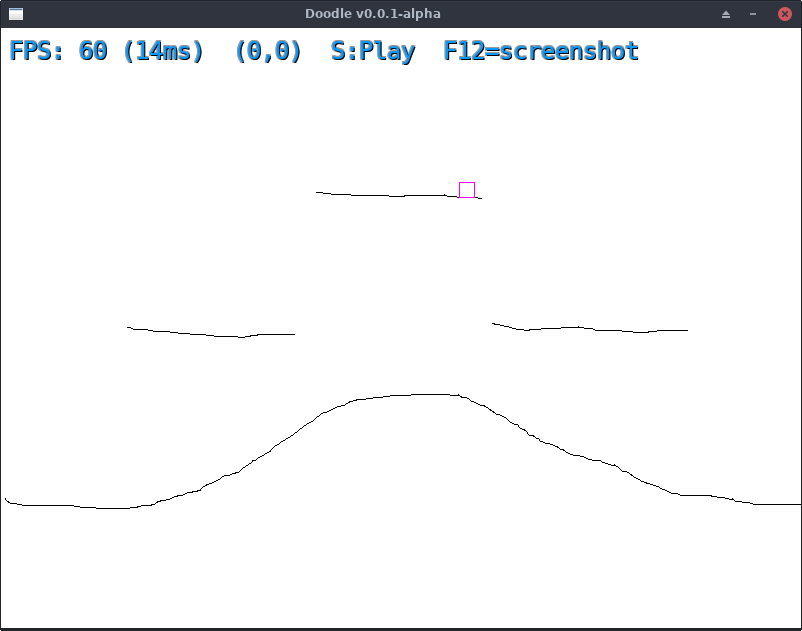
Pictured above is the very first screenshot of "gameplay." The player character is represented by a magenta square, and I think I didn't even really have collision detection hooked up, so the character could move freely and I just positioned it to look like it's sitting on top of one of the platforms I had drawn.
At this stage in development, my prototype was able to save and restore your drawings in a custom (JSON) format and you could toggle between Edit Mode and Play Mode to draw your level and "play" it.
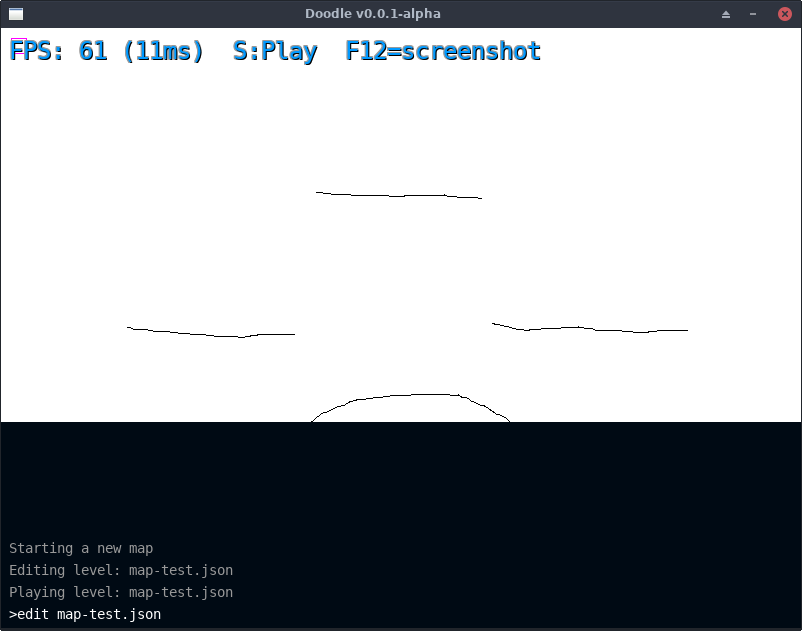
One of the very first features I ever programmed into my game was the
developer console. You'd press Enter to open a command prompt at the bottom
of the screen in-game, and you could type commands like new or save to
run various game functions in lieu of a proper user interface.
Remember, I'm using SDL2 here, everything I draw on screen I have to come up with myself, and drawing buttons and user interface elements would take some work. A text-based command shell to debug my game at run-time or invoke game features was crucial.
An important feature of the developer shell also was that it can pop open on its own to ask the user a question. The game still uses the developer shell today for that purpose: when you save your level for the first time and it asks you to give it a file name, the developer shell pops open with the question for you to type a response to.
When I program text input controls for my user interface, this use of the Developer Shell can be replaced with a better alternative.
Before putting any more work into user interfaces or the level editor, I needed to make sure I could get the collision detection working in Play Mode.
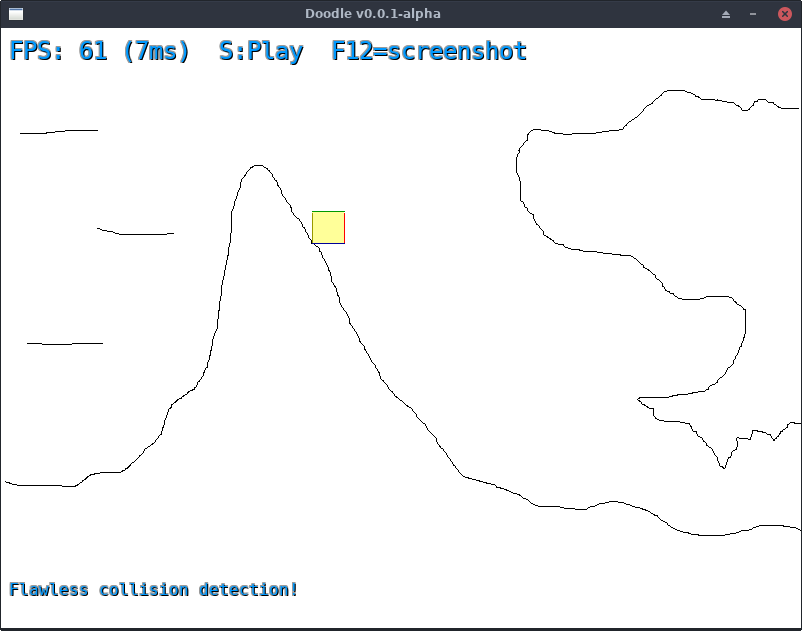
There are plenty of tutorials how collision detection works for 2D platformer games, but none of them applied to my project. Players can draw their own level completely freehand, putting pixels anywhere they want, and these pixels should behave as solid ground during gameplay and pixel-perfect collision detection is needed. Most 2D platformers are tile-based and collisions are checked whole regions at a time, but my game needed to literally check every pixel during movement because any one of them could be solid or fire or whatever.
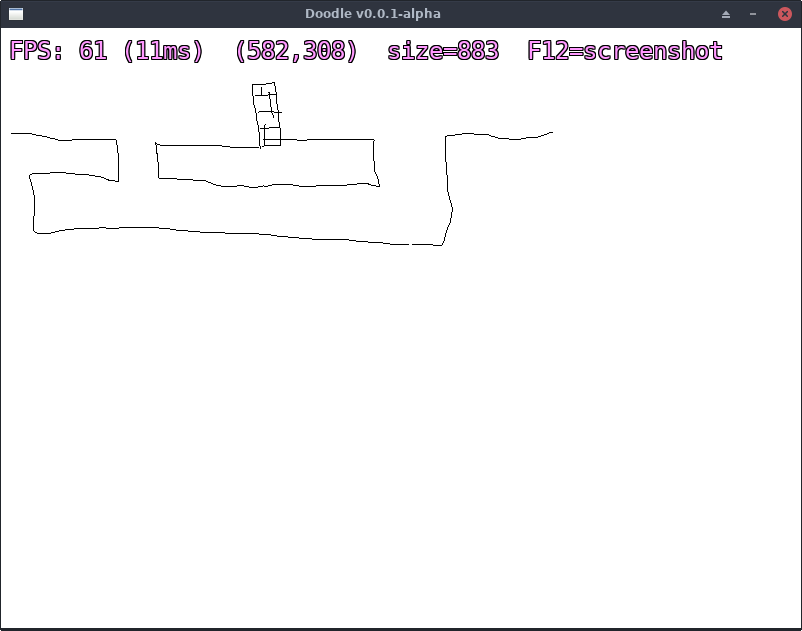
In the above screenshot the player character, now drawn as a yellow box with colored collision debug lines on its edges, is perfectly nestled in a corner of this hill.
The way my algorithm works took advantage of Go's built-in concurrency features:
It seems to work okay for the scope and concept of my game so far!
Now, my game is really in need of a user interface. The level editor will need buttons to select drawing tools, and panels and frames to arrange the interface in a sane way for my own mental health, and any other kind of UI widget I can manage to program: checkboxes, menus, windows.
Now, there might've already existed some UI toolkits that use SDL2 but they would probably be written in C and I am programming in Go. I was fortunate that my Go SDL2 module came with instructions how I could cross-compile my game for Windows while running on Linux, so I could avoid a world of hurt trying to ship my game later down the road; but I didn't want to press my luck bringing in additional C libraries into my game. SDL2 was a gamble enough!
So I needed to develop my own user interface toolkit in Go. By the way, I have released this as an open source project alongside my render engine: see go/ui and go/render.
The very first UI widgets I programmed were the Label and the Button:
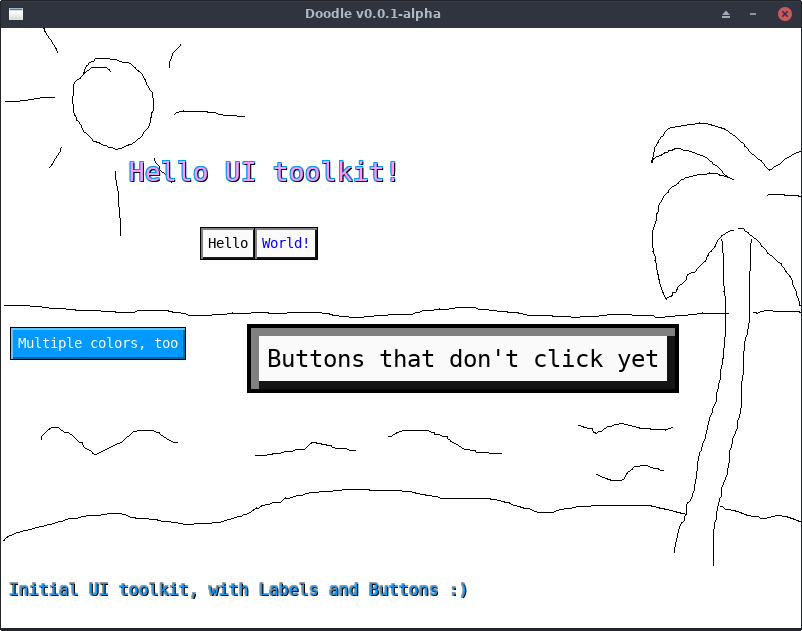
I programmed my UI toolkit to work in layers of abstractions. The Label is the simplest of all widgets: it has a position and a size and it contains text (provided easily by SDL2_ttf). Then a Button is able to wrap around a child widget, such as a Label, and provide a raised border and click event handlers. Many of the widgets "extend" or wrap around simpler widgets and produce increasing layers of complexity.
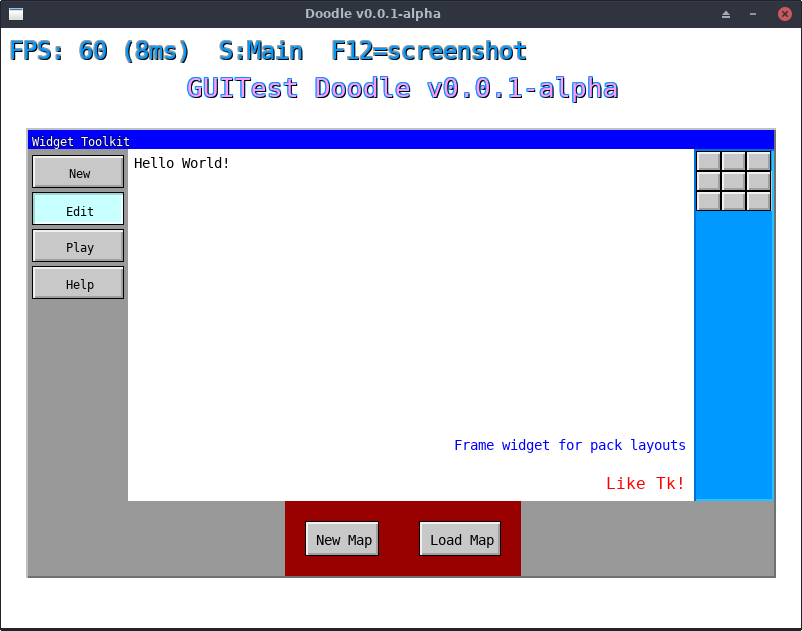
I did my initial experimentation with my UI toolkit in-game in a hidden
test screen of my app. The screen is still in the game today! Typing guitest
in the developer console brings up this screen.
Buttons and Labels are one thing, but a real UI toolkit needs to have Frames too that can parent the other widgets and position them sanely using relative configuration so that I don't need to micro-manage the X,Y position and size of every tiny little thing on the screen.
The GUITest was a way to develop, test and debug various widgets and placement algorithms until I got it somewhat stable enough to spruce up my Level Editor with.
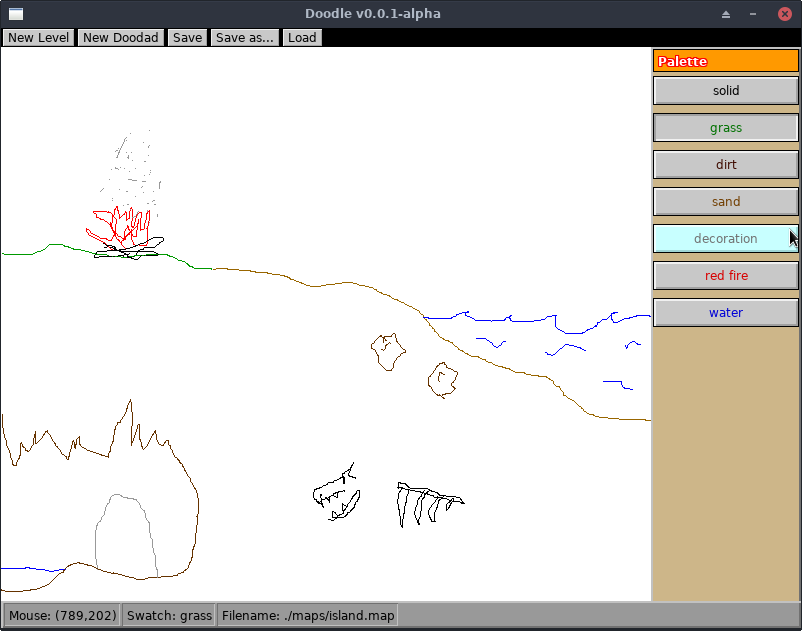
This is an early screenshot of the Level Editor User Interface.
Along the top of the window was a black frame having "menu buttons" for "New Level", "Save", "Load", etc.; these were just buttons that ran actions when clicked, as I hadn't programmed proper menus into my UI toolkit yet.
The right side of the screen was a "Palette Drawer" having RadioButtons that set the color I'll draw with. The RadioButton widget extended the Button by tracking a variable state and works how you'd expect: only the selected color's RadioButton is pressed "in" at the exclusion of the other colors.
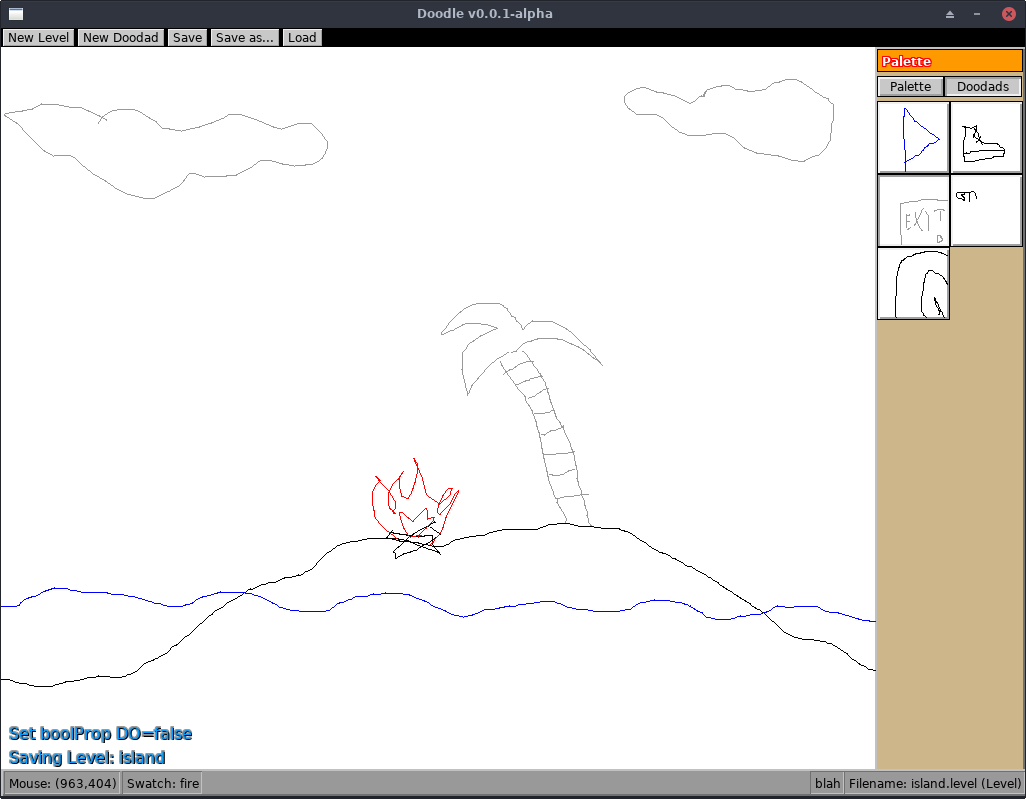
The Doodads Palette was introduced in October: doodads are like reusable drawings you can drag onto your level.
The Palette drawer on the right became a "tabbed" interface: RadioButtons at the top could have you choose between "Palette" and "Doodads" to either see your color swatches or, well, doodads.
Doodads could be dragged out of the palette drawer and onto your level to place copies of them in your level.
For a developer's own mental health, they'll build in "debug features" to help visualize what the heck is going on while they're trying to fix bugs or figure out some tricky maths.
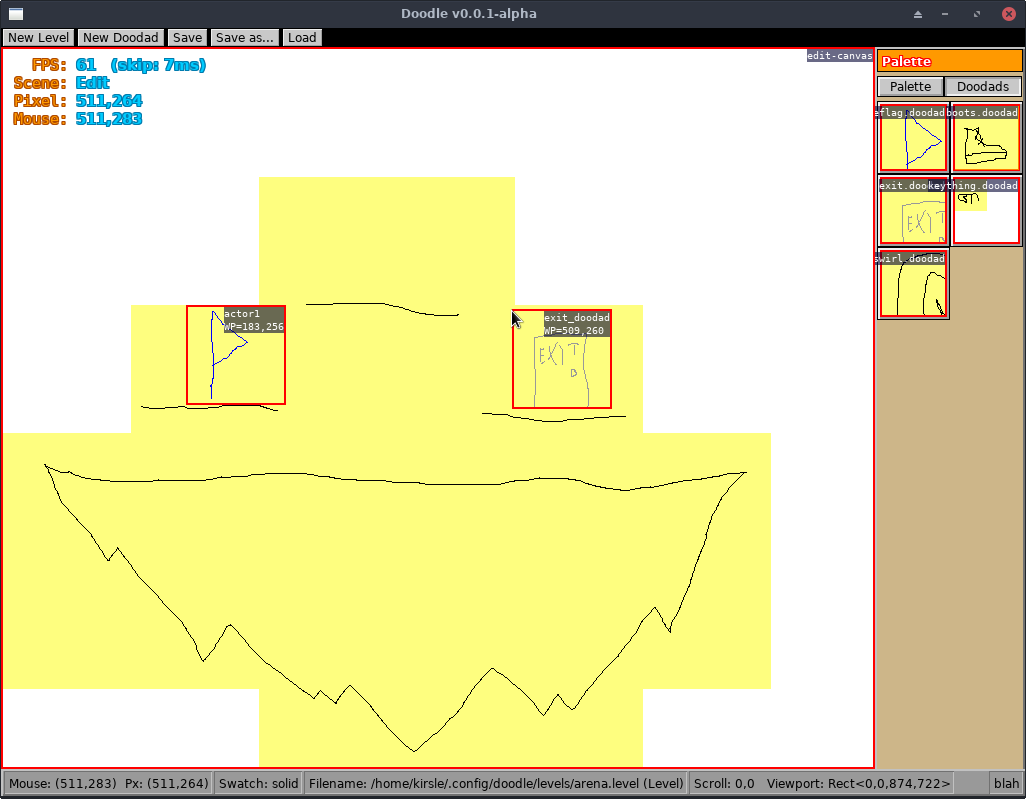
In the above screenshot, many debug features are active helping me to visualize game state and positioning of objects. Each Canvas widget is outlined in a red square and has a name in the top-right corner. The two doodads inside my level additionally have their level coordinates (world position, or WP) shown. Drawings are subdivided into "chunks" and they are highlighted in yellow; parts of the level not drawn on have no chunk created yet.
The Canvas widget builds on my UI toolkit but is entirely tied up in my game logic. It represents a "drawing" which is a general name for Levels and Doodads; your level is drawn in a Canvas widget and all doodads, in your level and in the Palette drawer, are also Canvases. The Canvas can scroll and pan and allow drawing and lots of other features that are used where they make sense.
At this stage in the game, the Doodads were just some nonsense images I sketched out in-game and had no logic to them, you could just place copies of them around your level. They wouldn't interact or collide with the player during gameplay.
Almost one full year into development, this is the first screenshot having "real" doodads in them: the ones I was designing for real for eventual use in the game, and not just throwaway sketches.
The first doodads created were Colored Locked Doors & Keys, Buttons and the Electric Door which only opens if powered by a linked Button that gets pressed by the player.
As you can guess, these were not drawn in-game; the editor was too crude for that. I drew them in The GIMP and, along with my game, I programmed a command-line tool that understands my game's file formats and is able to generate a Doodad file based on PNG images, and attach their JavaScript programming.
So, remember how early on I was using SDL2 for my game? Well, I didn't want to tie myself down to SDL2, in case later on I wanted to use OpenGL or Vulkan or some other toolkit in place of it. And also because SDL2 is a C library and I'm using Go, which has nice high-level data types and features, and using a C library from Go means you need to write Go like C and that feels clunky and awkward.
So very early on I had written my own render library that would "wrap" around SDL2 and provide to me a nice Go API that does what I want in terms that make sense for my program. I want to just DrawRect(Rect, Color) and get a rectangle on my screen, I don't want to care about the SDL2 API calls that go into selecting a color and managing the render state.
And my abstraction layer meant I could replace the SDL2 implementation with, oh I dunno, HTML5 Canvas API calls for JavaScript/WebAssembly.
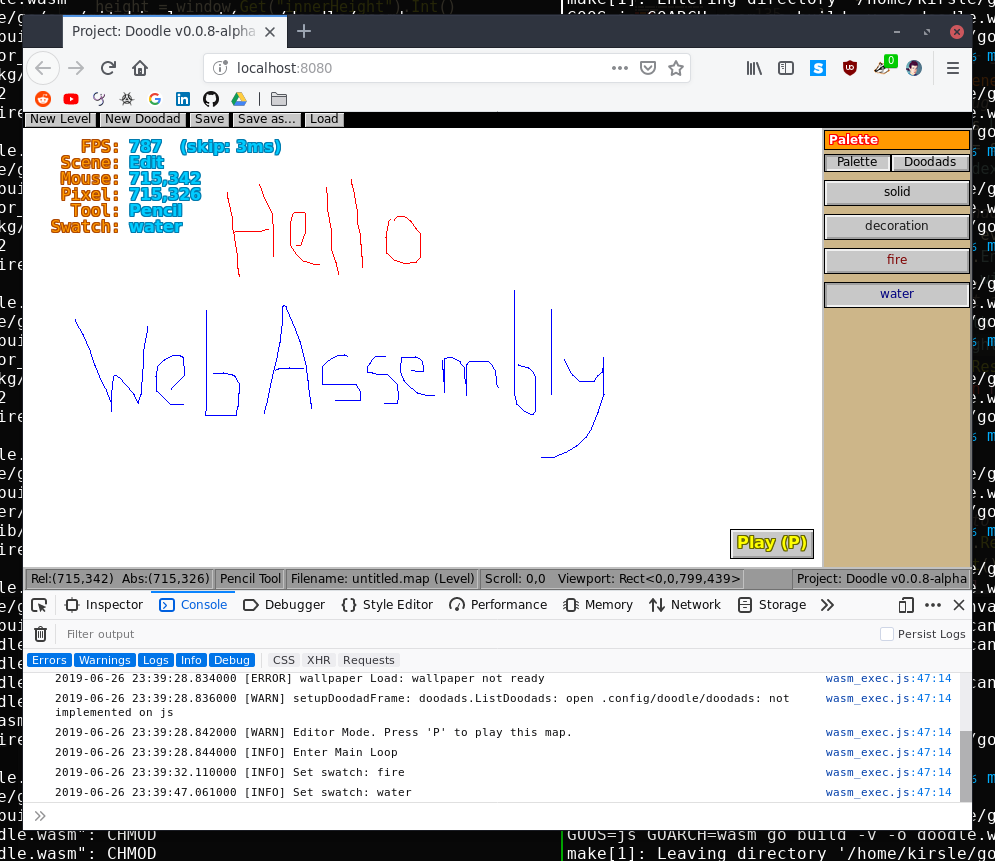
Pictured above was an early version of my game running inside a web browser
because I had compiled it for WebAssembly. On page load it calls the web browser's
API, in a way much like JavaScript would, to select a <canvas> tag and draw
pixels onto it with the CanvasRenderingContext2D
API instead of SDL2 and my game could run none the wiser.
The 99% of my game's code knows nothing about SDL2, it knows my render library, so when I swap out SDL2 for Canvas/WebAssembly my game easily ported to run in a web browser.
Now, performance wasn't great then, and it's even worse now that my game has gotten more complicated. A bulk of the bottleneck is in my UI toolkit; a screen full of buttons incurs many draw calls that I could optimize in the future by caching textures or something. A dragon to tackle another day.
By the way, my render engine is released as an open source project at go/render so you can create graphical apps in Go targeting SDL2 or WebAssembly too.
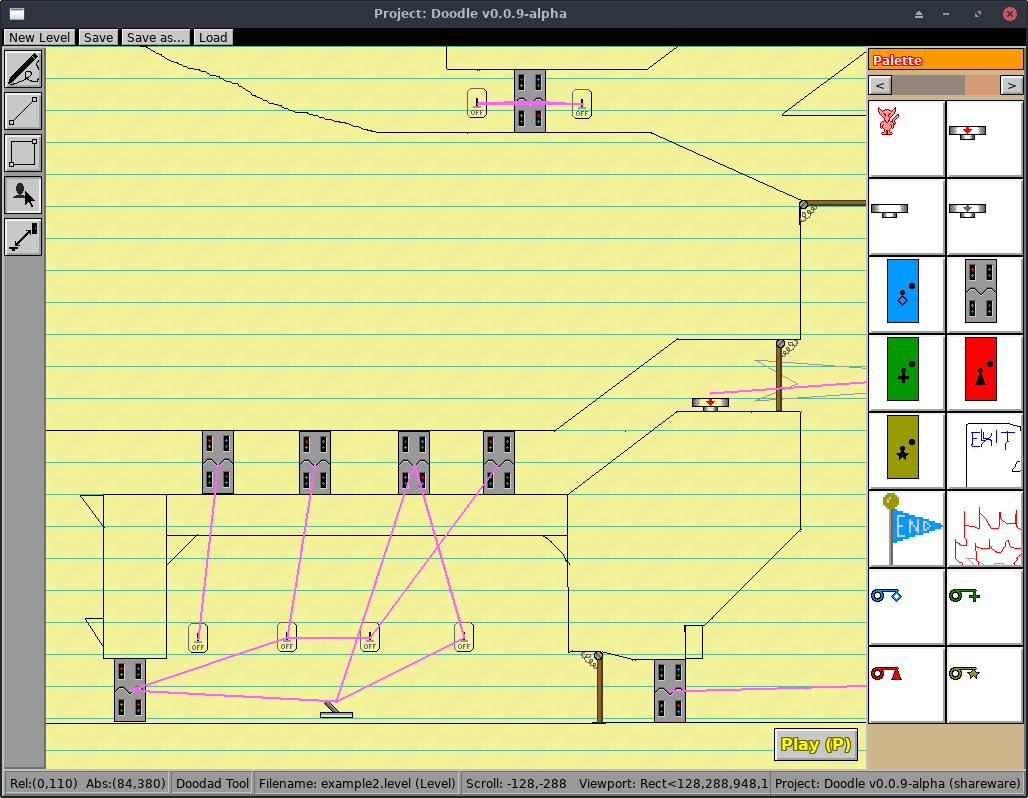
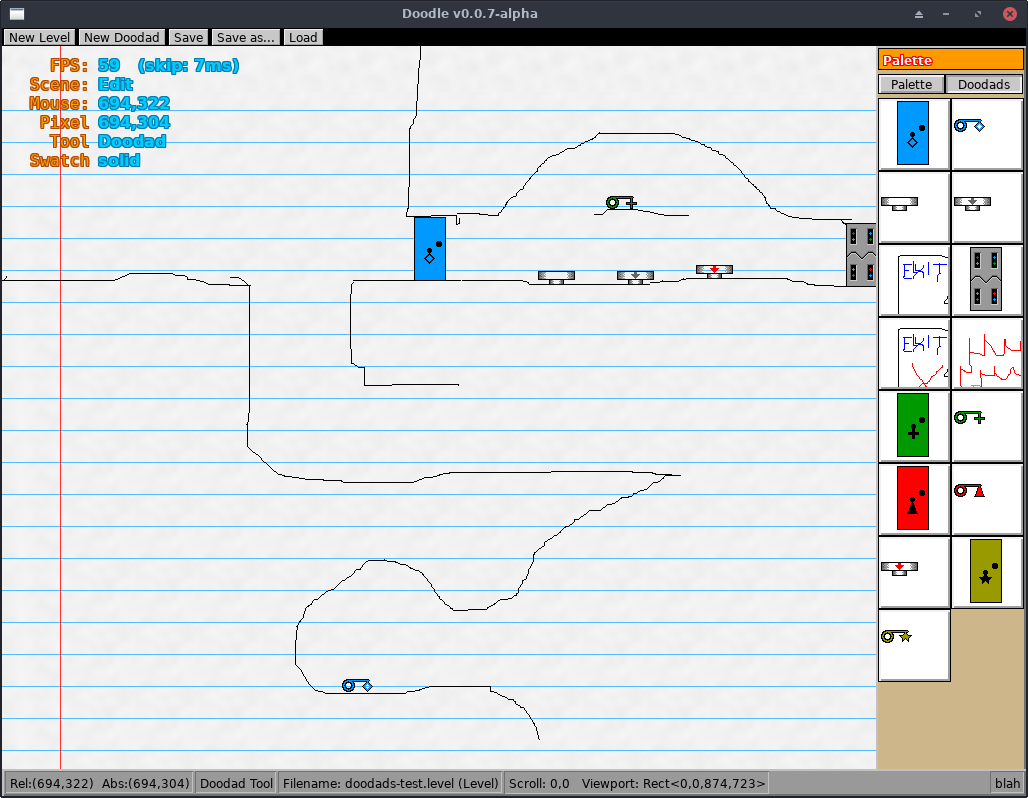
More love for the level editor, I added a left-side toolbox panel housing RadioButtons with icon images to select from various draw tools:
The Link Tool provides the channel on which a Button could open an Electric Door when pressed. You drag a Button and an Electric Door into your level and connect them with the Link Tool and then they can send signals to each other in-game.
Doodads in my game are programmed using JavaScript. And it's not the cool, modern JavaScript either, but the old ES5 JavaScript we had before Google Chrome. I would've liked to use something nicer but out of my options this was the best fit.
I'm using robertkrimen/otto which implements a JavaScript interpreter in pure Go. That is useful because Otto lets me expose my native Go types and structs directly to the JavaScript interpreter so that Doodad scripts can call functions in my game easily without any tedious data translation dances like what you'd get bridging across C language.
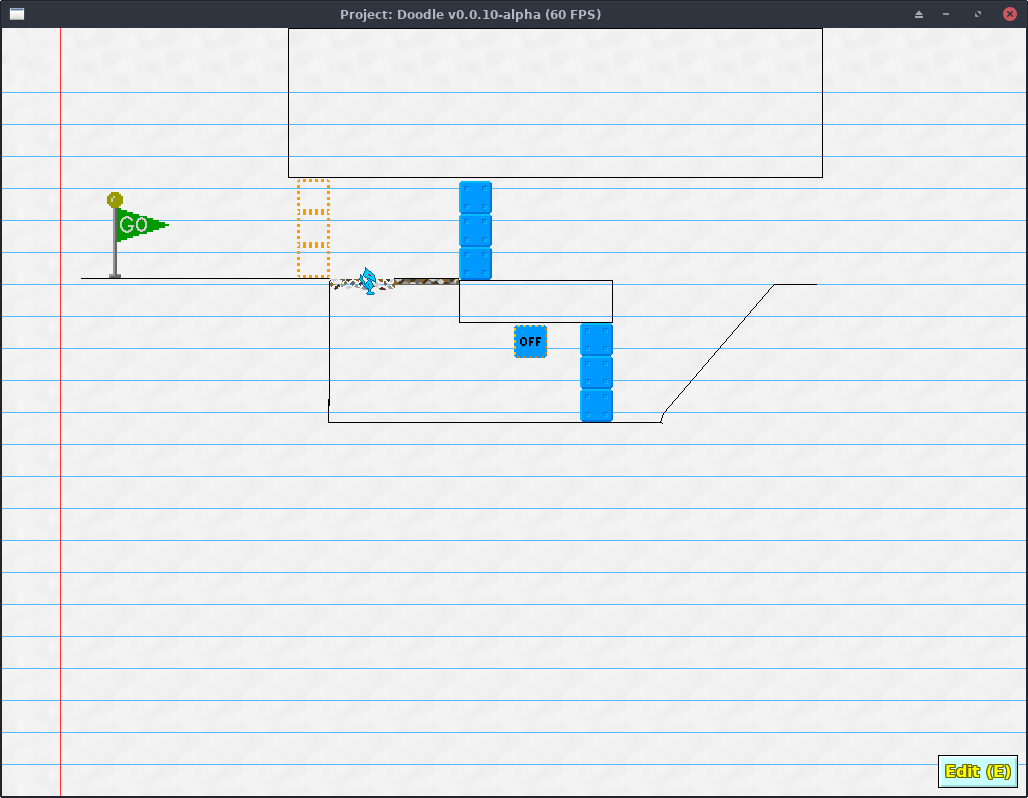
The level editor UI had been the fastest evolving side of my game, but here's a check-in on what gameplay looked like.
I didn't have a player character design yet, so a stand-in was the blue Azulian. What's an Azulian? It's an inside thing, a character I had made up in middle school. Since very early versions of my game you played as a Blue Azulian, and the Red Azulian as an "enemy mob" is still in the game today (as of time of writing). Both of them will likely go the way of hidden easter eggs in some future release of my game.
In the above screenshot I had new doodads including the Start Flag, Crumbly Floors, and blue and orange State Blocks that toggle opposite each other when their ON/OFF button is hit.
Eventually, I programmed "pop-up windows" for my Go UI toolkit which meant I could shove even more features into my game by stuffing them into pop-up windows that can be moved around the screen and closed when not needed.
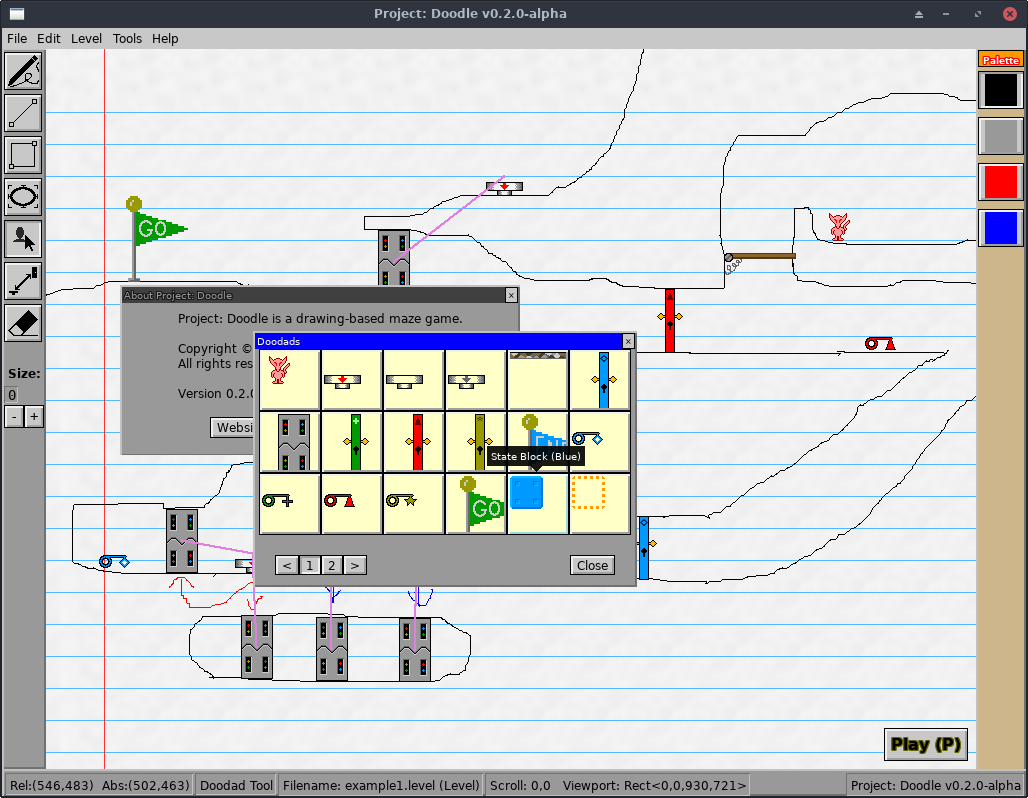
The general inspiration for my User Interface goals are Rollercoaster Tycoon (1 & 2), having toolbars and pop-up windows for various tasks.
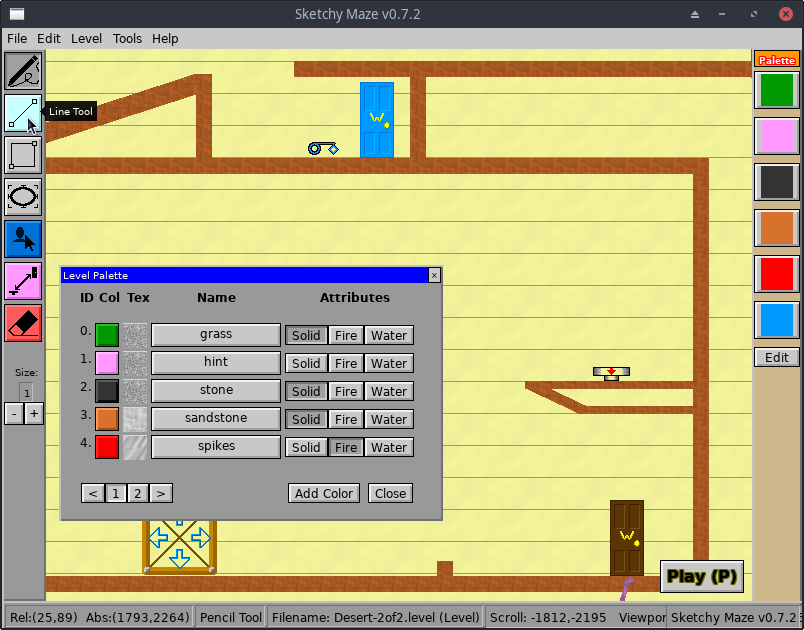
By this stage in the game, the Toolbox on the left gained an Ellipse and Eraser Tool, Brush Size/thickness feature, and the Doodads Palette was turned into a pop-up window so that the Color Palette on the right could shrink in size and leave more room for your drawing.
An easter egg?
In my game if you open the developer console with the tilde/grave key and type in:
boolProp show-hidden-doodads truethen the Blue Azulian and Boy (player character) become available in the Doodads window to drop into your level. They both have have no behavior: they are affected by gravity but don't do much else. These two were the Player Character and depended on controller inputs to move them, so they do nothing when loaded as another doodad on your level!
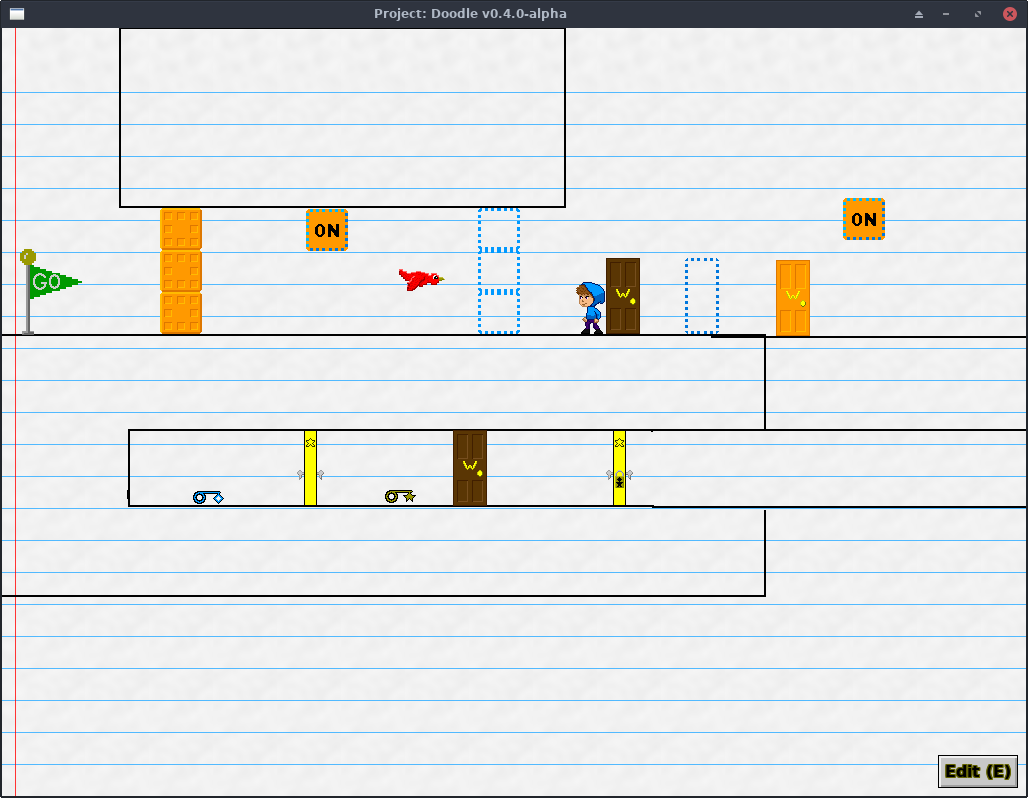
By this time I had designed sprites for the player character so that the Blue Azulian could be retired, and added several new doodads including Warp Doors and the Red Bird. The Colored Doors also had a re-design away from their original, front-facing sprite and towards a side-angle profile view of the door.
The above is a screenshot of the latest version of the game. It's still in alpha release mode, but it has come a long way from that first painting prototype SDL2 program!
It has a bunch of doodads, five example levels built-in, an editable palette, brush texture patterns (those were fun to program!), you can embed custom doodads inside level files for easy transport to another computer, and it's rapidly approaching my definition of "1.0" release status.
I want it to have a "story mode" built-in with a series of levels that automatically play in sequence, and more doodads and features they can take advantage of, and get a solid platform going that I can keep on adding to and making better over time.
Going back to the whole "I wanna make a game!" bit at the beginning... at a certain point in my life, I realize I don't want to make "a game." Game developers make games, they work on it for a year, release it, and never look at it again because they're working on their next project. That's not what I wanted to do.
I wanted a "game project" that I could improve and add features to for as long as I found it interesting. Like Minecraft. When I begin selling my game at some point, you'll buy it once and get free updates for as long as I make them. The game may be clunky and basic now, but who knows how it will evolve? My UI toolkit looks like "Windows 95" now, because those are easy shapes to draw with primitive draw calls, but I can add theme support to my UI toolkit and my game immediately gets a make-over and benefits all at once from it.
And you can even help me with that! My UI toolkit is open source and on GitHub too. As a side consequence of making my game I'm also making an increasingly featureful UI toolkit that could be used for other graphical applications for Go developers!
Check out my game's website at SketchyMaze.com! I currently release this game for most desktop PCs (GNU/Linux, Windows, macOS) as 64-bit x86. Sometimes I release builds for Linux on ARM64 (my game "kind of" runs on the Pine64 Pinephone!)
Also check out its Guidebook Site, the user manual included with the game. It's full of screenshots and descriptions of the built-in doodads and how every feature of the game works. If I weren't a software engineer, I'd have been a writer, I love writing documentation and you should check it out!
There are 0 comments on this page. Add yours.
0.0165s.
![]()