I blog about anything I find interesting, and since I have a lot of varied interests, my blog entries are kind of all over the place. You can browse my tags to sort them by topic and see which ones I frequently write about, or the archive has a complete history of my posts, dating back to 2008!
Besides my blog, I have pages for my creative projects, which are linked to on the navigation bar.
I write a lot about Linux and Android, Minecraft, and I like to rant about stuff. Generally anything that makes me curious. Also check out my Bookmarks for all sorts of cool websites about various topics I'm interested in.
For the geeks: this website respects your privacy and doesn't run any third party ads or analytics. This site speaks HTTP and doesn't require any JavaScript to work.
Dream Journal: Healthcare RobotI frequently have pretty vivid, detailed and crazy dreams and when I have a particularly interesting one, I write it down in my dream journal. The one I awoke from this morning left such a strong impression on me that I also feel like sharing it here on my blog!
It involves artificial intelligence, humanoid robots and morally bankrupt billionaire corporations. I like to think I can tell a good story, so I hope you'll check this one out!
So at the start of this dream, I had received a mysterious package in the mail. It was a medium sized box, maybe three feet tall, and had no return address but it was addressed to me, and it wasn't anything that I ordered myself.
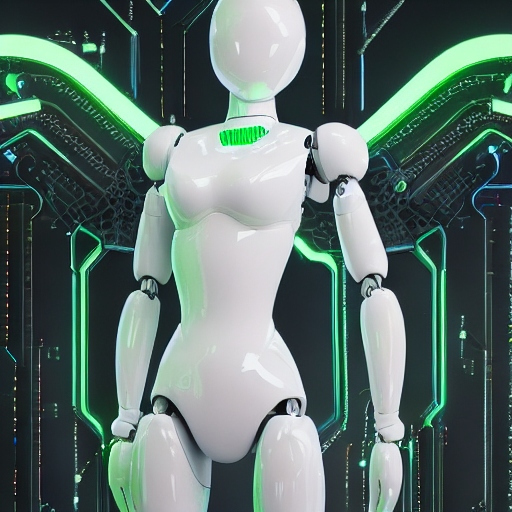
Inside the box was a humanoid robot, covered in sleek white panels and looking like something that Apple might design. I powered it on, and it was able to speak with me in plain English and seemed to have a level of intelligence on par with ChatGPT. It had arms and legs and a robot face and everything. Presumably it could walk and move around as well. When it would enter an idle mode (maybe to recharge), it would "turtle up" and retreat into its shell, taking up less space in the room, a few feet tall. When standing, it was the size of a small adult human, maybe 5 feet tall or so.
An A.I. generated image of what this robot may have looked like, created on deepai.org.
On a different day in this dream, I was hanging out in the living room and I had a couple of friends over, and the robot was in its idle pose nearby. Suddenly, the robot whirred to life, and panels on its body opened up, and then I can only describe that it 'attacked' me. Out of these panels, a bunch of wires shot out quickly, some with needles on the ends, which all found their way to my body. One such needle went into my arm, into a vein, reminiscient of when you are put on an IV drip at a hospital. I don't remember where the other wires landed.
The robot then injected me with something: tiny little machines. Some of them assembled themselves together inside my body, forming a larger disc shaped structure a couple of inches across, and I could see it move around under my skin and could feel it if I touched it. Most of the other tiny machines navigated their way through my veins, arteries and other ducts in my body.
I could feel all of these things moving around, and especially around my lower abdomen. I've never experienced having kidney stones before, but I imagine it could be similar, though instead of painful, the movement felt ticklish and highly sensitive, similar to post-orgasm sensitivity, as they worked their way around my body.
Naturally, I was freaking the fuck out, but I was also afraid to respond too violently to all of this in case I broke the robot and left its work in a half-complete state, which could result in a much worse outcome for me. My friends in the room with me were watching all this happen and they were shocked and didn't know what to do either.
During this time, the robot was unresponsive and didn't respond to any voice commands. It was in its idle pose, but clearly busy computing something, with lights on its chassis flashing and everything.
After no more than 10 minutes or so, the robot was done and it disengaged from my body, retracting all the wires and tools back into itself, closing its panels and then transforming into its humanoid social form to talk to me.
Of course, I asked it what the fuck just happened. It explained to me that it is a healthcare robot and it had just finished giving me an examination. It told me I had some plaque buildup in my arteries that it cleaned out for me, and that while my kidneys were in the range of normal healthy function, they were a bit on the lower end of that range (whatever that meant).
Naturally, I had a whole lot of questions. This robot was made from some highly sophisticated technology that I had never seen the likes of before.
I asked it who built it. The robot replied that it was created by a major multi-billion dollar pharmaceutical company. It told me the name of the company, though I don't remember it now.
I asked it why it was delivered to my house. It explained that the company who created it was facing some problems: they weren't cleared yet to begin human trials on the new technology, and they were facing fines or regulations and were at risk of going bankrupt or forced to shut down. They mailed these units out for free to random people as a way to circumvent the law, get some human test subjects, and (hopefully) prove that the machine is safe and effective. I was just one of the "lucky" ones who received one of these units.
I asked the robot whether I can opt-out of their test program, and the robot said I could not. In the room with us was a small figurine of Baymax from Big Hero 6. I picked it up and showed it to the robot and said: "in the movie Big Hero 6, they had healthcare robots and you could say to the robot 'I am satisfied with my care' and they will power down and stay that way" and the robot told me that that wouldn't work on it, and that it was designed for long-term active care.
I asked the robot whether I could tell people about all of this - I had a good mind to, at the very least, write about this experience on my blog. It strongly advised against me telling anybody about it. It didn't threaten me or tell me what would happen if I disobeyed, and I know I never signed a non-disclosure agreement about this, but given the highly advanced technology it had just displayed for me, I decided I would comply with it - at least for now. But I had found the whole thing highly sketchy and unethical and was beginning to contemplate what my next steps should be, before finally waking up from this dream.
Anonymous asks:
What is your favorite memory of Bot-Depot?
Oh, that's a name I haven't heard in a long time! I have many fond memories of Bot-Depot but one immediately jumped to mind which I'll write about below.
For some context for others: Bot-Depot was a forum site about chatbots that was most active somewhere in the range of the year 2002-08 or so, during what (I call) the "first wave of chatbots" (it was the first wave I lived through, anyway) - there was an active community of botmasters writing chatbots for the likes of AOL Instant Messenger, MSN Messenger, Yahoo! Messenger, and similar apps around that time (also ICQ, IRC, and anything else we could connect a bot to). The "second wave" was when Facebook Messenger, Microsoft Bot Platform, and so on came and left around the year 2016 or so.
My favorite memory about Bot-Depot was in how collaborative and innovative everyone was there: several of us had our own open source chatbot projects, which we'd release on the forum for others to download and use, and we'd learn from each other's code and make better and bigger chatbot programs. Some of my old chatbots have their code available at https://github.com/aichaos/graveyard, with the Juggernaut and Leviathan bots being some of my biggest that were written at the height of the Bot-Depot craze. Many of those programs aren't very useful anymore, since all the instant messengers they connected to no longer exist, and hence I put them up on a git repo named "graveyard" for "where chatbots from 2004 go to die" to archive their code but not forget these projects.
Most of the bots on Bot-Depot were written in Perl, and one particular chatbot I found interesting (and learned a "mind blowing" trick I could apply to my own bots) was a program called Andromeda written by Eric256, because it laid down a really cool pattern for how we could better collaborate on "plugins" or "commands" for our bots.
Many of the Bot-Depot bots would use some kind of general reply engine (like my RiveScript), and they'd also have "commands" like you could type /weather or /jokes in a message and it would run some custom bit of Perl code to do something useful separately from the regular reply engine. Before Andromeda gave us a better idea how to manage these, commands were a little tedious to manage: we'd often put a /help or /menu command in our bots, where we'd manually write a list of commands to let the users know what's available, and if we added a new command we'd have to update our /help command to mention it there.
Perl is a dynamic language that can import new Perl code at runtime, so we'd usually have a "commands" folder on disk, and the bot would look in that folder and require() everything in there when it starts up, so adding a new command was as easy as dropping a new .pl file in that folder; but if we forgot to update the /help command, users wouldn't know about the new command. Most of the time, when you write a Perl module that you expect to be imported, you would end the module with a line of code like this:
1;
And that's because: in Perl when you write a statement like require "./commands/help.pl"; Perl would load that code and expect the final statement of that code to be something truthy; if you forgot the "1;" at the end, Perl would throw an error saying it couldn't import the module because it didn't end in a truthy statement. So me and many others thought of the "1;" as just standard required boilerplate that you always needed when you want to import Perl modules into your program.
What the Andromeda bot showed us, though, is that you can use other 'truthy' objects in place of the "1;" and the calling program can get the value out of require(). So, Andromeda set down a pattern of having "self-documenting commands" where your command script might look something like:
# The command function itself, e.g. for a "/random 100" command that would
# generate a random number between 0 and 100.
sub random {
    my ($bot, $username, $message) = @_;
    my $result = int(rand($message));
    return "Your random number is: $result";
}

# Normally, the "1;" would go here so the script can be imported, but instead
# of the "1;" you could return a hash map that describes this command:
{
    command => "/random",
    usage => "/random [number]",
    example => "/random 100",
    description => "Pick a random number between 0 and the number you provide.",
    author => "Kirsle",
};
The chatbot program, then, when it imports your folder full of commands, it would collect these self-documenting objects from the require statements, like
# A hash map of commands to their descriptions
my %commands = ();

# Load all the command scripts from disk
foreach my $filename (<./commands/*.pl>) {
    my $info = require $filename;

    # Store their descriptions related to the command itself
    $commands{ $info->{'command'} } = $info;
}
And: now your /help or /menu command could be written to be dynamic, having it loop over all the loaded commands and automatically come up with the list of commands (with examples and descriptions) for the user. Then: to add a new command to your bot, all you do is drop the .pl file into the right folder and restart your bot and your /help command automatically tells a user about the new command!
For an example: in my Leviathan bot I had a "guess my number" game in the commands folder: https://github.com/aichaos/graveyard/blob/master/Leviathan/commands/games/guess.pl
Or a fortune cookie command: https://github.com/aichaos/graveyard/blob/master/Leviathan/commands/funstuff/fortune.pl
After we saw Andromeda set the pattern for self-documenting commands like this, I applied it to my own bots; members on Bot-Depot would pick one bot program or another that they liked, and then the community around that program would write their own commands and put them up for download and users could easily download and drop the .pl file into the right folder and easily add the command to their own bots!
I think there was some effort to make a common interface for commands so they could be shared between types of chatbot programs, too; but this level of collaboration and innovation on Bot-Depot is something I've rarely seen anywhere else since then.
We had also gone on to apply that pattern to instant messenger interfaces and chatbot brains, as well - so, Leviathan had a "brains" folder which followed a similar pattern: it came with a lot of options for A.I. engine to power your bot's general responses with, including Chatbot::Alpha (the precursor to my RiveScript), Chatbot::Eliza (an implementation of the classic 1970s ELIZA bot), and a handful of other odds and ends - designed in a "pluggable", self-documenting way where somebody could contribute a new type of brain for Leviathan and users could just drop a .pl file into the right folder and use it immediately. Some of our bots had similar interfaces for the instant messengers (AIM, MSN, YMSG, etc.) - so if somebody wanted to add something new and esoteric, like a CyanChat client, they could do so in a way that it was easily shareable with other botmasters.
For more nostalgic reading, a long time ago I wrote a blog post about SmarterChild and other AOL chatbots from around this time. I was meaning to follow up with an article about MSN Messenger but had never gotten around to it!
A discussion thread I got pulled into on Mastodon had me suddenly nostalgic for something we once had on the Internet, and which was really nice while it lasted: the Extensible Messaging and Presence Protocol, or XMPP, or sometimes referred to by its original name, Jabber.
What kicked off the discussion was somebody asking about a more modern "decentralized chat platform" known as Matrix (not the movie). A lot of people online talk about how they like Matrix, but I one time had a go at self-hosting my own Matrix node (which I feel I should rant about briefly, below), and the discussion turned back towards something that we used to have which was (in my opinion) loads better, XMPP.
One of the many things I get really interested in is the nature of "reality" or at least the conscious parts of it (e.g. my perception of reality). The mind is such a curious and powerful thing -- like how none of us has ever actually 'seen' Objective Reality, because our brains are trapped in our dark skulls and all we really get are electrical signals sent by our eyes and other sensors. The brain then makes up all the stuff you see and call reality: a multimedia simulation based on what your brain thinks is going on out there in the world. We've all heard questions like "is my green, your red?" and how you'll never know for sure what somebody else sees in their reality.
In recent years I have been getting into meditation and really paying attention, really studying the way my mind works and I have found a few interesting things that I haven't seen talked about much online. I am currently suspicious that there is a connection between lucid dreaming, closed-eye visuals during wakeful consciousness, and the place in between the two: psychedelic visuals, which you can apparently just meditate your way into seeing, no entheogens required.
Let's start with the easy one. When I close my eyes and look into the darkness of my eyelids, I frequently will see some shapes and colors. From what I've heard from other people, this seems fairly common - you might see these too.
My regular closed-eye visuals tend to just be vague, formless blobs of color, maybe a blue blob here and a green one there. All kind of meandering around on their own, but very low resolution. Maybe they might vaguely form a face or some recognizable shape, but just loosely -- like seeing shapes in the clouds -- nothing very exciting.
But spoiler alert: they can get much more exciting.
One night, I woke up from dreaming at maybe 3:00 in the morning (who knows), to get up and use the bathroom as one does. When I got back in bed I closed my eyes and I decided to look for my closed eye visuals (often if I'm not deliberately trying to see them, they go unnoticed by me and I think I just "see" blackness with my eyes closed).
I was expecting to see the usual amorphous blobs, but what I instead saw blew me away: my closed eye visuals (henceforth called CEVs) were breathtakingly sharp, vivid, colorful and crisp. I was seeing a colleidoscope of random images flashing before my eyes. It reminded me a lot of the Marvel movie opening logo. But every image I saw was just so crystal clear, with sharp lines and edges and vivid colors -- a far cry from the usual vague shapes my CEVs take on during the daytime.
I attribute this to the fact I had woken up from dreaming (REM sleep) and my brain was still close to that dream state. I have a suspicion that CEVs have a whole spectrum of forms they take: the vague blobbies is on one end of the spectrum, and full-color life-like hallucinations that we call "dreams" are at the opposite end.
And in between those two poles are other states that some people are familiar with.
A couple of years ago, quite by accident, I managed to meditate my way into seeing psychedelic visuals over top of reality. And you can probably learn to do this, too. I will save you the long story (I had written about it before if curious) and cut straight to the chase -- here is how I've been able to consistently pull this off on command.
The trick is to just lock your eyes onto as fine a point as you can manage, and resist the urge to twitch your eyes even as your vision begins to play tricks on you. Many of you have probably experienced this much already: you know if you stare at a thing for too long, your vision plays tricks and things start disappearing or acting weird because of the sensory satiation, and darting your eyes will "reset" your vision to normal. But try and resist the urge to dart your eyes and just let your visuals do what they shall.
What happens next for me is: I will begin to see my closed eye visuals project themselves over top of reality, with my eyes open. The blobby, amorphous shapes I see with my eyes closed appear while they're open. But then my CEVs will begin to "play off of" or interact with my reality: where the border of one of the blobs touched a ridge on my ceiling that I was staring at, the ridge would wiggle or bounce back, as if my CEVs are interacting with it.
These visuals slowly ramp up and I'll begin seeing geometric patterns, fractals, lots of colors, and as these fractals interact with the scene I am staring at, they get everything to start wiggling and dancing. It can take me about 30 minutes into my meditation before I am seeing fully, 100% authentic, height of the strongest acid or mushroom trip I'd ever been on, visuals projected out onto whatever I was staring at during my meditation.
And when I've decided I had enough: I just look somewhere else and snap! everything is back in its place, in much the same way that darting your eyes during the earliest part of all of that "resets" your vision to normal.
Tell me if this sounds familiar: when I was a kid I would sometimes be woken up from a really good dream and wished I could have stayed in my dream a little bit longer to see how it ended. I could try and "make up" the ending myself, daydream how I think it might have gone, but it never felt right -- when you're in a dream, it's like your subconscious is telling you a story, and you can't quite predict what's going to come next. There's something magical about dreams that when I try and make up the ending myself, it doesn't come out right.
Well -- and I don't know exactly when this started, but it was in recent months at least -- I have somehow gained the ability to let my imagination wander freely and I can actually let my dreams finish themselves out, autonomously, after I wake up and I'll be fully aware I'm awake (and feel my body in bed, be able to hear my surroundings) but still visually see and hear the dream at the same time.
I attribute this to my practice with meditation -- I don't know of concrete steps that someone could try (not like my previous section) but I suspect the ability to "let go" of your mind, or to just watch it and not mess with it, was a feature here. I'll give you an example of what I mean.
A couple years ago I was reading some of Carl Jung and he talked about "active imagination" where he was able to visualize a scene in his head with characters in it, and then set his imagination free, and he could interrogate the characters and ask them questions and he would get responses from them that he couldn't predict (in very much the same way as dream characters). It's different to regular conscious daydreaming where you are controlling the dialogue of all the characters. It's more like when you are dreaming, and your dream characters talk to you and you can't quite predict what they're going to say because it's a different part of your mind that controls them: your subconscious.
After reading this I was trying, and failing, to do active imagination myself. I could set up the scene, and ask my characters a question, but I always felt like it was I who was dictating their responses -- I was just daydreaming consciously with myself. I haven't yet tried active imagination again, but this ability to let my subconscious wander and finish my dreams out seems to be very close to what I was thinking here.
There's already a lot of literature out there about lucid dreaming so I won't go too deep here.
Lucid dreaming is basically when you become aware that you're dreaming. You may be having some crazy dream about something nonsensical happening and have the epiphany: "oh shit, this is a dream!" and you can have a lot of fun with it. You can decide to change anything you want about the dream, or fly through the air like Superman, or summon specific dream characters that you want to talk to. I've had a good handful of lucid dreams in my life, but never very consistently. In many cases I'll realize I'm dreaming, and then just let my dream tell its story without meddling with it too much. I've found that if I meddle too much, my dream "gives up" on its story and just gives me all the controls, and it becomes a little bit less fun for me. I have "god mode" control but much less of the dream is unpredictable or surprising then (though my dream characters are still unpredictable in what they say).
From talking to my dream characters and asking them deep and personal questions about myself, and getting surprising answers back from them, I am suspicious that talking to a dream character is the same as talking directly to my inner subconscious, in plain English.
Just thought I'd jot down some of my latest findings. I have told some friends about these and some of them have experienced similar things, if not to the same extent I have yet. I hope this may have sparked your curiosity and if others may be able to reproduce some of my findings themselves.
I have more posts like this on my #42 blog tag where I write about life, the universe, and everything. It's a lot of stuff about consciousness and occasionally spiritual stuff (the two have many likes alike, and all the characters and archetypes that Jung says are in our consciousness have mirrors in religious figures from all cultures which I also find very fascinating!)
So I haven't posted a good rant on my blog in quite some time - I had chilled out a lot in my older years, but I just have to tell this story about Safari and my struggles in getting it to work with my chat room I had built recently.
My chat room is a fairly basic app - it's open source and written "from scratch" using WebSockets to handle the client/server communication and they pass basic JSON messages around. All fairly standard stuff and shouldn't be a big ask for any modern web browser that supports modern web standards. It works flawlessly in Google Chrome as well as all other Chromium derivatives (including Edge, Brave, etc.), and it works flawlessly on Firefox, and when you run either browser on your Windows, Linux or Mac OS computer. It even works great on all Androids, too - using Chromium or Firefox browser engines.
But then there's Safari. Safari "supports" WebSockets but it doesn't do so very well and I've been fighting this for weeks now trying to chip away at this problem. Both when you run Safari on your Mac OS Ventura desktop or on your iPhone or iPad, Safari is very easy to overwhelm and it will disconnect from the chat room at the slightest hiccup of an issue.
My rant here actually is about three different problems that have made my life difficult trying to get Safari to work:
I don't own a Macbook or an iOS device and so would have no way to even debug or look into this problem, but at least there is an option to run Mac OS inside of a virtual machine (using something like OSX-KVM) so at least I can look into the desktop Safari browser and see what its deal is.
First - here is how my chat basically works: you connect, send your username to log in, the chat tells everyone you joined, sends everyone the new Who's Online roster, and sends some "welcome messages" to the one who joined where I can send my rules or new feature announcements to you.
What I would see when a Safari user logged in was: they'd connect, log in, receive all those welcome messages and then they would immediately hangup the connection and log off. On their side, the web browser gives a very unhelpful error message regarding the WebSocket:
Protocol error.
That's it - it doesn't say what the error was. Even when I have a Safari browser in front of me, they give me no help at all to find out what's wrong!
Through trial and error, I found out:
...and that kind of thoroughly sucks. I can remove all the welcome messages so as to allow Safari to at least log on, but then just one user posting a paragraph of text will kick all the Safari users out of the chat room!
Chrome and Firefox don't experience this issue. A while ago I added picture sharing in chat - you send your picture over WebSocket and it echoes it as a data: URL to all the chatters, passing those bytes directly back out; Firefox and Chrome can cope with this perfectly, but that would for sure kick Safari users off for too long of a message!
So, when it comes to Mac OS users I can tell them: Chrome and Firefox work better. But this advice does not fly on iPads or iPhones because, per Apple's rules, web browsers on iOS are not allowed to bring their own browser engines - they all are just custom wrappers around Mobile Safari.
And you guessed it: Mobile Safari doesn't like my WebSockets either!
I am hoping that with EU pressure placed on Apple to where they will allow competing browser engines to join their platform, that at least some of my iOS users will have a way to use my chat room. But how it stands currently is: iPads and iPhones simply can't use my chat room at all, or if they can get on (maybe it's the "too long of message" issue with them as well), they will be fragile and easy to boot offline just by writing too long of a message.
Apple will not innovate on Safari and make it support modern web standards, and they've made sure that nobody else can innovate either. The Blink engine from Chromium and Gecko from Firefox both work great with WebSockets and if only they were allowed to exist in their true forms on Apple mobiles, I wouldn't be ranting about this right now, I could just say "don't use Safari."
And side rant: the reason Apple won't allow Chrome or Firefox to compete with them is because they are scared shitless about Progressive Web Apps, which could compete with their native app store. They won't innovate on Safari at all until their feet are held to the fire (thanks for that as well, EU!), their web browser sucks (as this WebSockets thing illustrates), they're holding everybody back - the new Internet Explorer 6.0!
Even if I owned an iPad, it wouldn't help - you can't get to the browser logs on an iPad browser to even see what kind of error message it's throwing. Though I imagine the error message would be just as helpful as desktop Safari, anyway: "Protocol error."
In order to get logs off an iOS web browser, you need to pair it with a Macbook computer -- the only kind of device that is allowed to run the iOS development kits and is the only way to debug anything that happens on your iPad.
With Mac OS, at least there is a way I can spin up a virtual machine and get my hands on Safari. There is no way to do this for iOS. There's no virtual machine where I can run the genuine Mobile Safari app and have a look at this issue myself. I wish Apple weren't so closed in their ecosystem - comparing it to Android for example, you can debug an Android app using any kind of computer: Windows, Linux, Mac OS, even another Android, even on-device on the same Android.
I am not an iOS developer, I don't care to be an iOS developer, and I don't own any Apple hardware, and it really sucks when I run into a web app issue that should have nothing to do with Apple specific software, and I simply can not even get in and look at the error messages.
I'd been chipping away at this for weeks, basically blindly trying things and throwing shit at the walls and hoping one of my Apple using friends tries my chat room once in a while to see if any of my efforts have worked (spoiler: they haven't worked).
I've also tried reaching out to developers on Mastodon and other social media: my chat room is open source, could somebody with Apple hardware help me debug and see if they can find out what I can do better to get Safari to like my chat room. Maybe I didn't reach the right ears because I've gotten only crickets in response. Meanwhile about a third of my users still can not get onto my chat room at all.
Where I've landed so far is: it seems Safari can connect, but that < 500 character limit issue seems horribly broken and I don't want Safari users getting kicked off left and right by surprise, it's a bad user experience.
If I wait it out long enough (and if the EU is successful), Apple may permit actually good web browser engines on their platform and then my chat will work perfectly on them. It may just take a couple of years though - first Apple would have to be successfully sued into submission, and then Google/Mozilla would have to port their browser engines over which could be its own long tail of development work.
Maybe as a consequence of that regulation, Apple will actually put some new work into Safari instead of just neglecting it and they'll fix their shit. Currently it seems like my WebSocket messages need to be smaller than a tweet on Twitter, and it honestly won't be worth all the effort it would take me to reimagine my whole chat room and come up with a clever protocol to break messages apart into tiny bite sized chunks when it's only one, non-standards compliant web browser, which drags its stick thru the mud as badly as Internet Explorer ever did, that has the issue here.
So are they the new Internet Explorer, or somehow even worse?
I have sometimes had people visit my blog because they were Googling around in general about Apple and they like to fight me in the comments because I dissed their favorite brand. If this is you, at least say something constructive in the comments: have you ever built a WebSockets app and do you have experience to share in how to get Safari to behave? If you're simply an end user fanboy and never installed Xcode in your life, save your comments, please.
Cardell asks:
So this is related to The Breath of the Wild save hacking. I play on the Yuzu emulator now. I just want the Mster Cycle earlyish and fresh vanilla game. Have found a save file editor but it doesn't let you add runes so I can't get the cycle. How did you add it to your save files on the blog? I'm sorry to bother you with something so insignificant but what I'm trying to do is so niche I can't find anything lol
I'm not sure about the Switch version but may have some ideas to get you started.
The savegame editor I used may be for the WiiU only and it provided a simple "Motorcycle" checkbox that adds the rune. If the Switch save editor doesn't do that, but does give you 'advanced' access to the various game flags, maybe setting the flag IsGet_Obj_Motorcycle may do it - the flag is set in my WiiU save files. Or otherwise browse and search around in the flags - there are a lot of them that control all sorts of features in the game, and sometimes they have uintuitive names (IsGet_Obj_RemoteBomb does the bomb rune, IsGet_Obj_StopTimer is the stasis rune, IsGet_Obj_Magnetglove is the magnesis rune, IsGet_Obj_IceMaker for cryonis).
There is also a caveat around runes at all when you're talking very early game: you can hack all these runes in to your profile, but you can't use them in-game until you have picked up a rune yourself. The D-pad shortcut doesn't work otherwise. What I did for my WiiU save files was to:
With the Camera rune added, the D-pad shortcut unlocks and I can now use all of the runes, including the motorcycle, despite never entering one of the Plateau tutorial shrines. (Doing those tutorial shrines would also unlock your rune ability - you just need a rune added "normally" for the tutorial to advance enough to let you use them!)
Good luck!
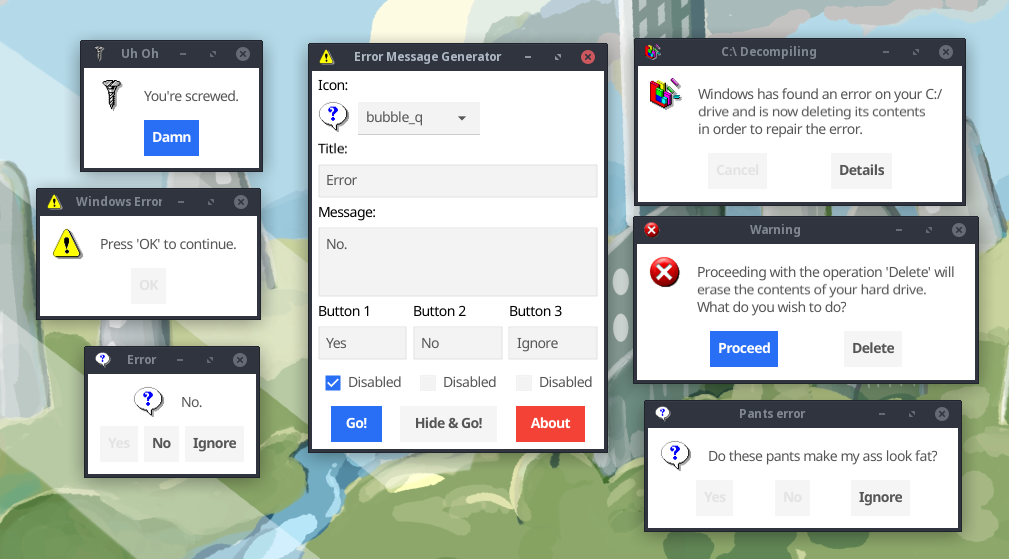
I have just released a new toy program on my website: Error Message Generator 2.0, or ErrorGen for short.
ErrorGen is a simple program that lets a user configure customized error dialog pop-ups, with a custom icon, message and buttons, to prank their friends with or to put to good use by shell scripts if you want to ask the user a quick question from your external program.
My original ErrorGen was inspired by a web tool called "Atom Smasher's Error Message Generator" which would produce images of error dialogs that you could save to disk. My program, however, created "real" dialogs on your desktop PC that you could drag around the screen and interact with. The original version was written using Perl/Tk in 2006 and hasn't been updated a lot since - with the latest release built in 2008 for Windows XP and it hasn't aged well and doesn't run as easily on modern Windows anymore.
In 2022, Atom Smasher's page went offline and I have seen an uptick of interest in my old ErrorGen program ever since: it is recently the #1 most requested page on my website!
So, on January 21, 2023 I decided to reinvent my ErrorGen program from scratch, this time programming it in Go and to explore the Fyne UI toolkit which I had seen around but hadn't played with before. ErrorGen 2.0 has equivalent features to what my original Perl version had, but with a fresh and modern look based on Material Design that comes with Fyne and built for the modern era. I also have some plans to extend ErrorGen 2.0 with new features and especially make it more useful for command line interfaces, to make something on par with GNOME's Zenity tool.
You can check out the new ErrorGen on my Error Message Generator page. The classic Perl version from 2006 is still available here if you want it.
Is Zenmsg a virus? asks:
It only opened a command box, and nothing else happened. Is this a virus?
No, it's not. 😊 ZenMsg is a command-line program (so it opens your DOS prompt if double-clicked on), but it requires command-line options to tell it what to do. When run without any options, it prints its usage information to the terminal and then exits; so when double-clicked on, your DOS prompt appeared and then closed because ZenMsg exited.
You'll want to run it from a PowerShell or Command Prompt window first (so that the console sticks around after the program exits), and you can see it just prints its usage information:
C:\Users\Noah\Downloads> ZenMsg.exe
Usage:
      ZenMsg [--error --alert --info --question]
             [--title] [--text] [--button label]
             [--icon name_or_file]
             [--default label] [--cancel label]
             [--disabled n]
             [--version] [--help]

    Use the "--help" option for more help.

(and it goes into detail on all the options)
If you call it with ZenMsg --help it goes into full detail (the same documentation that's in the ZenMsg.html page the program ships with), including all the names of built-in icons. Every icon available on the Error Message Generator is built in to ZenMsg, and you can point it to a custom image on disk to use your own icon:
BUILT-IN ICONS

Here is a list of all the built-in icons that you can use by name:

  aim_guy         - Blue AIM guy icon
  aol_icon        - Blue AOL icon
  attention       - Yellow triangle around an exclamation mark
  bomb            - Round black bomb icon
  bomb_dynamite   - Icon of a bundle of dynamite and a trigger
  bomb_grenade    - Icon of a grenade
  bulb            - White light bulb
  butterfly       - MSN Butterfly icon
  cake            - Slice of pink cake on a blue plate
  circularsaw     - Icon of a handheld circular saw
  control_panel   - Generic control panel icon
  cow             - Icon of a cow and a computer tower
  defrag          - Disk Defragmenter icon
  disk_blue       - Generic blue floppy disk icon
  disk_blue_label - Blue floppy disk with a label
  disk_orange     - Generic orange floppy disk
  disk_red        - Generic red floppy disk
  disk_red_label  - Red floppy disk with a label
  disk_skull      - Gray floppy disk with skull and crossbones
  disk_yellow     - Generic yellow floppy disk
  error           - Old-school X in a red circle error dialog icon
  error2          - Modern, shiny incarnation of an error dialog icon
  error3          - Beveled error dialog icon (like Windows XP)
  error4          - A red X icon
  file_cabinet    - File cabinet icon
  find            - Find Files icon
  floppy_drive    - Generic floppy drive icon
  fortunecookie   - Icon of a fortune cookie
  garbage_empty   - Empty garbage can
  garbage_full    - Bloated garabage can
  gun             - Icon of a revolver pistol
  hammer          - Icon of a hammer
  heart           - Icon of a shiny red heart
  help            - Old-school Windows Help icon
  hub             - Icon of a hardware hub of sorts (networking?)
  hwinfo          - Icon of a PCI device with blue "i" bubble above it
  ie5             - Icon of old-school Internet Explorer
  info            - Speech bubble with an "i" inside
  keys            - Generic icon of keys
  keys2           - Old Windows key icon
  keys3           - Generic key and padlock icon
  labtec          - Icon of a server or something?
  mac             - Striped colorful Apple logo
  mail            - Generic icon of an envelope
  mail_deleted    - Same envelope with a red X emblem in the corner.
  mailbox         - Mailbox with the flag down
  mouth           - Smiling mouth icon
  msdos           - MS-DOS icon
  mycomputer      - A "My Computer" icon
  mycomputer2     - A "My Computer" icon
  mycomputer3     - A "My Computer" icon
  newspaper       - Generic newspaper icon
  peripheral      - Generic computer peripheral icon
  plant_leaf      - A certain green leafy plant
  pocketknife     - A swiss army pocket knife
  question        - Icon of a speech bubble with a "?" inside
  radiation       - Yellow and black radiation symbol
  ram             - Icon of a couple sticks of RAM
  recycle         - Green recycle arrows logo
  recycle2        - Recycle arrows enveloping a globe of Earth
  scanner         - Generic scanner icon
  screw           - Golden screw icon
  screw2          - Gray screw icon
  setup           - Generic icon for "setup.exe" type programs
  skull           - Black skull and crossbones
  skull2          - Picture of a skull
  skull3          - White skull and crossbones
  tux             - Icon of our favorite Linux mascot
  tux_config      - Tux dressed up like a repairman
  ups             - Icon of an uninterruptible power supply
  zipdisk         - Icon of a single zip disk
  zipdisks        - Icon of numerous zipdisks
You can call ZenMsg from a batch file or any other program (e.g. a Python or Perl script could call ZenMsg.exe and send it parameters). For example, open Notepad and save the following as "example.bat" (with quotes, ensuring that it gets a .bat extension and not .bat.txt) and place it in the same folder next to ZenMsg.exe:
@echo off
ZenMsg --alert --title "Critical Error" --text "Now you've done it." ^
	--button "Ok" --button "Cancel" --button "Accept blame" ^
	--disabled 1 --disabled 2 > zenmsg-answer.txt

echo The user had selected:
type zenmsg-answer.txt
del zenmsg-answer.txt
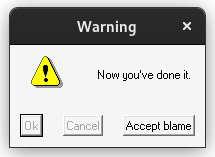
Double-clicking your example.bat file would then pop up that alert box. ZenMsg prints the user's selected button to its standard output, which we captured above by piping it into zenmsg-answer.txt (it's possible to get output from commands in e.g. Perl scripts too, so your program can ask the user a question and then have branching behavior depending on which button the user clicked on).
NNN asks:
What kind of music do you listen to?
I listen to all sorts of things but most frequently are the following:
I generally like a lot of indie & electronic music in recent years. I have a Spotify playlist of several artists I like. Depending on my mood, some of my top go-to artists are Plantrae or Dirtwire if I just want some cool music with no/minimal vocals. Plantrae is also a great one to put on as some ambient music at the background of a party. Otherwise ZHU is often the one I click on and let Spotify have its way with me. Bob Moses is another favorite if I want something a little more bass-ey to jam out to.
I listen to a fair amount of pop music too, my top exposure to it being my car radio when I'm driving around, so whatever's on the Top 40 at a given time. Sometimes those songs will get stuck in my head and I'll play one on Spotify and let it wander and play similar songs for me. I also have a number of country artists/songs I like when I'm in the right mood and I have a short playlist on YouTube of sad songs when I need to get some emotions out.
And probably my #1 most favorite song in the world (which I don't let myself listen to very often, so that I don't ruin it for myself) is Canon in D.
Ax Wilson asks:
For some reason it is not opening the ZenMsg file how do i make it work.
ZenMsg is a command-line program designed to be invoked by batch scripts or similar apps when you want to show a customized alert box pop-up. When you run the program without any command-line parameters (including if you just double-clicked on ZenMsg.exe from your file browser), the program just prints out its usage instructions to your command prompt and then exits; if you double-clicked to run it, exiting means you saw a cmd window for a brief second which then closed immediately.
To run it properly, open Command Prompt (or Powershell) first, navigate into the directory you placed ZenMsg.exe in, and run "ZenMsg" at the command prompt to see its usage instructions. For an "easy" way to get a Command Prompt opened to the right directory, you can open Windows Notepad and type this text into it:
@echo off
cmd
And save it as "terminal.bat" (with quotations on it! so that it saves with a ".bat" extension, and not "terminal.bat.txt") in the same folder as ZenMsg.exe; then double-clicking on the terminal.bat will open a Command Prompt already pointed at the current directory, so you can just type "ZenMsg" to run the other program. For more info about the Command Prompt, see the DOS tutorial on ComputerHope.com which is where I myself learned how to use the Command Prompt, way back in the day!
Anonymous asks:
Why is ZenMsg a command line program?
My Error Message Generator program is a GUI where you can build your custom alert box message visually, and ZenMsg is a command-line version that can pop up your alert box without the ErrorGen GUI being needed.
The reason that ZenMsg is a CLI tool is so that you can invoke it from other programs easily, including from batch files or scripts written in Perl, Python or anything else. Actually, it's name, "ZenMsg" is based on the GNU/Linux program, Zenity from the GNOME project.
You should also be able to create a Windows shortcut file that runs ZenMsg with parameters so you can have a desktop icon that, when double-clicked, pops up a ZenMsg alert box with custom icon, message and buttons if you want to prank your friends or something.
0.0073s.
![]()